- Read here to set up your ACTATek Bio-Clock installation and configuration
- Install SOAP 3.0 Toolkit
- Click File > Timecards (e-Time™) > Import Configuration.
- Navigate to Source
- Select Bio-Clock or Generic Text Format.
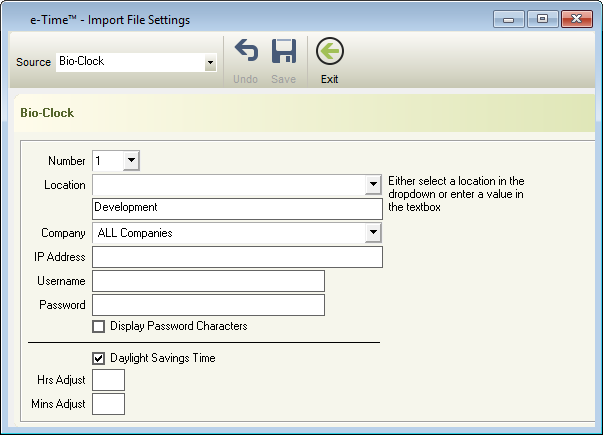
- Bio-Clock
- Number: If you have multiple Bio-Clocks, choose the Number of the Bio-Clock you will be using for this Company.
- Location: If you have multiple Bio-Clocks, select the Location this Bio-Clock is for.
- Company: Select the Company this Bio-Clock is for.
- IP Address: Enter the IP Address of the Bio-Clock.
- Username: Enter the Username for the Bio-Clock.
- Password: Enter the Password for the Bio-Clock.
- Display Password Characters: Display the hidden password.
- Daylight Savings Time: Select if you would like the imported times to be automatically adjusted by -1 hour from 2am on the first Sunday in October until 2am on the first Sunday in April.
- Hrs Adjust: If required, enter the number hours you would like you Employees Times adjusted by.
- Mins Adjust: If required, enter the number hours you would like you Employees Times adjusted by.
- Hrs Adjust and Minds Adjust can be used when your Bio-Clock stored times as UTC+0 or to remain in control of your Daylight savings setting.
- Generic Text Format
- Employee ID: The times will be matched against the below option to import to the correct Employee.
- EmpDBID: Employee Database ID which is predefined by e-PayDay®
- EmpClock ID: Established by the user in Employees.
- EmpCode: Predefined and can be located in Employees.
- Delimiter
- All Fields
- None
- Strings
- Character
- Quotes
- Custom
- Separator
- Comma
- Vertical Bar
- Semicolon
- Space
- Tab
- Custom
- Date Format
- DD/MM/YYYY
- MM/DD/YYYY
- YYYY/MM/DD
- If required, select Header Record
- Click Load File
- Locate the Generic Text Import File
- Click Open
- Click Don’t Save.
- Next to each line of Data, select the appropriate settings.
- Employee ID: The times will be matched against the below option to import to the correct Employee.
- Bio-Clock
- Click Save then Exit
Example Generic Text Import File
- Employee ID: EmpClockID
- Delimiter: None
- Separator: Comma
- Date Format: DD/MM/YYYY
- Header Record: Ticked.
Employee ID, Date of Clocking Time, Time Clocked In or Out
1000, 29/06/2017, 10:30:00
1000, 29/06/2017, 13:45:00
1000, 29/06/2017, 14:15:00
1000, 29/06/2017, 17:25:00
1000, 30/06/2017, 10:30:00
1000, 30/06/2017, 13:45:00
1000, 30/06/2017, 14:15:00
1000, 30/06/2017, 17:25:00
1000, 03/07/2017, 10:30:00
1000, 03/07/2017, 13:45:00
1000, 03/07/2017, 14:15:00
1000, 03/07/2017, 17:25:00
1000, 04/07/2017, 10:30:00
1000, 04/07/2017, 13:45:00
1000, 04/07/2017, 14:15:00
1000, 04/07/2017, 17:25:00
1000, 05/07/2017, 10:30:00
1000, 05/07/2017, 13:45:00
1000, 05/07/2017, 14:15:00
1000, 05/07/2017, 17:25:00
Revision:
21
Last modified:
May 19, 2022

