
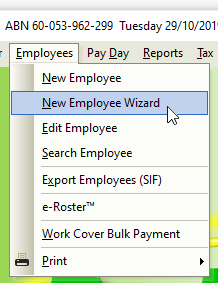
- Click Employees > New Employee Wizard or
Click Employees from the Side Bar then click New (Wand Icon). - Click Next.
- In Payee Type, select Working Holiday Maker.
- Enter or select the Employees
- Surname.
- Given Names.
- Alternate Name (If the employee is known as any other name)
- Address.
- Suburb/City.
- State.
- Post Code.
- Country.
- Birthdate.
- Gender (Sex).
- Click Next.
- Enter or select the Employees
- Pay Period.
- Date Hired
- Job Title.
- Award #.
- Click Next.
- Enter or select the Employees
- Superannuation Fund.
- SG (% or $)
- Additional SG $ Amount if required.
- RESC Payment % or $ if required.
- SG Start Date.
- Employee Super Number.
- Click Next.
- Navigate to Payee TFN.
- Click Edit (Pencil Icon).
- Enter the Employees TFN – If the Employee has not provided you with a TFN, please use a Unique Tax File Number.
- Click Next.
- Navigate to Pay Location/Department.
- Select the Pay Location/Department from the drop-down menu or add a new Pay Location/Department.
- Navigate to Payment Method.
- Select FAST-Bank™, ListPay, Deposit, Cheque or Cash. This setting will be identical to Banking in Company).
If Cheque or Cash are is chosen, there are no additional fields required therefore skip to Step 46.- Click Edit (Pencil Icon).
- Click New.
- Enter the
- Priority No. If the Employees Pay is only being distributed to one Bank Account, Priority No. will be 1.
- Amount ( $ or % ) being paid to this bank account. If the Employees Pay is only being distributed to one Bank Account, Amount will be 100%.
- BSB.
- Account Number.
- Reference to show on the Employees Bank Statement.
- Account Name.
- Click Save.
- Repeat the above steps to add multiple Bank Accounts, changing the Priority No. and Amount ($ or %) as necessary.
- Click Exit.
- Click Edit (Pencil Icon).
- Click Next.
- Enter the Employees
- Contact Phone Number.
- e-Mail Address for e-Mailing Pay Slips, Payment Summaries and Single Touch Payroll Reporting. Learn more about Single Touch Payroll here.
- Click Save.
- If you are Single Touch Payroll Reporting and the Employees Date Hired is less than 30 days in the past, the following alert will be displayed: You have just added a new Employee. Before a pay run can be processed for this employee, their completed Tax File Number Declaration must be replicated in and sent from e-PayDay®, as required when reporting using Single Touch Payroll.
- Select Close then click Click here to continue to close the alert as completing the Tax File Declaration will be part of the final step.
- If you wish to add another employee, select Yes then click Next to continue. Repeat the above process until each employee is added or
If you do not wish to add any other employees, select No then click Finished to Exit. - If you have migrated from another payroll solution, read here to enter ALL YTD Information that is required for STP reporting, Including the Tax File Declaration AND Leave Accrual Balances.
Revision:
29
Last modified:
Oct 18, 2021