In the General tab, users can define the basic properties of the form.
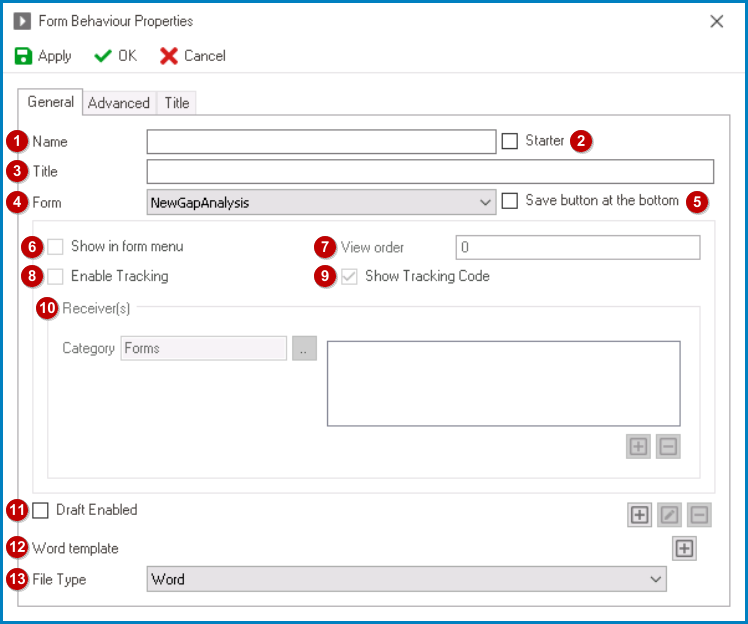
- Name: This is a text field that allows users to input the name of the form behavior. It is a mandatory field.
- There are the following rules determining the validity of names:
- A valid name can contain letters, numbers, and the underscore symbol. It cannot, however, contain spaces or other special characters. It also cannot begin with a number.
- A form behavior must have a unique name. It cannot have the same name as another form behavior linked to the entity.
- There are the following rules determining the validity of names:
- Starter: This is a checkbox which, if selected, allows users to mark a form as a “starter form.”
- If this checkbox is selected, it will enable the following fields: Show in Form Menu, View Order, Enable Tracking, and Show Tracking Code.
- Title: This is a text field that allows users to input the title of the form behavior.
- The title inputted in this field will be the displayed title of the form in the DBP web application.
![]()
- Unlike with names, there are no rules determining the validity of titles.
- The title inputted in this field will be the displayed title of the form in the DBP web application.
- Form: This is a single-select dropdown field that retrieves the list of forms (from the List of Forms section of the Forms module). It allows users to select the form to which they they want to apply the form behavior.
- Save Button at the Bottom: This is a checkbox which, if selected, allows for a Save button to be displayed at the bottom of the form.
![]()

- Show in Form Menu: This is a checkbox which, if selected, allows for the form to be displayed in the form menu of the web application.
- If this checkbox is selected, it will enable all fields inside the Receivers section of the window.
- View Order: This is a numeric field that allows users to determine the order in which the form appears in the form menu or its assigned category.
- Enable Tracking: This is a checkbox which, if selected, allows users to enable tracking of form submissions.
- In the DBP web application, users can track form submissions using the Tracking form.
- Show Tracking Code: This is a checkbox which, if selected, allows the unique tracking code to be displayed on the form after submission, enabling users to track the form’s progress and completion.
- The form’s tracking code is displayed in the top right corner of the screen.
![]()
- The form’s tracking code is displayed in the top right corner of the screen.
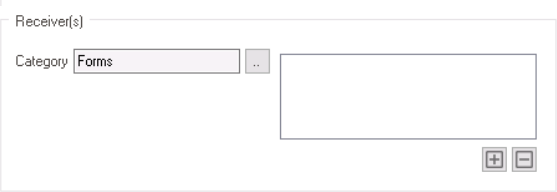
- Receivers: In this section, users can specify who can access the form and where the form will be stored in the web application.
- Category: This field allows users to assign a category to the form, which determines the folder where the form will be stored in the web application. This helps to keep forms organized and easily accessible.
- To select a form category, click on the
![]() button. It will display the Task Admin Form Category window.
button. It will display the Task Admin Form Category window.
- For more information on the contents of this window, click here.
- Using categories, users can group multiple forms that are related to the same subject, making it easier to organize and locate them in the web application.
- Form Categories Example: Web View
- This menu map illustrates the organization of forms in the Business Continuity Management category, which is a top-level category in the web application. Under this category, there are two subcategories: Disaster Recovery Plans and Admin. The Disaster Recovery Plans subcategory contains five forms, while Admin has one form.

- To select a form category, click on the
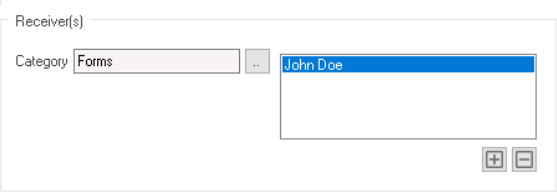
- Receivers: This field allows users to define the receiver(s) authorized to access the form. These receivers are individual users, roles, or groups that are explicitly identified by the user.
![]()
![]() : This button allows users to add a new receiver.
: This button allows users to add a new receiver.
- It will display the Receivers window, from which users can select the specific receiver.
- For more details on the Receivers window, see previous instance.
- Once a receiver has been added, it will populate the Receivers field.
![]()
- It will display the Receivers window, from which users can select the specific receiver.
![]() : This button allows users to remove a selected receiver.
: This button allows users to remove a selected receiver.
- Category: This field allows users to assign a category to the form, which determines the folder where the form will be stored in the web application. This helps to keep forms organized and easily accessible.
- Draft Enabled: This is a checkbox which, if selected, allows users to save the form as a draft.
- To set up the draft, users must create the corresponding task type.
- To create the task type, select the
![]() button.
button.
- It will display the Task Type Properties window.
- To modify the task type, select the
![]() button.
button. - To remove the task type, select the
![]() button.
button.
- To create the task type, select the
- After saving the form in the web application, users can access the draft in the Drafts folder of the Task Navigation Pane.
![]()
- To set up the draft, users must create the corresponding task type.
- Word Template: This field allows users to add a template to the form.
- To upload a template file, select the
![]() button.
button.
- It will display the Word Template Editor window, in which users can upload template files in different languages.
- To upload a template file, select the


- File Type: This is a single-select dropdown field that displays the list of file types. It allows users to select the desired file type(s) for the downloadable template.
- File Types: Word, PDF, or All Output Types.
- Word: This option allows users to download the template in Microsoft Word format.
- PDF: This option allows users to download the template in Portable Document Format (PDF).
- All Output Types: This option allows users to download the template in all available file formats, including Word and PDF.
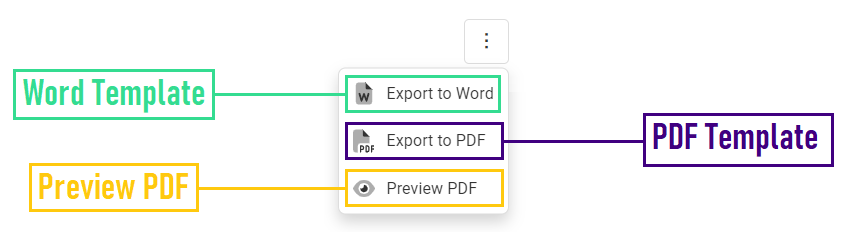
- When enabled, templates can be accessed using the kebab (or three dots) menu located in the upper rightmost corner of the form.
![]()
- As outlined in the above image, using the available options in the menu, users can download a Word template, download a PDF template, or preview a PDF template.
- File Types: Word, PDF, or All Output Types.