
In the Naming tab, users can configure basic properties required for the KPI’s identification and management.
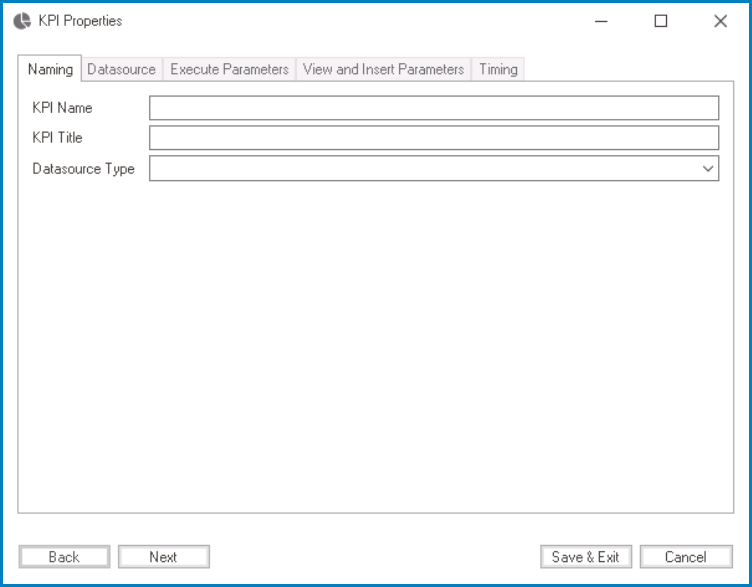
- KPI Name: This is a text field that allows users to input the name of the KPI. It is a mandatory field.
- There are the following rules determining the validity of names:
- A valid name can contain letters, numbers, and the underscore symbol. It cannot, however, contain spaces or other special characters. It also cannot begin with a number.
- A KPI must have a unique name. It cannot have the same name as another KPI in the application.
- There are the following rules determining the validity of names:
- KPI Title: This is a text field that allows users to input the title of the KPI.
- The title inputted in this field will be used as the display title for the KPI.
- Unlike with names, there are no rules determining the validity of titles.
- DataSource Type: This is a single-select dropdown field that displays the list of data source types. It is a mandatory field. It allows users to choose the appropriate data source type to associate with the KPI.
- Data Source Types: Connect to DB, Manual, or Connect to WebService.
- Connect to DB: This option allows users to connect the KPI to a specified database to retrieve performance data.
- To set up the database connection, users can navigate to the Database subtab within the DataSource tab.
- Manual: This option enables users to manually input performance data into the KPI, making it useful when no specific data source is available.
- To manually add columns and insert values into them, users can navigate to the View and Insert Parameters tab.
- Once they have configured the required details in this tab, users can save their changes by clicking on the Save & Exit button.
- To manually add columns and insert values into them, users can navigate to the View and Insert Parameters tab.
- Connect to WebService: This option allows users to connect to an external web service to retrieve performance data for the KPI.
- If this option is selected, it will enable the WebService subtab within the DataSource tab, which allows users to configure the web service connection settings.
- Once they have configured the required details in this tab, users can save their changes by clicking on the Save & Exit button.
- If this option is selected, it will enable the WebService subtab within the DataSource tab, which allows users to configure the web service connection settings.
- Connect to DB: This option allows users to connect the KPI to a specified database to retrieve performance data.
- Data Source Types: Connect to DB, Manual, or Connect to WebService.