In the Code Designer, users can write and build code specifying the behavior of a given rule, action, or guard. This code is scripted using the C# programming language.
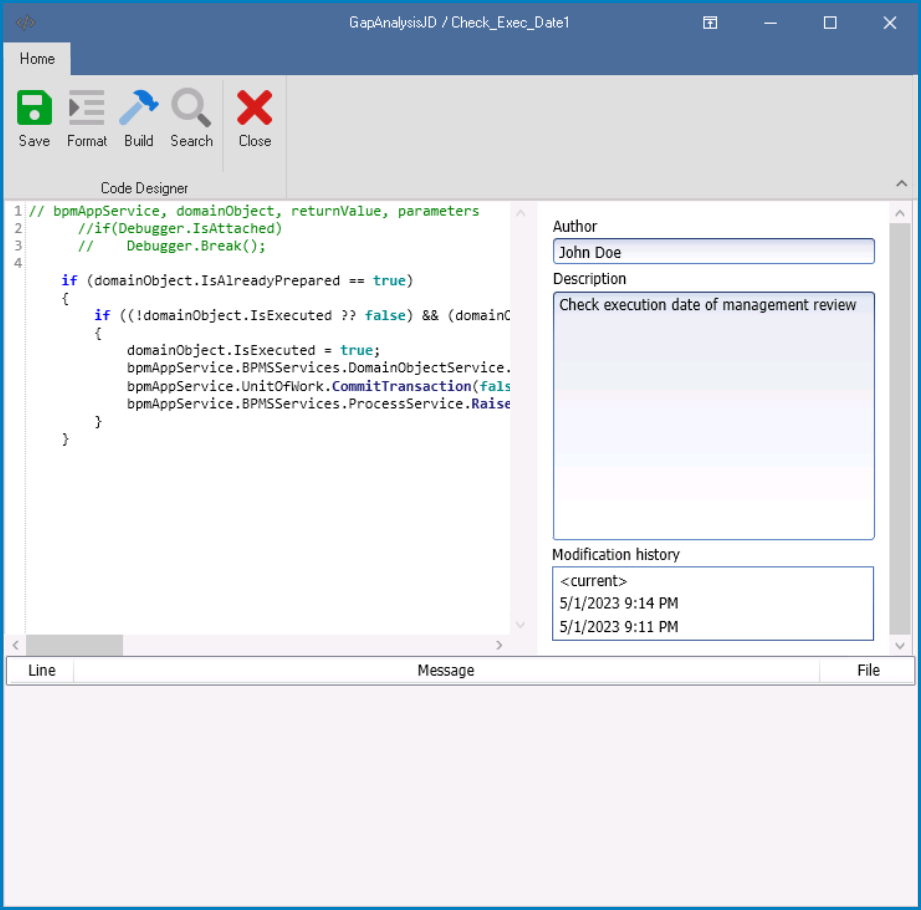
- Save: This button allows users to save any changes they have made to their code.
- If this button is selected, a validity check will automatically be performed and the results will be displayed in the Message field.
- Format: This button allows users to automatically structure and format their code according to certain predefined standards or formatting rules.
- By clicking on this button, users can quickly apply formatting changes to their code without having to manually adjust indentation, spacing, or other formatting elements.
- Build: This button allows users to compile and build their code.
- During this process, the code will be checked for errors, and any issues or errors encountered will be reported in the Message field. If the validity check is successful and there are no errors, the Message field will display a message indicating that the build was successful.
- Search: This button allows users to search for and find specific keywords, phrases, or pieces of code within their code file. Users can also replace text with a new string or code snippet by entering the search term and the new string or code snippet in the appropriate fields.
- If this button is selected, it will display the Find window.
- Close: This button allows users to close the Code Designer.
- Code Environment: This is the area where users can write and edit their code.
- In the code environment, there are comments written in the code that suggest which objects or variables can be used to accomplish certain tasks. These comments are intended to help programmers understand how the code works and to make modifications or additions to the code more easily.
- Debugging Code with Debugger.Break()
-
- “if (Debugger.IsAttached) — Debugger.Break()” is a line of code that is currently commented out in the code environment. When uncommented, it causes the code to break at that point when the code is run in Visual Studio’s debugger.
- In order for the code to break at that point when using the Visual Studio debugger, the programmer needs to have Visual Studio open and running, and they need to have attached the debugger to the process that is running the code.
![]()
- In order for the code to break at that point when using the Visual Studio debugger, the programmer needs to have Visual Studio open and running, and they need to have attached the debugger to the process that is running the code.
- “if (Debugger.IsAttached) — Debugger.Break()” is a line of code that is currently commented out in the code environment. When uncommented, it causes the code to break at that point when the code is run in Visual Studio’s debugger.
- In the code environment, there are comments written in the code that suggest which objects or variables can be used to accomplish certain tasks. These comments are intended to help programmers understand how the code works and to make modifications or additions to the code more easily.

- Code Metadata: In this panel, users can view and manage the metadata for their code, including authorship, descriptions, and modification history.
- Author: This field allows users to input their name, which will be displayed as the author of the code modification.
- Once saved, a user’s name remains displayed in the panel until a new name is provided.
- Description: This field allows users to input a brief description of the task or code they are working on.
- Once saved, a user’s description remains displayed in the panel until a new description is provided.
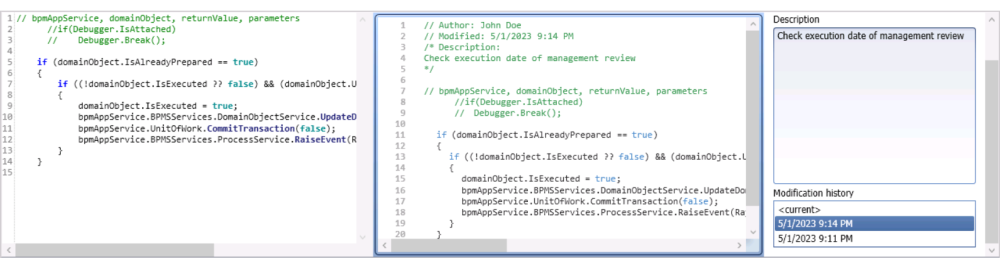
- Modification History: This field displays a log of all changes made to the code, including the date and time of each modification.
- When a specific entry is selected in this field, a small panel appears highlighting the section of the code that was modified, along with the name of the author and their corresponding description, date, and time.
![]()
- When a specific entry is selected in this field, a small panel appears highlighting the section of the code that was modified, along with the name of the author and their corresponding description, date, and time.
- Author: This field allows users to input their name, which will be displayed as the author of the code modification.
- Message: This is an area where messages and errors are displayed after a user performs an action, such as saving or building their code. This field is useful for debugging and troubleshooting code.
- When the user selects the Save or Build button, the program automatically performs a validity check on the code.
- If there are errors in the code, they will be displayed in the Message field.
- If the code is valid, a message indicating success will be displayed.
- When the user selects the Save or Build button, the program automatically performs a validity check on the code.