In the Applications group of the Home tab, users are provided access to the following set of commands:
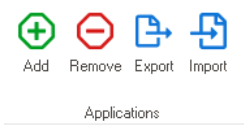
- Add: This button allows users to add a new application.
- If selected, it will display the Application window. In this window, users can set the name and title of the application.
![]()
- Name: This is a text field that allows users to input the name of the application.
- This is the name that the application will be registered under in the database. This name will also be used later on as part of the established naming convention.
- It is recommended that the name of an application be kept short and simple. It cannot contain spaces or special characters.
- Title: This is a text field that allows users to input the title of the application.
- This is the title that the application will be registered under in the Application Tree of the Designer.
- Unlike the name, the title of an application can be longer and more descriptive. It can include spaces and special characters.
- Version: This is a numeric updown field that allows users to input the version number of the application.
- Users can enter this number either manually or by using the increment/decrement arrows.
- To enable this field, users must first create and save the application. Then, they must right-click on the application from the Application Tree and select Change App from the context menu.
- Users can enter this number either manually or by using the increment/decrement arrows.
- Create or Cancel: To create and save the application, click on the Create button. To cancel this process, click on the Cancel button.
- Once an application has been created, the results are recorded in the Output section of the Designer.
- Name: This is a text field that allows users to input the name of the application.
- If selected, it will display the Application window. In this window, users can set the name and title of the application.
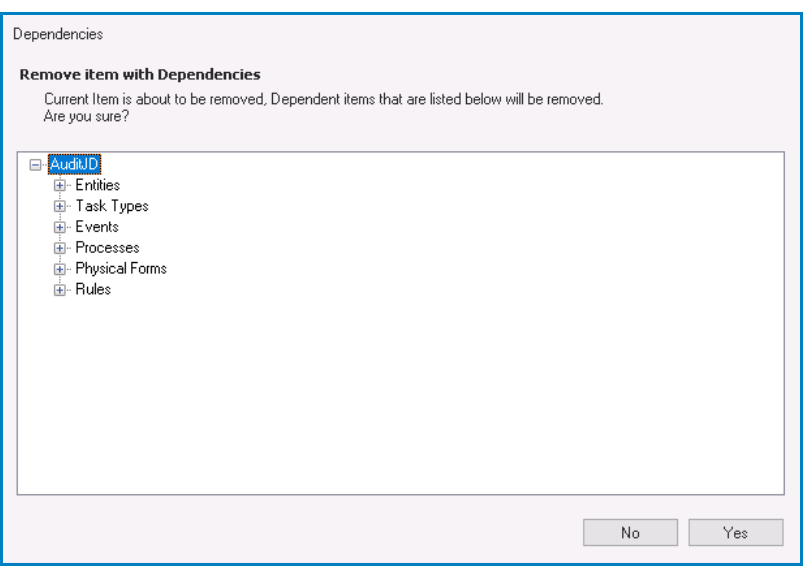
- Remove: This button allows users to remove an application.
- To begin the removal process, select the application from the Application Tree and then click on the Remove button. It will display the Dependencies window. In this window, users can access an overview of the selected application, including its dependent objects.
![]()
- Yes or No: To confirm the removal, click on the Yes button. To cancel, click on the No button.
- Once an application has been removed, the results are recorded in the Output section of the Designer.
- Yes or No: To confirm the removal, click on the Yes button. To cancel, click on the No button.
- To begin the removal process, select the application from the Application Tree and then click on the Remove button. It will display the Dependencies window. In this window, users can access an overview of the selected application, including its dependent objects.
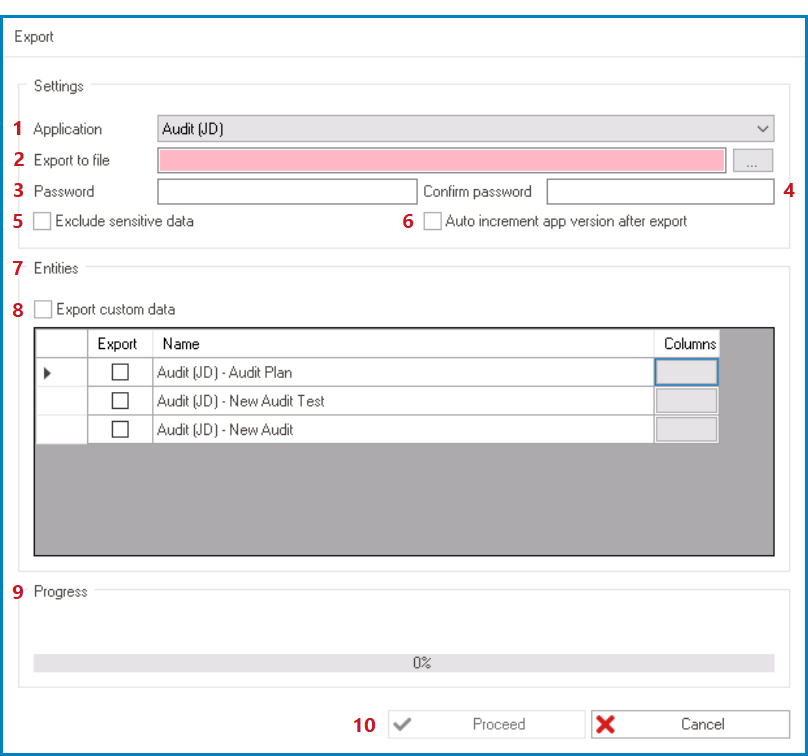
- Export: This button allows users to export an application.
- If selected, it will display the Export window. Depending on the settings configured in this window, a backup file will be created for the selected application in the .rba format.
![]()
- Application: This is a single-select dropdown field that retrieves the list of applications (from the Application Tree). It allows users to select the application that they would like to export.
- Users can also determine the application in advance by selecting it from the Application Tree before clicking on the Export button.
- Export to File: This field allows users to specify the physical path/folder to which the file will be exported. It is a mandatory field.
- To select this location, click on the
![]() button. Users will also need to specify the name under which the file will be saved.
button. Users will also need to specify the name under which the file will be saved.
- To select this location, click on the
- Password: This fields allow users to set the password to protect the exported application file.
- Once a password has been set, the output file will be locked and thenceforth can only be accessed using the password.
- To import the application, users will be required to input the password.
- Once a password has been set, the output file will be locked and thenceforth can only be accessed using the password.
- Confirm Password: This field requires users to re-enter the password they set to confirm it and ensure it was typed correctly.
- Exclude Sensitive Data: This is a checkbox which, if selected, allows users to exclude sensitive data such as connection strings, passwords, and other confidential information from the exported application file.
- Auto Increment App Version After Export: This is a checkbox which, if selected, allows users to automatically increment the application version number after export.
- After the export is complete, the version number of the application will be automatically incremented by one.
- Entities: In this section, users can access the list of the entities belonging to the application.
- To select an entity for export, enable the checkbox adjacent to it.
- Once the user has determined that they would like to proceed with the export, all selected entities/field data will be transferred to the specified database.
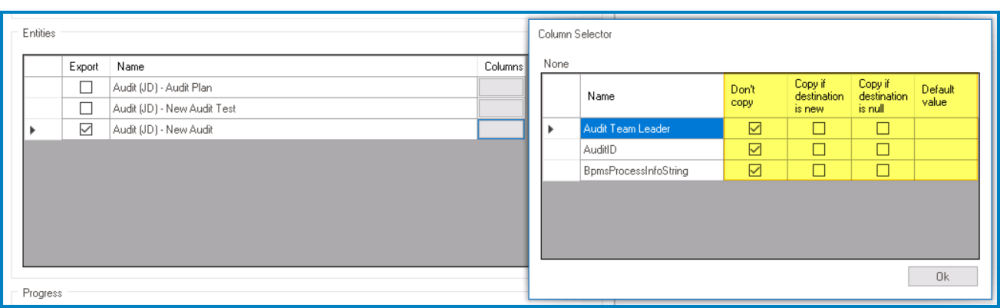
- Selecting an entity automatically selects all attributes of that entity. To alter this selection, use the Columns field adjacent to the entity.
- If the Columns field is selected, it will display the Column Selector window.
![]()
- In this window, users can specify their preferences as to which (and in what situation) attributes are copied
- If the Columns field is selected, it will display the Column Selector window.
- To select an entity for export, enable the checkbox adjacent to it.
- Export Custom Data: This is a checkbox which, if selected, allows users to export custom data associated with the application.
- All entities belonging to the application will, in turn, be selected for export.
- Progress: This bar is used to visualize the progress of the data transfer.
- Proceed or Cancel: To continue with the export, click on the Proceed button. To cancel, click on the Cancel button.
- To enable the Proceed button, users must first set up the file in its intended folder.
- Application: This is a single-select dropdown field that retrieves the list of applications (from the Application Tree). It allows users to select the application that they would like to export.
- If selected, it will display the Export window. Depending on the settings configured in this window, a backup file will be created for the selected application in the .rba format.
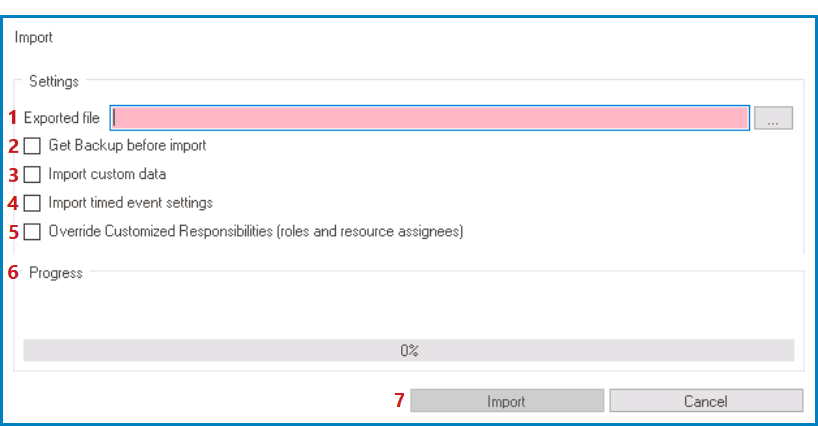
- Import: This button allows users to import an application into the Designer.
- If selected, it will display the Import window.
![]()
- Exported File: This field allows users to select the file/application that they would like to import. It is a mandatory field.
- To select the .rba file, click on the
![]() button.
button.
- To select the .rba file, click on the
- Get Backup Before Import: This is a checkbox which, if selected, allows users to backup existing data before the import.
- Import Custom Data: This is a checkbox which, if selected, allows users to import custom data associated with the application.
- Import Timed Event Settings: This checkbox determines whether to include timed event settings during the import process.
- If this checkbox is selected, importing an RBA file and deploying will update the server’s timed event settings with the values stored in the RBA file.
- If this checkbox is left unselected, importing an RBA file and deploying will preserve the server’s timed event settings.
- Override Customized Responsibilities: This checkbox determines whether to override customized responsibilities (role and resource assignees) during the import process.
- If this checkbox is selected, all existing and new task receiver settings on the server will be taken from the RBA file.
- Task assignees for tasks or task types that already exist on the server will be overwritten with the values in the RBA file.
- Task assignees for tasks or task types that do not already exist on the server will be imported from the RBA file.
- If this checkbox is left unselected, all existing task receiver settings on the server will be preserved. All new task receiver settings, however, will take their values from the RBA file.
- Task assignees for tasks or task types that already exist on the server are preserved.
- Task assignees for tasks or task types that do not already exist on the server (i.e., are being imported into the server for the first time) will take the task receiver values from the RBA file.
- If this checkbox is selected, all existing and new task receiver settings on the server will be taken from the RBA file.
- Progress: This bar is used to visualize the progress of the data transfer.
- Import or Cancel: To proceed with the import, click on the Import button. To cancel, click on the Cancel button.
- To enable the Import button, users must first select the intended file/application.
- Exported File: This field allows users to select the file/application that they would like to import. It is a mandatory field.
- If selected, it will display the Import window.