
A post-form action is an action that takes place after the submission of a form.
To manage post-form actions in the application, take the following steps:
- From the Application Tree, navigate to Business Logics > Actions > Post-Form Actions (double-click to open). It will display the Post-Form Actions tab and expand the menu bar to show additional options.
![]()
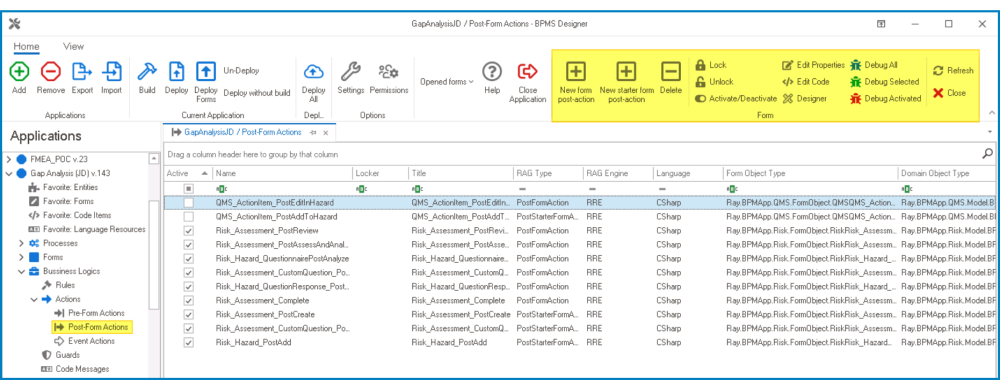
- From the menu bar, select the desired option.
![]()
- New Form Post-Action: This button allows users to define a new post-form action.
- If selected, it will display the Post-Form Action Properties window.
- New Starter Form Post-Action: This button allows users to define a new post-form (starter) action.
- If selected, it will display the Post-Form (Starter) Action Properties window. This window is largely a duplicate of the Post-Form Action Properties window, with the exception being that it allows users to create actions specifically aimed at starter forms.
- If selected, it will display the Post-Form (Starter) Action Properties window. This window is largely a duplicate of the Post-Form Action Properties window, with the exception being that it allows users to create actions specifically aimed at starter forms.
- Delete: This button allows users to delete a post-form action.
- To use this function, first select a post-form action from the list.
- Lock: This button allows users to lock the post-form action, restricting access to it so that only one user can make changes to it at a time.
- Unlock: This button allows users to unlock the post-form action.
- If selected, access restriction on the post-form action will be lifted.
- Activate/Deactivate: This is a toggle switch that allows users to choose between activating and deactivating the post-form action.
- Edit Properties: This button allows users to edit the properties of an existing post-form action.
- If selected, it will display the Post-Form Action Properties window. In this version of the window, however, all fields are populated with previously inputted information.
- To use this function, first select a post-form action from the list.
- Edit Code: This button allows users to launch the Code Designer, in which users can write or edit code specifying the behavior of the post-form action.
- For more details on how to define post-form actions using the Code Designer, click here.
- Designer: This button allows users to launch the Rule Designer, in which they can define rules that specify the conditions and actions for the post-form action.
- For more details on how to define post-form actions using the Rule Designer, click here.
- Debug All: This button allows users to debug all post-form actions in the list.
- Debug Selected: This button allows users to debug only the selected post-form action in the list.
- Debug Activated: This button allows users to debug only the post-form actions that are tagged as active.
- Refresh : This button allows users to refresh the Post-Form Actions tab.
- Close: This button allows users to close the Post-Form Actions tab.
- New Form Post-Action: This button allows users to define a new post-form action.

- Post-Form Action Example
-
- For example, suppose we have a mandatory field called ‘Name of Employee’, and we want an error message to be displayed whenever the user tries to submit the form without filling the field. To achieve this, we can define an action like the one below:
- If (domainObject.NameOfEmployee = null)
{ actionResult.Result = Rayvarz.BPMS.RuleModel.Result.Error; actionResult.Message = “Please select the Name of Employee”;
- If (domainObject.NameOfEmployee = null)
- For example, suppose we have a mandatory field called ‘Name of Employee’, and we want an error message to be displayed whenever the user tries to submit the form without filling the field. To achieve this, we can define an action like the one below: