
An Entity-Relationship (ER) diagram is a graphical representation of entities and their attributes, as well as the relationships between entities in an application.
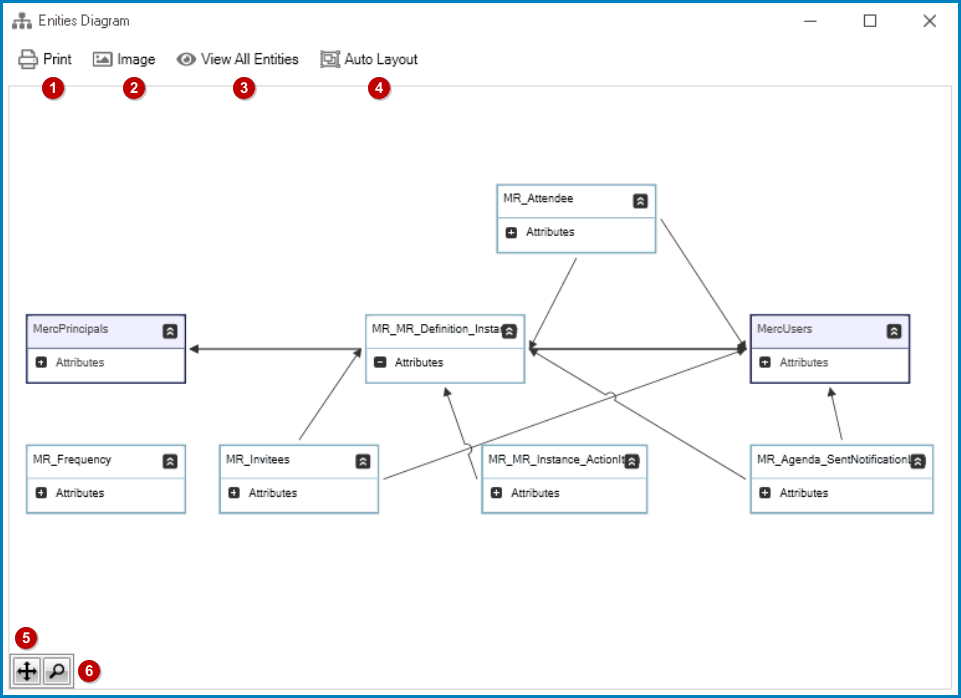
- Print: This button allows users to print the diagram.
- If selected, the Print dialog box will appear, enabling users to specify the printer and other printing preferences.
- Image: This button allows users to save the diagram as an image.
- If selected, a Save As dialog will appear, enabling users to choose a location on their local system to save the file.
- View All Entities: This button provides users with a comprehensive view of all entities within the diagram.
- Auto Layout: This button allows users to automatically arrange the entities and their relationships in a visually appealing and organized manner, without the need for manual adjustment.
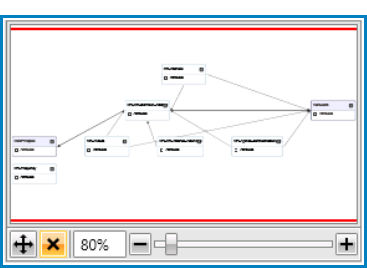
- Auto Fit: This button allows users to automatically resize the diagram to fit within the available space, ensuring that all entities and relationships remain visible.
- Magnify: This button allows users to zoom in or out on specific areas of the diagram.
- If selected, a preview box will appear in the lower left corner of the screen, displaying a miniature view of the entire diagram along with a slider that users can use to adjust the zoom level.
![]()
- The slider displays the zoom level as a percentage, enabling users to precisely specify the level of magnification.
- The slider displays the zoom level as a percentage, enabling users to precisely specify the level of magnification.
- If selected, a preview box will appear in the lower left corner of the screen, displaying a miniature view of the entire diagram along with a slider that users can use to adjust the zoom level.
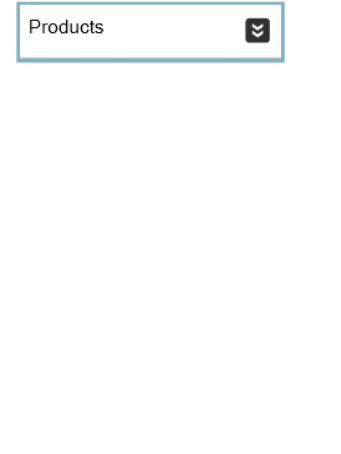
Expand / Collapse Nodes
Users can expand and collapse the tree nodes to view or hide the associated attributes of each entity.
Attribute Context Menu
To access the attribute context menu, right-click on an attribute in the diagram. It will display the following options:
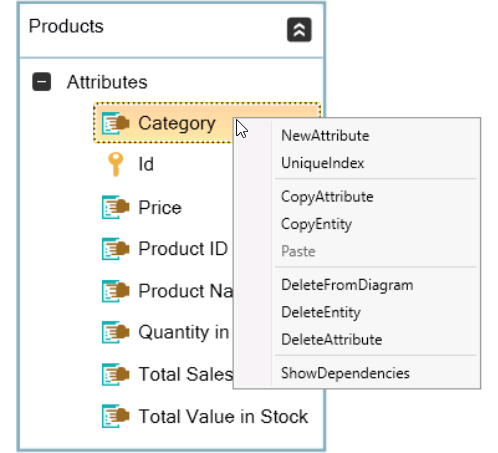
- New Attribute: This option allows users to add a new attribute under the entity.
- If selected, it will display the Attribute window, in which users can define the properties of the attribute.
- This window is largely a duplicate of the Attribute subtab in the Entity Designer.
- If selected, it will display the Attribute window, in which users can define the properties of the attribute.
- Unique Index: This option allows users to create a unique index for the entity associated with the attribute.
- Copy Attribute: This option allows users to copy the attribute.
- Copy Entity: This option allows users to copy the entity associated with the attribute.
- Paste: This option allows users to paste the copied attribute.
- To enable this option, users must first select an attribute and click on the Copy Attribute option.
- Delete From Diagram: This option allows users to remove the entity associated with the attribute from the diagram.
- Delete Entity: This option allows users to delete the entity associated with the attribute.
- If selected, users will be alerted of the action with a confirmation message.
- To confirm the deletion, click on the Yes button. To cancel, click on the No button.
- If selected, users will be alerted of the action with a confirmation message.
- Delete Attribute: This option allows users to delete the attribute.
- If selected, users will be alerted of the action with a confirmation message.
- To confirm the deletion, click on the Yes button. To cancel, click on the No button.
- If selected, users will be alerted of the action with a confirmation message.
- Show Dependencies: This option allows users to show the dependencies of the entity.