
In the Attribute subtab, users can define the properties of the newly created attribute as well as manage the structure of the Entity Tree.
This subtab is divided into two key components:
- Attribute Properties
In this section of the tab, users can define the properties of the attribute.

- Name: This is a text field that allows users to input the name of the attribute. It is a mandatory field.
- There are the following rules determining the validity of names:
- A valid name can contain letters, numbers, and the underscore symbol. It cannot, however, contain spaces or other special characters.
- An attribute must have a unique name. It cannot have the same name as another attribute within the entity.
- There are the following rules determining the validity of names:
- Title: This is a text field that allows users to input the title of the attribute. It is a mandatory field.
- The title inputted in this field will be used as the display title for the attribute.
- Unlike with names, there are no rules determining the validity of titles.
- Description: This is a multi-line text field that allows users to input a description for the attribute.
- Attribute Type: This is a radio button that allows users to select only one option from a set of mutually exclusive options. It is a mandatory field. Users can choose to create either a data attribute or a reference attribute.
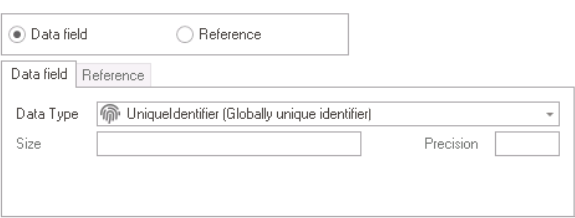
- If the Data Field option is selected, it will enable the Data Field tab.
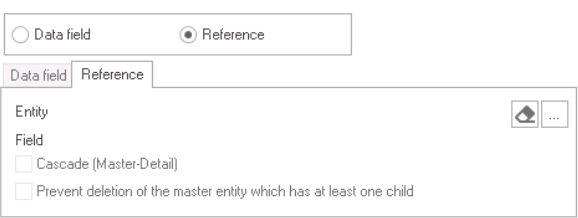
- If the Reference option is selected, it will enable the Reference tab.
- If the Data Field option is selected, it will enable the Data Field tab.
- Data Field: In this tab, users can define the properties of the data attribute.
![]()
- Data Type: This field allows users to choose the data type of the attribute from a dropdown menu. The selected data type will determine the SQL field type of the attribute in the database.
- Attributes are linked to form controls according to their data type.
- For more information on form controls and their compatible data types, click here.
- Attributes are linked to form controls according to their data type.
- Size: This field allows users to set the size of the attribute.
- Depending on the attribute selected, this field may be enabled or disabled.
- Precision: This field allows users to set the precision of the attribute.
- This field is only enabled for the Decimal and Numeric data type options.
- This field is only enabled for the Decimal and Numeric data type options.
- Data Type: This field allows users to choose the data type of the attribute from a dropdown menu. The selected data type will determine the SQL field type of the attribute in the database.
- Reference: In this tab, users can define the properties of the reference attribute.
![]()
- Entity: This field automatically displays the referenced entity.
- For an entity to appear in this field, users must first make their selection.
![]() : This button allows users to remove the selected entity and field.
: This button allows users to remove the selected entity and field.![]() : This button allows users to select the entity and field.
: This button allows users to select the entity and field.
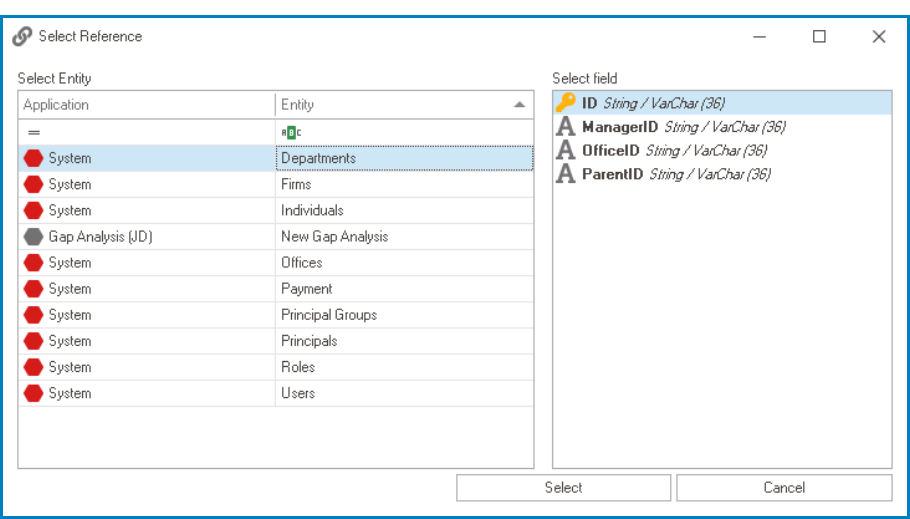
- If clicked, it will display the Select Reference window, where users can choose an application or system entity and select a specific field or attribute within it.
![]()
- Select or Cancel: To select an entity and field, click on the Select button. To cancel the selection and exit the window, click on the Cancel button.
- If clicked, it will display the Select Reference window, where users can choose an application or system entity and select a specific field or attribute within it.
- Field: This space automatically displays the referenced field within the entity.
- For a field to appear in this space, users must first make their selection.
- Cascade (Master-Detail): This is a checkbox which, if selected, allows changes made to the referencing entity to automatically apply to the referenced entity in a master-detail relationship.
- Cascade (Master-Detail): Example
- To better understand the concept of cascading, consider the following example:
- Assume that there are two entities: ‘customer’ and ‘order’.
- Each customer can have multiple orders, and the relationship between the customer and the order is one-to-many, established using a connecting entity.
- If the Cascade (Master-Detail) checkbox is selected for the reference attribute, deleting a customer entity will also result in the deletion of all the orders associated with that customer.
- This is because an order without a customer is meaningless, and hence, it’s logical to delete all the orders associated with a customer when the customer entity is removed.
- Assume that there are two entities: ‘customer’ and ‘order’.
- To better understand the concept of cascading, consider the following example:
- Prevent Deletion of Master Entity: This is a checkbox which, if selected, allows users to prevent the deletion of a master entity that has at least one child entity associated with it.
- Preventing Deletion of Master Entity: Example
- To better understand the concept of preventing the deletion of the master entity, consider the following example:
- Assume that there are two entities: ‘student’ and ‘course’.
- Each student can take multiple courses, and the relationship between the student and the course is one-to-many, established using a connecting entity.
- If a student is deleted, it may be undesirable to also delete the associated course.
- If a user attempts to delete a student who is associated with at least one course, selecting the Prevent Deletion of Master Entity checkbox for the reference attribute will prevent the deletion of the student entity.
- Instead, the system will throw an error to inform the user that the student entity cannot be deleted as it has at least one associated course.
- Assume that there are two entities: ‘student’ and ‘course’.
- To better understand the concept of preventing the deletion of the master entity, consider the following example:
- Entity: This field automatically displays the referenced entity.
- Show as Column in Task List: In this section, users can customize the display of attributes as columns in the task list of the web application.
- Hide: This option allows users to remove the attribute from the list of columns.
- Hidden By Default: This option allows users to hide the attribute from the list of columns by default.
- Users can then choose whether to display the column by manually adding it.
- Show By Default: This option allows users to display the attribute as a column by default in the list of columns.
- Users can then choose whether to hide the column by manually removing it.
- Users can then choose whether to hide the column by manually removing it.
- Read Only: This is a checkbox which, if selected, allows users to ensure that the system will not update or overwrite any data stored in that attribute.
- Defines Field: This is a checkbox which, if selected, allows users to designate the attribute as a defining or differentiating factor for the entity. This means that the attribute is considered a critical component of the entity and is necessary for its definition.
- For example, in the case of a Book entity, the Name and Author attributes may be considered defining factors, and so both would have the Defines Field checkbox selected.
- For example, in the case of a Book entity, the Name and Author attributes may be considered defining factors, and so both would have the Defines Field checkbox selected.
- Track Changes: This is a checkbox which, if selected, enables changes to be tracked for the attribute.
- In the example, changes to the Author attribute of the Book entity could be tracked by selecting the Track Changes checkbox.
- In the example, changes to the Author attribute of the Book entity could be tracked by selecting the Track Changes checkbox.
- Attribute Menu
In this section of the tab, users can manage attributes.
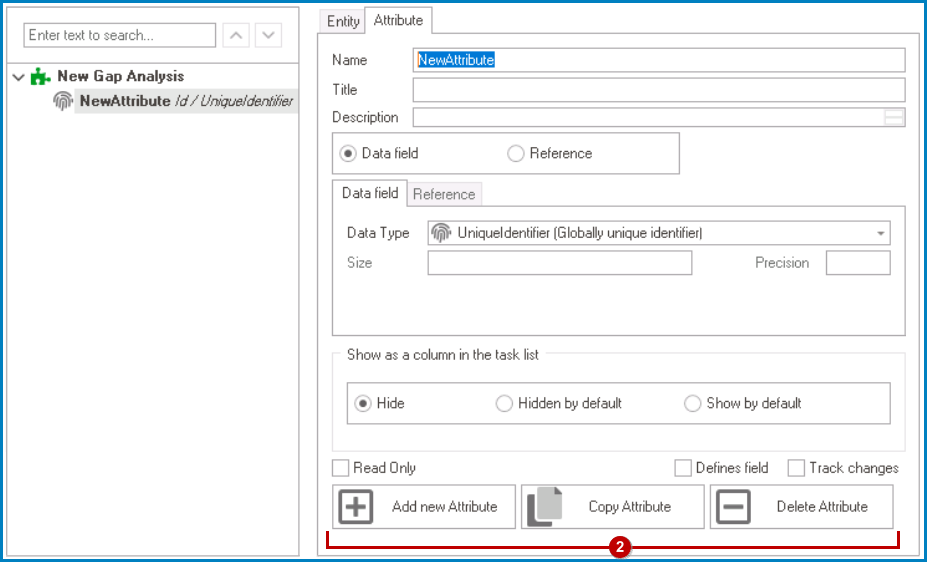
- Add New Attribute: This button allows users to add a new attribute.
- Copy Attribute: This button allows users to copy the selected attribute.
- To paste the attribute, users will need to select the Paste Attribute button in the Entity tab.
- If selected, a new attribute with all the properties of the original will be automatically created.
- Users can then modify the properties of the duplicate attribute as needed.
- By default, however, the name of the duplicate attribute will follow this format: OriginalName_1.
- By default, however, the name of the duplicate attribute will follow this format: OriginalName_1.
- Users can then modify the properties of the duplicate attribute as needed.
- If selected, a new attribute with all the properties of the original will be automatically created.
- To paste the attribute, users will need to select the Paste Attribute button in the Entity tab.
- Delete Attribute: This button allows users to delete the selected attribute.
- If selected, users will be alerted of the action with a confirmation message.
- To confirm the deletion, click on the Yes button. To cancel, click on the No button.
- If selected, users will be alerted of the action with a confirmation message.