Post-development condition usually means an increase of imperviousness and decrease of overland flow path. Those changes could increase the total runoff from the catchment and make sharply increased peak flow.
Create a New Scenario by Duplicating an Existing Scenario
Click the “undeveloped” scenario under the Drainage Network Scenarios in the Project Manager. Click the Duplicate button  at the top of the Project Manager. In the pop-up Duplicate Scenario window, change the Name to “developed” and make sure that all the checkboxes in the Include column are checked on. Click Duplicate. A duplicated scenario will be added to the Project Manager and open in the Schematic view. Scroll the mouse wheel to zoom in/out the Schematic view until the new scenario is properly displayed.

The duplicate scenario has the same Outfall node and Subcatchment as in the “undeveloped” scenario. It also has the same Background Image, Runs and analysis option.
Change Background Image
The background image was duplicated from the “undeveloped” scenario, so we should change it with the image for “developed” scenario. The background image of “developed” scenario can be found in the folder “…\background\developed site.jpg”.
To change the background image, right click on the empty space on the Schematic view to open the context menu. Select Background -> Change Background…. In the pop-up window, choose and add the image for “developed” scenario to the Schematic view. For more details, follow the instruction in Step 3: Undeveloped Site – Add Background Image
Add Objects to Schematic View
As explained in SWMM Application Manual (EPA, Sept. 2016), the studied site was discretized into seven Subcatchments (i.e., S1, S2, … S7) and the runoff of the seven subcatchments flow to an Outfall node. In this tutorial, we will only introduce how to create the model by using VOSWMM.
The Outfall node is already in the developed scenario, because it was duplicated in the Scenario Duplication. We only need to add more Subcatchments to the “developed” scenario. To add Subcatchments, there are two ways:
- Drag and Drop the command from Tool Box as introduced in Step 4: Undeveloped Site – Add Objects to Schematic View
- Copy and Paste the Subcatchment command on the Schematic view by using the tools
![]() and
and ![]() in the Home toolbar or using Ctrl+C and Ctrl+V.
in the Home toolbar or using Ctrl+C and Ctrl+V.
 and
and  in the Home toolbar or using Ctrl+C and Ctrl+V.
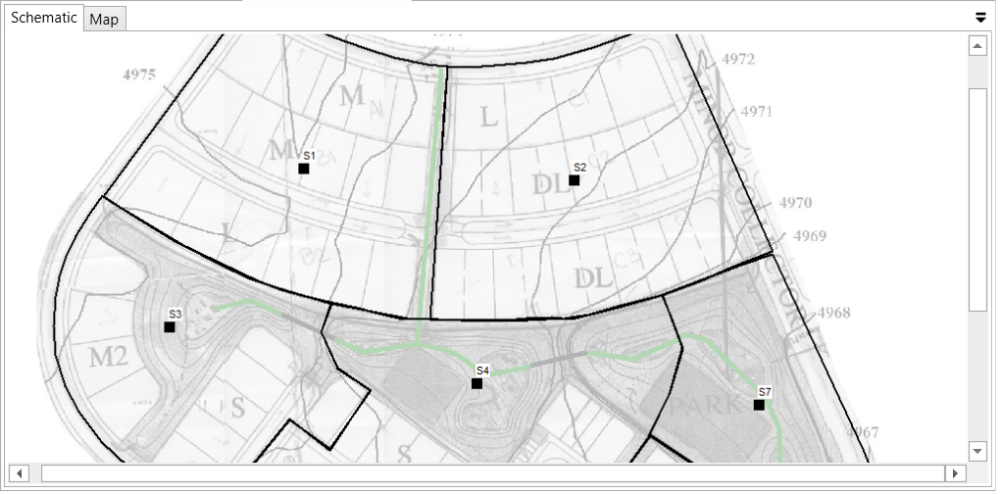
Once the commands are added to the Schematic view, move the commands to proper locations and change the NYHD accordingly. The location of each subcatchment (i.e., S1, S2, … S7) is denoted on the background image. Zoom into the image to see the subcatchment denotation. For example, the zoomed image below show the locations of S1, S2, S3, S4 and S7.
Then, add connections from the Subcatchments to the Outfall node. The details can be found in Step 4: Undeveloped Site – Add Objects to Schematic View
The model created for the “developed” scenario will be looked like the figure below.

Assign Object Properties
The Outfall node was duplicated from the “undeveloped” scenario, so it has the same properties as in the “undeveloped” scenario. We only need to change the Properties of Subcatchments in the “developed” scenario.
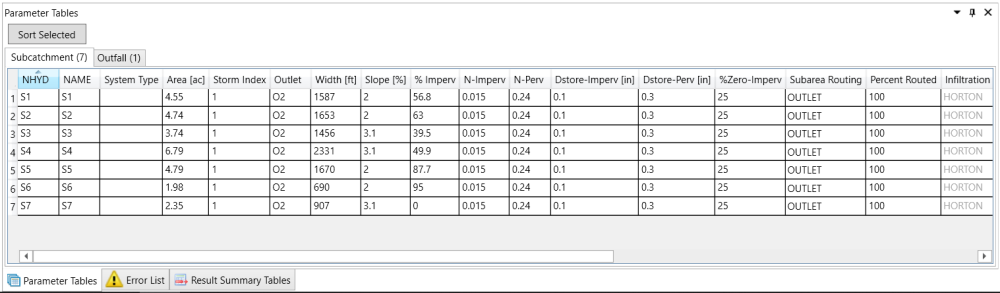
To view and edit the properties of the Subcatchments node, click on the Parameter Tables tab, which by default is at the bottom of the VOSWMM main interface. Click the Subcatchment tab in the Parameter Tables.
The parameters of all the seven Subcatchemnts are listed in the table below. To edit the properties in the Parameter Table of Subcatchment, you can choose to either edit table cells one by one or copy the entire table below to the Parameter Table.
| NHYD | NAME | System Type | Area [ac] | Storm Index | Outlet | Width [ft] | Slope [%] | % Imperv | N-Imperv | N-Perv | Dstore-Imperv [in] | Dstore-Perv [in] | %Zero-Imperv | Subarea Routing | Percent Routed |
|---|---|---|---|---|---|---|---|---|---|---|---|---|---|---|---|
| S1 | S1 | Blank | 4.55 | 1 | O2 | 1587 | 2 | 56.8 | 0.015 | 0.24 | 0.1 | 0.3 | 25 | OUTLET | 100 |
| S2 | S2 | Blank | 4.74 | 1 | O2 | 1653 | 2 | 63 | 0.015 | 0.24 | 0.1 | 0.3 | 25 | OUTLET | 100 |
| S3 | S3 | Blank | 3.74 | 1 | O2 | 1456 | 3.1 | 39.5 | 0.015 | 0.24 | 0.1 | 0.3 | 25 | OUTLET | 100 |
| S4 | S4 | Blank | 6.79 | 1 | O2 | 2331 | 3.1 | 49.9 | 0.015 | 0.24 | 0.1 | 0.3 | 25 | OUTLET | 100 |
| S5 | S5 | Blank | 4.79 | 1 | O2 | 1670 | 2 | 87.7 | 0.015 | 0.24 | 0.1 | 0.3 | 25 | OUTLET | 100 |
| S6 | S6 | Blank | 1.98 | 1 | O2 | 690 | 2 | 95 | 0.015 | 0.24 | 0.1 | 0.3 | 25 | OUTLET | 100 |
| S7 | S7 | Blank | 2.35 | 1 | O2 | 907 | 3.1 | 0 | 0.015 | 0.24 | 0.1 | 0.3 | 25 | OUTLET | 100 |
- To change the cell values one by one, click on that cell in the Parameter Table and then click again to change the cell to editable mode.
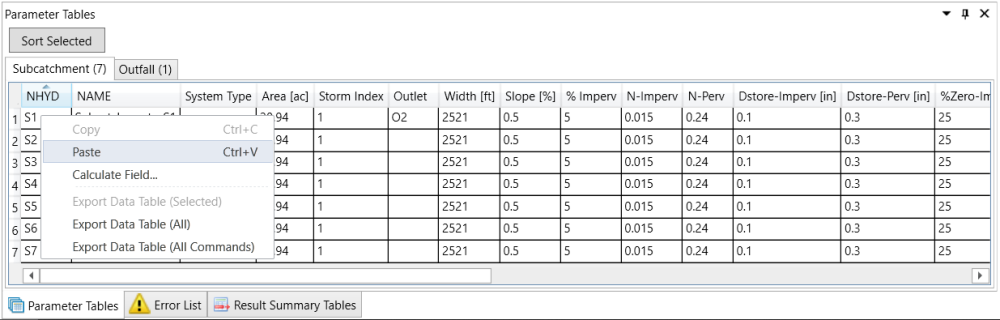
- To copy the entire table to the Parameter Table of the Subcatchment, first copy the table above without the header row. Then, click on the header of NHYD to sort the Parameter Table by NHYD.ascendingly and right click on the first cell under the NHYD column in the Parameter Table of Subcatchments. In the opened context menu, select “Paste”.
Click on the header of NHYD to sort the Parameter Table by NHYD ascendingly. The final table will be looked like this.