
Export Layer
You have the flexibility to export layers in various formats based on your specific needs. To export a layer, follow the steps outlined below:
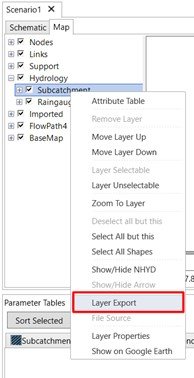
1. Right-click on the layer you want to export. This will open a context menu with several options.
2. From the context menu, select “Layer Export”. This will initiate the layer export process.
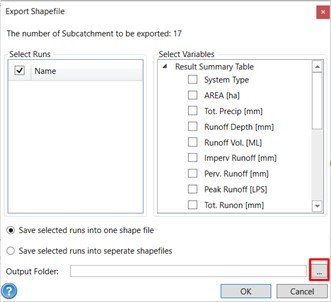
3. A dialog box will appear, allowing you to specify the export settings and file format. In this dialog box, locate the “Output Folder” section.
4. To choose the output folder where the exported layer will be saved, click on the ellipsis (…) button next to the “Output Folder” field. This will open a file browser window.
- Shape File (*.shp)
- AutoCAD (*.dxf)
- Comma Separated (*.CSV)
- Geographic Markup (*.gml, *.xml)
- GeoJSON (*.json, *.geojson)
- Google Earth Keyhole Markup Language (*.kml, *.kmz)
- Google Exchange Format (*.gpx)
- LandXML (*.xml)
- MapInfo (*.mif)
- MapInfo Native Format (*.tab)
- SQL Layer Connector (*.ttkls, *.ttklayer)
- Standard Tessellation Language (*.stl, *.stla)
- XYZ Point Cloud data (*.xyz)
8. Select the desired format from the list according to your requirements.
9. Once you have chosen the file format, click the “Export” or “Save” button to initiate the export process.
10. Click on “OK”, the software will then generate the exported layer in the selected format and save it to the specified output folder.
To export specific polygons from a shape file, follow these steps:
Select the polygon(s): On the map, click to select the desired polygons that you want to export. You can select one or multiple polygons at a time.
Right-click on the layer: After selecting the polygons, right-click on the layer containing the shape file that you want to export.
Select “Layer Export”: From the context menu that appears, choose the option labeled “Layer Export.” This action will initiate the export process.
Export only selected polygons: Since you have selected specific polygons, VOSWMM will export only those selected polygons rather than the entire shape file. This allows you to export a subset of the data.
Specify export settings: In the export window that opens, you may need to specify additional settings.
Confirm and initiate export: Once you have configured the export settings according to your requirements, click on the “OK” button to start the export process.
Exported shape file: VOSWMM will generate a new shape file containing only the selected polygons, based on the export settings you specified. The exported shape file will be saved in the designated destination folder.