This tutorial will walk you through the step-by-step process of automatically generating subcatchments in rural areas using VOSWMM. By following these instructions, you’ll be able to conduct large-scale studies with ease. Let’s dive in!
Step 1: Importing the DEM File
1. Start by downloading the provided sample file named “AutoGenerateSubcatchmentsRuralAreas” from the official website.
AutoGenerateSubcatmentsRuralAreas
2. Launch the VOSWMM software on your computer.
3. Access the map-related functionalities by clicking on the “Map” tab within the software.
4. To import the specific DEM file for your case study, navigate to the “GIS Tools” menu and select “Add Layer”.
5. Locate the downloaded file on your computer and open the “Data” folder.
6. Choose the “DemRural.tif” file and click “Open” to import the DEM file into the Map tab.
Step 2: Zooming to the Imported Layer
1. Right-click on the imported DEM layer in the Map tab.
2. From the context menu that appears, select “Zoom to Layer” to automatically zoom in and focus on the imported layer.
Step 3: Saving the Project
Before proceeding with the automatic subcatchment generation, it’s crucial to save your project to prevent any potential data loss.
1. Click on the “Save” button located at the top left corner of the software interface.
2. Choose a suitable location on your computer to save the project and provide a descriptive name for it.
Step 4: Generating Catchments
1. Switch to the “Micro-Drainage” tab within VOSWMM and locate the “Generate Catchments” option under the “Rural DEM Processing” section.
2. In the opened window, select the DEM file you imported earlier.
3. Choose an appropriate value for the “Target Discretization Level” or “# of Cells”. It is recommended to assign larger values to generate larger subcatchments in rural areas.
4. Specify a folder path in the “Output Folder Path” field to save the generated files.
5. Execute the software by clicking the “Run” button.

After the automatic generation of subcatchments using the “Generate Catchments” feature in VOSWMM, you will find the resulting subcatchments under the “Hydrology” layer. This layer contains all the subcatchments that have been created based on the defined criteria and settings.
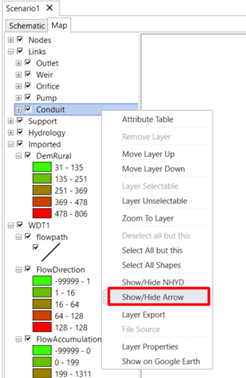
In case the flow direction for conduits appears too large and obstructive, you can easily adjust it:
1. Right-click on the conduit layer.
2. From the context menu, select the “Show/Hide Arrow” option to toggle the display of arrows indicating flow direction within conduits.