
The Raster Clipping tool in VOSWMM is particularly helpful when working with large DEM files but only requiring a small portion for analysis. This tool allows you to clip out the desired area of the DEM, enhancing processing speed and efficiency. To utilize this tool, you will need a DEM file and a shape file containing the desired clipping polygon(s).
Here’s a step-by-step guide on how to use the Raster Clipping tool:
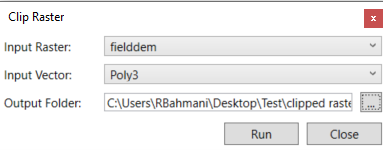
1. Begin by clicking on the “Clip Raster” option in the software’s interface.

2. The Clip Raster window will appear, consisting of three essential parts: a. “Input Raster”: Here, you should select the DEM file that you wish to clip. b. “Input Vector”: This section requires a shape file containing the polygon(s) that define the desired clipping area. The inside of the polygon(s) will be considered for clipping the DEM file. c. “Output Folder”: Choose a destination where the clipped raster file will be saved.
3. Once you have set the input raster, input vector, and output folder, click on the “Run” button to execute the tool.
4. The software will process the clipping operation, and the resulting clipped raster will be added as a layer under the “Imported” layer.
By utilizing the Raster Clipping tool, you can narrow down your focus to specific regions of interest within a large DEM file. This feature not only improves processing speed but also allows for more targeted analysis and enhances efficiency in working with large datasets.