
The Project Manager is to manage the scenarios, climate data, runs and result plotting in the project. By default, it’s located on the right-hand side besides the Properties tab on the VO-SWMM main interface.

Toolbar
On the top of Project Manager is the tool bar. The buttons are described in the table below.
| Icon | Command | Description |
|---|---|---|
 |
Add | Add new selected item |
 |
Delete | Delete selected item |
 |
Duplicate | Duplicate selected item |
 |
Resource Library | Open Resource Library |
Tree View
Below the toolbar is a tree view of scenarios and climate data. Items are represented with icons described in Table below. Some of the sections would open the detail information window by double-click, which is also described in table below. For example, the Rain Group Viewer will be opened by double-clicking on Rain Group section.
Items
| Icon | Item | Icon | Item | Description |
|---|---|---|---|---|
 |
Scenario Section |  |
Scenario | Open Scenario |
 |
Rain Data Section |  |
Rain Group | Open Rain Group Viewer |
| |
Run Data Section | Runs | Open Run Group Window | |
| |
Elavation Profiles Section | |
Elevation Profile Group | Open Saved Elevation Profles |
| |
Scenario Comparison Section | |
Scenario Comparison Group | Open saved scenario comparisons |
| |
Saved Data Section | |
Saved Data Group | Open saved selection |

Context Menu
Context menus are also available in the tree view as shown in Figure below. If one menu item is not applied to current item, it will be greyed out. For example, the Set as Default Scenario menu is only applied to scenario. All the menus are described in Table below.
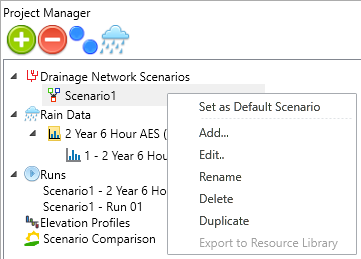
| Menu | Command | Applicable Items |
|---|---|---|
| Set as Default Scenario | Set selected scenario as default scenario | |
| Add… | Add Scenario or Open Resource Library | |
| Edit… | Open Scenario or Data Viewer | |
| Rename… | Rename the selected item | |
| Delete… | Delete Selected Item | |
| Duplicate… | Duplicate Selected Item | |