The Curve Editor dialog is used when creating or editing a Curve object, which can be of various categories such as Storage, Shape, Tidal, Diversion, Pump, Rating, Control, or Weir. To use the Curve Editor:
- Provide values for the following dialog items: Name (curve name), Type (for Pump Curves, select the curve type), and an optional Description. Enter the curve’s X and Y data in the Data Grid.
- If you need to add more rows to the Data Grid, simply press the key in the last row.
- Right-clicking on the Data Grid provides an Edit menu with options to delete, copy, insert, and paste selected cells, as well as options to insert or delete a row.
- Confirm your curve entries by pressing OK or cancel them by clicking Cancel.
Additionally, you can load a previously saved curve from a file using the Import button or save the current curve’s data to a file using the Export button.
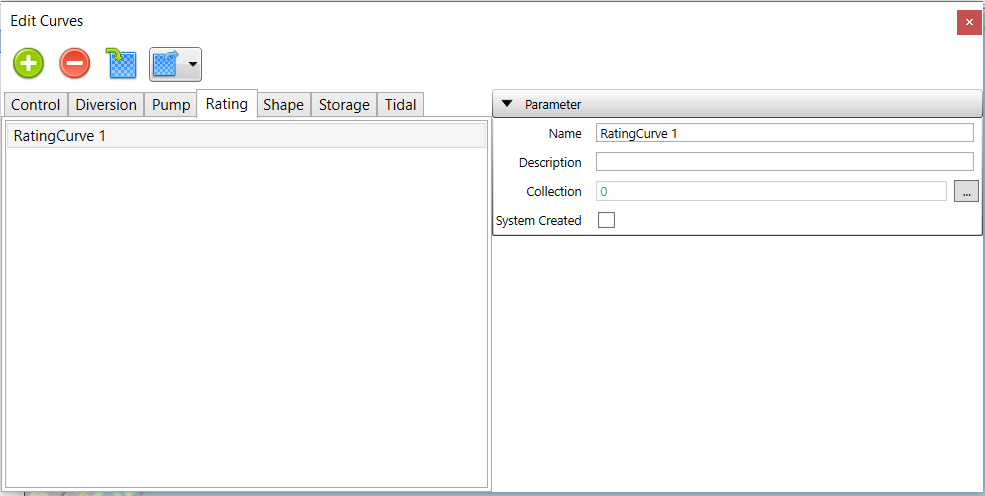
Click the Curves button to open the Edit Curves window. Click on the tab of desired curve to edit/add/delete curves
| Button | Description |
|---|---|
 |
Add one curve |
 |
Delete selected curves. Please note to use Ctrl and Shift keys for multiple selection. |
 |
Import a group of curves |
| |
Export all the curves under the selected curve type |
Import a Group of Rating Curves
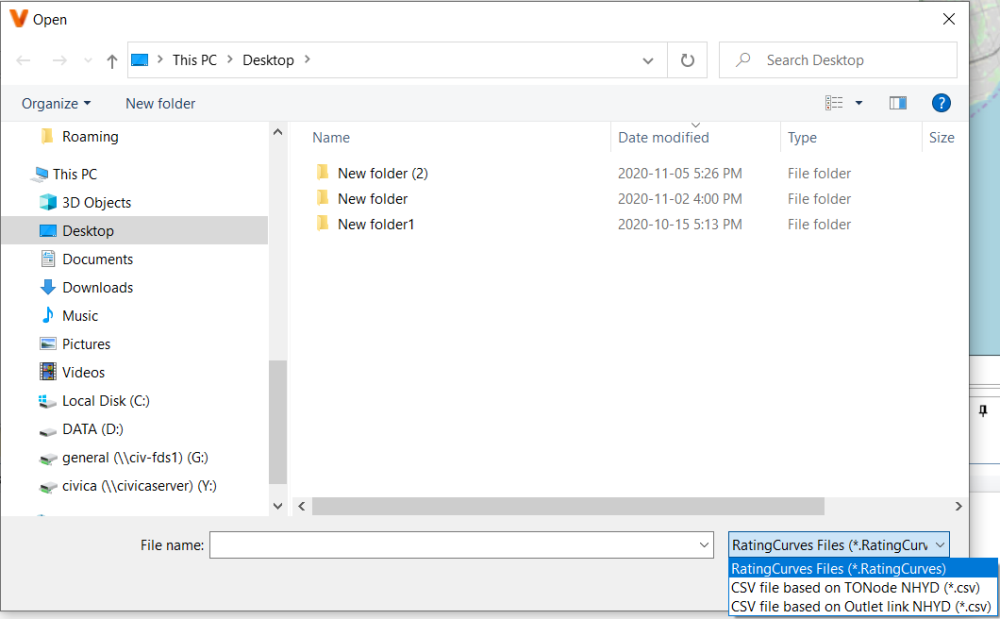
Navigate to Rating curves, and click the Import button . In the pop-up window, select the file type. There are three types of files supported for Rating Curve group importing:
- File extension as RatingCurve: this type of file is like a xml file. Normally it will be used when the users export the curves into a xml file by using the Export function and send the xml file to other users, so the other users can directly import the xml file.
- CSV file based on ToNode NHYD: the file is organized in a way, so that the curve will be assigned to outlet links based their ToNode NHYD. More details will be explained below about the csv file format.
- CSV file based on Outlet Link NHYD: the file is organized in a way, so that the curve will be assigned to outlet links based their own NHYD. More details will be explained below about the csv file format.
CSV File Format of Rating curves
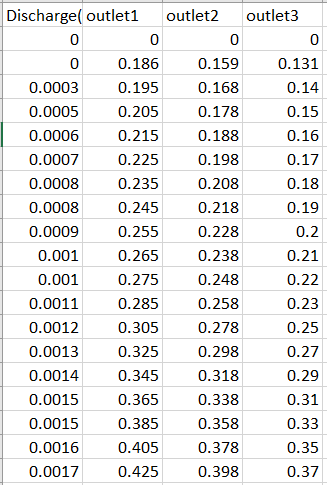
- Format 1: this format applies to the situation when all the rating curves share the same discharge flow. The first column is the discharge outflow of outlet links. The following columns are the head or depth of the inlet node of the outlet links. The headers of those following columns are the rating curve names. The name of curve will also be taken as the NHYD of either the To Node of the outlet links or the Outlet link themselves, depending on the selection of file types as stated above.
Download the sample csv file of rating curves in Format 1 with headers named as ToNode NHYD
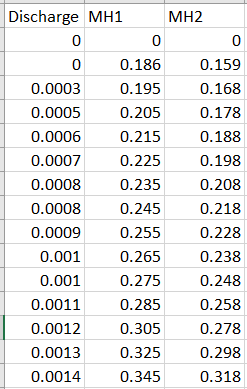
Download the sample csv file of rating curves in Format 1 with headers named as Outlet Link NHYD
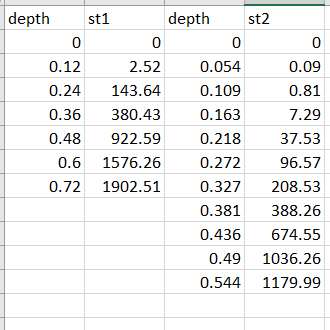
- Format 2: this format applies to the situation when the rating curves have different discharge flow. Each curve defines its own discharge flow and head or depth in two separate columns. The header of every second column is the name of the curve. The name of curve will also be taken as the NHYD of either the To Node of the outlet links or the Outlet link themselves, depending on the selection of file types as stated above.
Download the sample csv file of rating curves in Format 2 with headers named as ToNode NHYD
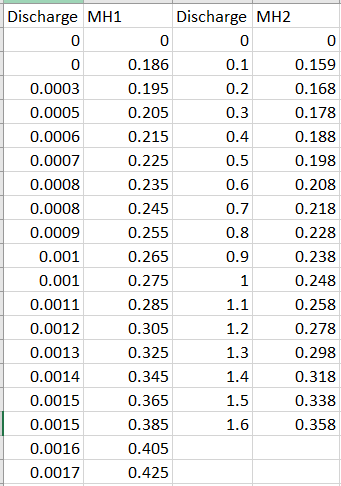
Download the sample csv file of rating curves in Format 2 with headers named as Outlet Link NHYD
Importing a Group of Curves (Control, Division, Pump, Shape, Storage, Tidal and Weir)
This part will explain the group importing and file formats for curves other than rating curves, including Control, Division, Pump, Shape, Storage, Tidal and Weir. In general, there are two types of files supported for the group importing of those curves:
- xml file: this type of file has an extension similar to the curve type name, for example, *.StorageCurves. Normally it will be used when the users export the curves into a xml file by using the Export function and send the xml file to other users, so the other users can directly import the xml file.
- CSV file: the file is organized in a way, so that the curve can be assigned to objects based their own NHYD, except for Control Curves that cannot be assigned automatically. More details will be explained below about the csv file format.
CSV File Format of Curves (Control, Division, Pump, Shape, Storage, Tidal and Weir)
The CSV files define the X and Y values for each type of curve. The X variable is the first variable in the curve editor table. Please use the following table to look up for the X and Y variables for each type of curve.
| Curve Type | X Variable | Y Variable |
|---|---|---|
| Control | Control Value | Control Setting |
| Division | Inflow | Outflow |
| Pump | Depth | Flow |
| Shape | Depth/Full Depth | Width/Full Depth |
| Storage | Depth | Area |
| Tidal | Hour of Day | Stage |
| Weir | Head | Coefficient |
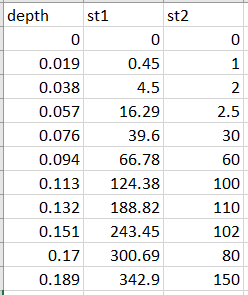
- Format 1: this format applies to the situation when all the curves share the same X value. The first column is the X and the following columns are Y for each curve. The header is the first row. The first cell of the header is the column name of the first column, i.e. the name of X variable. The following cells of the header are the name of curve. As long as the curve type is not Control, the name of curve will also be taken as the NHYD of the object, so the curve can be assigned to corresponding object.
Download the sample csv file of curves in format 1
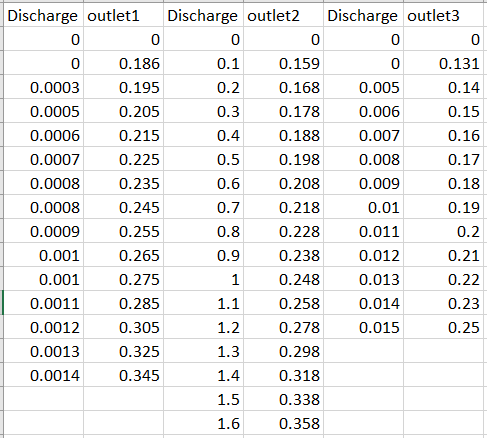
- Format 2: this format applies to the situation when each curve has different X from others. Each curve defines its own X and Y in two separate columns. The header of every second column is the name of the curve. As long as the curve type is not Control, the name of curve will also be taken as the NHYD of the object, so the curve can be assigned to corresponding object.
Download the sample csv file of curves in format 2