
The Quick-Access Toolbar has many common editing functions conveniently positioned, and they remain visible regardless of which ribbon is selected.
Many of these functions can also be accessed elsewhere.
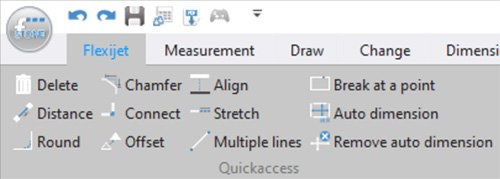
Delete  |
‘Delete’ allows for the removal of elements. Select the Delete button, then select the objects to be deleted or removed. Then, press ‘Confirm’ or ‘Enter’ key to complete the command. |
Distance  |
Select ‘Distance’, then measure or click the first point. Then, measure or click the second point. The X, Y, and Z distances, as well as the combined XYZ distance will be displayed in the Command window |
Round  |
‘Round’ creates a round fillet between 2 elements. Those elements must be on the same plane. Select the ‘Round’ button, then enter the desired radius and press ‘Confirm’ or ‘Enter’. When prompted, select the first element, and then the second element. |
Chamfer  |
‘Chamfer’ allows users to round a corner between 2 elements. Those elements must be on the same plane, and must be connected in the corner (share a corner). Select the ‘Chamfer’ button, then select the first element, and then the second element. Now, follow the prompts to enter the chamfer distance for the first line, and then the second line. |
Connect  |
Connect button allows users to connect (fillet) two elements. Those elements must be on the same plane. Select the ‘Connect’ button then select the first element and the second element. |
Offset  |
Offset a copy of an element at a defined distance.Typically used for adding ‘overhang’ to countertops. Select the ‘Offset’ button, then enter the distance to be offset, then press ‘Confirm’ or the ‘Enter’ key. Then, select the object to be offset, and then click/tap in the direction you which to offset. |
Align  |
Align allows users to re-orient the view of the canvas. NOTE: This function should not be used once a 3D location has been set, or if you wish to return to a location and resume a measurement. Select the ‘Align’ button and click on the left side of the line to which you would like to view horizontally. |
Stretch  |
Stretch extends an element to intersect with another element. Select the ‘Stretch’ button, then select the object to which you want your element to meet and press ‘Confirm’ or the ‘Enter’ key. Then, select the object to be extended. |
Multiple Lines  |
‘Multiple Lines’ is used to draw simple lines with a start point and an end point. Select the ‘Multiple Lines’ button, then click, tap, or measure the start point of the line. Next, select the end point of the line. Then, continue to create lines by selecting a new start point, end point, start point, etc. |
Break at a Point  |
Break at a Point is used to break an object at a single point. Select ‘Break at a point’, then select the object you wish to break, then select the break point. |
Auto-dimension  |
‘Auto Dimension’ quickly adds dimensions to all elements in an active folder. See Auto-Dimension for more information. |
Remove Auto Dimension  |
‘Remove Auto Dimension’ removes dimensions added using the ‘Auto-Dimension’ button. |
Feedback
Copyright © 2025 Flexijet GmbH
—
Powered by 
Post your comment on this topic.