
- To create PDF’s, see Exporting PDF’s. Note that DXF/other formats can also be exported while creating a PDF!
- To export Pictures and voice notes, including measurement photos, see Export Pictures and Voicenotes
Flexijet Stone offers many options and formats for exporting files to other software and machinery. Please contact your CNC’s tech support for information about any special formats required, and contact Flexijet Support at 1-844-MY-FLEXI (1-844-693-5394) Ext 2 or helpdesk@flexijet.info for assistance.
General export information:
Export an individual folder:
- Right click on the folder to be exported and select ‘Export>Export’ from the drop down menu.
![]()
![R click menu Export>Export]()
- Specify the desired file type, filename, and save location in the Export Dialog window, and click ‘Save’.
![Export name and file type]()
- Now, the Transformations window will open. Select any desired transformations and click ‘OK’ to proceed’. Your file will now be saved at the specified location.


Export a group of folders (subfolders) as a single 2D DXF/DWG:
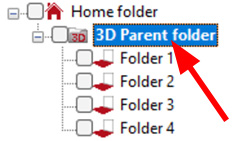
- Right click on the parent 3D folder of the group to be exported and select ‘Export>Export’ from the drop down menu. (Home folder can also be a 3D parent folder)
![3D Parent folder highlighted in Project Explorer]()
![R click menu Export>Export]()
- Specify the desired file type, filename, and save location in the Export Dialog window, and click ‘Save’.
![Export name and file type]()
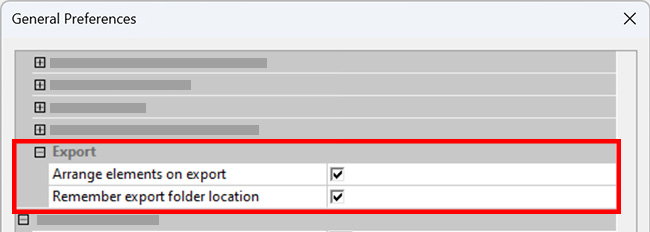
- Now, the Transformations window will open. Ensure that ‘Turn elements to horizontal’ and ‘Project elements to Z=0’ are selected’, and that ‘Arrange elements on export’ is selected in ‘General preferences’, and click ‘OK’ to proceed’. Your file will now be saved at the specified location, with all elements of the sub-folders
To export only selected objects (selected on-screen):
Version 3.3.7.0 and later:
- Navigate to the ‘File’ menu, and select ‘Export (Select Objects)’.
![]()
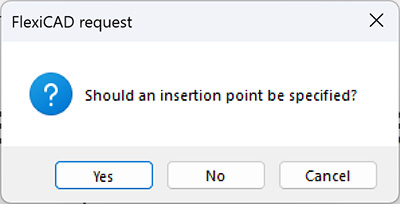
- Select the objects to be exported, and click ‘Confirm’ or ‘Enter’ to confirm the selection
- Prompt to select insertion point will appear. Click ‘Yes’ to specify the insertion point by clicking or entering coordinates.
![Export Select Objects dialog box insertion point be specified]()
- Specify the desired file type, filename, and save location in the Export Dialog window, and click ‘Save’
- Now, the Transformations window will open. Select any desired transformations and click ‘OK’ to proceed’

Note: In versions 3.3.6.0 and earlier, elements are selected after specifying filename and ‘Transformations’. Confirm the selection with ‘Enter’ or ‘Confirm’ to complete the export. Insertion point is not specified in earlier versions.
To export the entire project (including ‘Home’ folder and all sub-folders) as a single file:
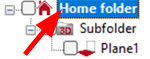
- Select the ‘Home’ folder from the project explorer by clicking on its name.
![Project explorer with Home folder highlighted]()
- Navigate to the ‘File’ menu, and select ‘Export’.
![]()
- Specify the desired filetype, filename, and save location in the Export Dialog window, and click ‘Save’
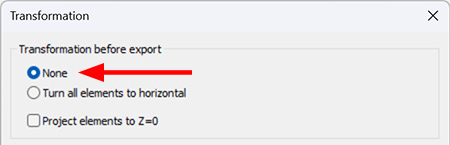
- Now, the Transformations window will open. For a 3D Export, turn off ‘Turn elements to horizontal’ and ‘Project to Z=0’. Select any desired transformations and click ‘OK’ to proceed’ Your file will now be saved at the specified location.

Exporting in 2D vs 3D:
- 3D: Export a 3D folder by right-clicking and choosing Export>Export, or from File>Export. Turn off the transformations on the ‘Transformations’ window and the 3D elements will be exported in 3D.
![Transformations window none selected]()
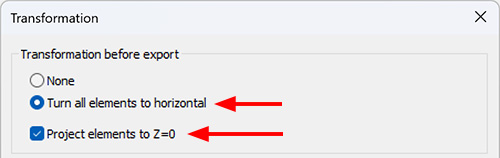
- 2D: If both ‘Turn all elements to horizontal’ and ‘Project elements to Z=0’ are selected on the Transformations window, all vertical and free plane folders will be rotated to lay flat on horizontal, their elements projected to Z=0, and they will be tiled out horizontally (not overlapping) on the resulting export file.
![Transformations window Turn horizontal and z0 selected]()
Transformations during export
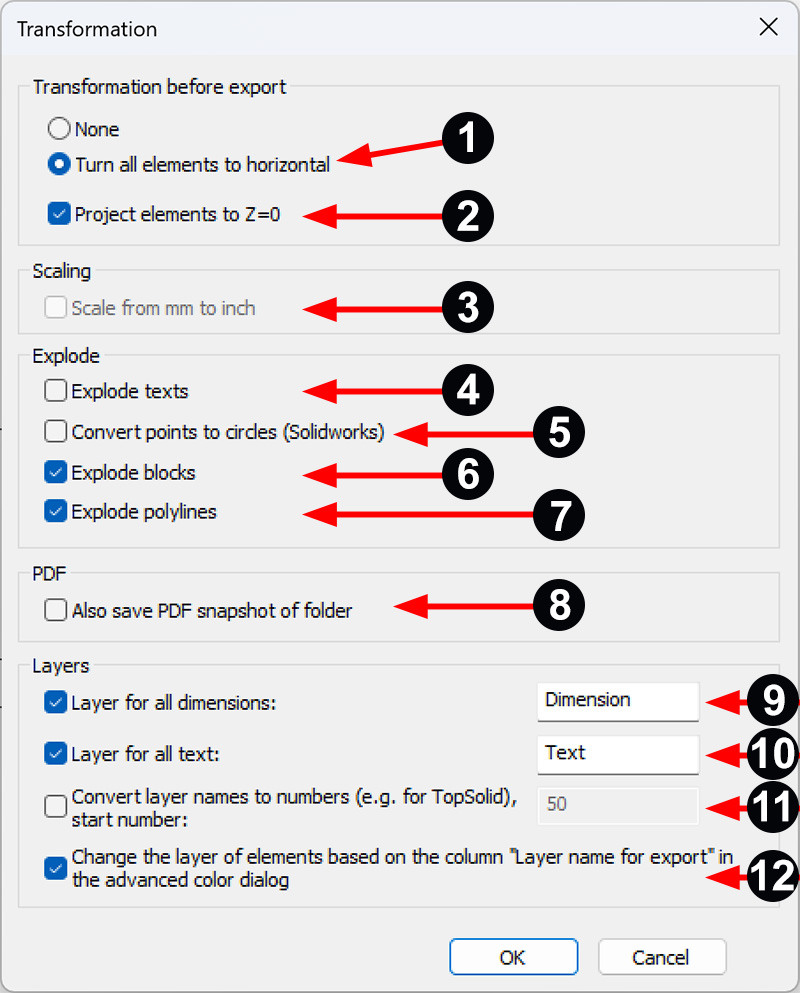
| 1. None/Turn all elements to Horizontal: | With this transformation, elements on vertical/free planes will be rotated to the horizontal X-Y plane. Elements already on a 2D horizontal plane or in a 3D folder will not be affected. |
| 2. Project elements to Z=0: | Elements are 2D-projected/flattened to Z=0. E.g.: If ‘Turn all elements to Horizontal’ is selected, elements on a vertical plane will be rotated to horizontal, and then projected flat to Z=0. |
| 3. Scale from mm to inch: | This option will scale elements from mm to inches. Note: This option is only available with some export formats, and is not generally required. |
| 4. Explode texts | Texts will be exploded to polylines, Not text elements. Only used for exporting to softwares which do not recognize text elements. |
| 5. Converts points to circles (Solidworks) | All points will be transformed to circles during export. Useful for softwares that do not recognize points. |
| 6. Explode blocks | All blocks, including Installation Symbols, will be exploded during export. |
| 7. Explode Polylines | New in version 3.3.7.0. All polylines are exploded during export. |
| 8. Also save PDF Snapshot of folder | A simple PDF snapshot of the folder being exported is saved in the same location as the resulting export. |
| 9. Layer for all dimensions: | Optionally define a layer for all dimensions to be assigned during export. |
| 10. Layer for all text: | Optionally define a layer for all text elements during export. Note: Exploded text is no longer text and therefore not transformed by this option. |
| 11. Convert layer names to numbers (e.g for TopSolid) | Layer names can be converted to numbers, for softwares such as TopSolid that do not like long layer names. The number specified is the beginning number. |
| 12. Change the layer of elements based on the column ‘Layer name for export’ | With this option, elements are assigned to the layer name based on the table in the Advanced Color Dialog. |
Note: If both ‘Turn all elements to horizontal’ and ‘Project elements to Z=0’ are selected on the ‘Transformations’ window, all vertical and free plane folders will be rotated to lay flat on horizontal, their elements projected to Z=0, and they will be tiled out horizontally (not overlapping) on the resulting export file if the option for ‘Arrange elements during export’ is selected in ‘General Preferences’.
To export to user-defined layers per color: (versions 3.2.0.0 and later)
The ‘Advanced Color Dialog’ must be used to export elements to different layers by color. These colors can be assigned a layer name for export. In Flexijet Stone version 3.2 and later, ‘Advanced color dialog’ can be selected from ‘CAD Preferences’ under ‘General Preferences’.
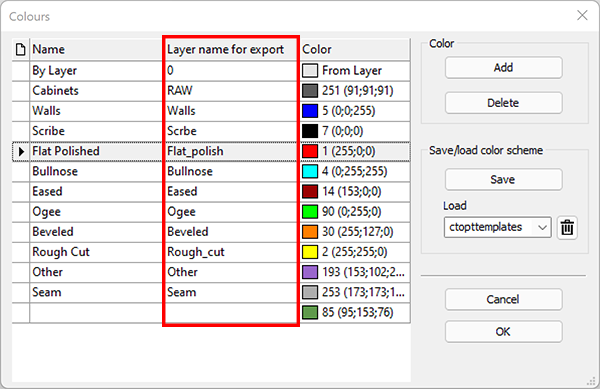
While exporting, select the option ‘Change the layer of elements based on the column “Layer Name for Export” in the advanced color dialog’.

Elements will be exported as per the settings in the Advanced Color Dialog.
To Export Measurement Points:
- From the File button (round FStone/F3D Button), choose ‘General Preferences’
- Select the appropriate options under ‘CAD Preferences>Measurement and Photo Points’
![Export Measurement Points on General Preferences]()
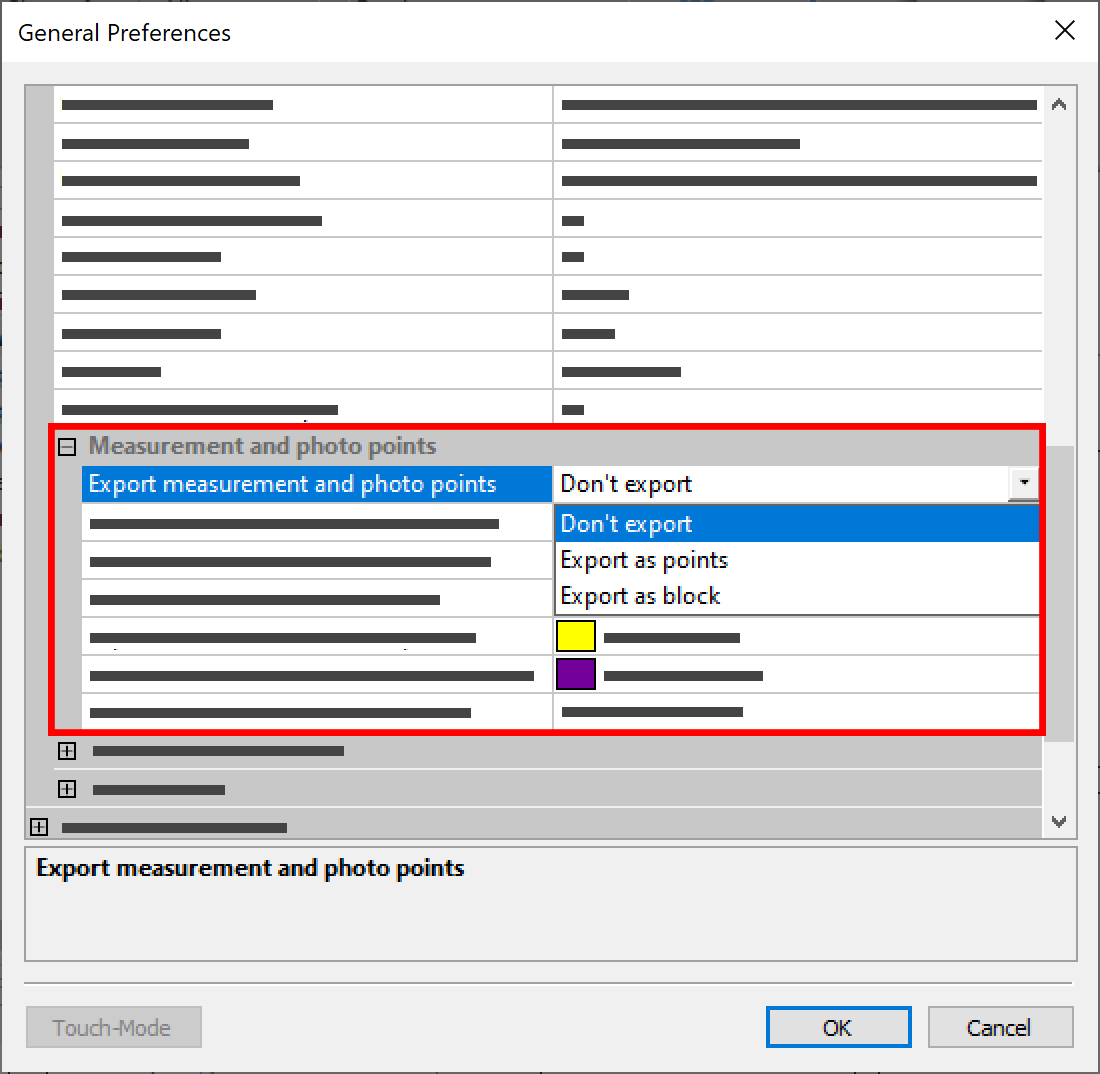
Additionally, the color of exported measurement points can be adjusted in the ‘CAD Preferences’ section of ‘General Preferences’.
Flattening to Z=0 for software versions 3.0.22.0 and earlier:
To flatten objects to Z=0 before exporting,
- Optional: Duplicate folder by right-clicking on the folder and select ‘Copy and Paste Folder”. (This will preserve the 3D data of these measurement points)
- Right-click on the desired folder and select Plane>2D Projection.
- Your folder’s elements have now been flattened to Z=0. Export folder as usual by right-clicking and selecting ‘Export’.
![Flatten to Z=0 Gif]()
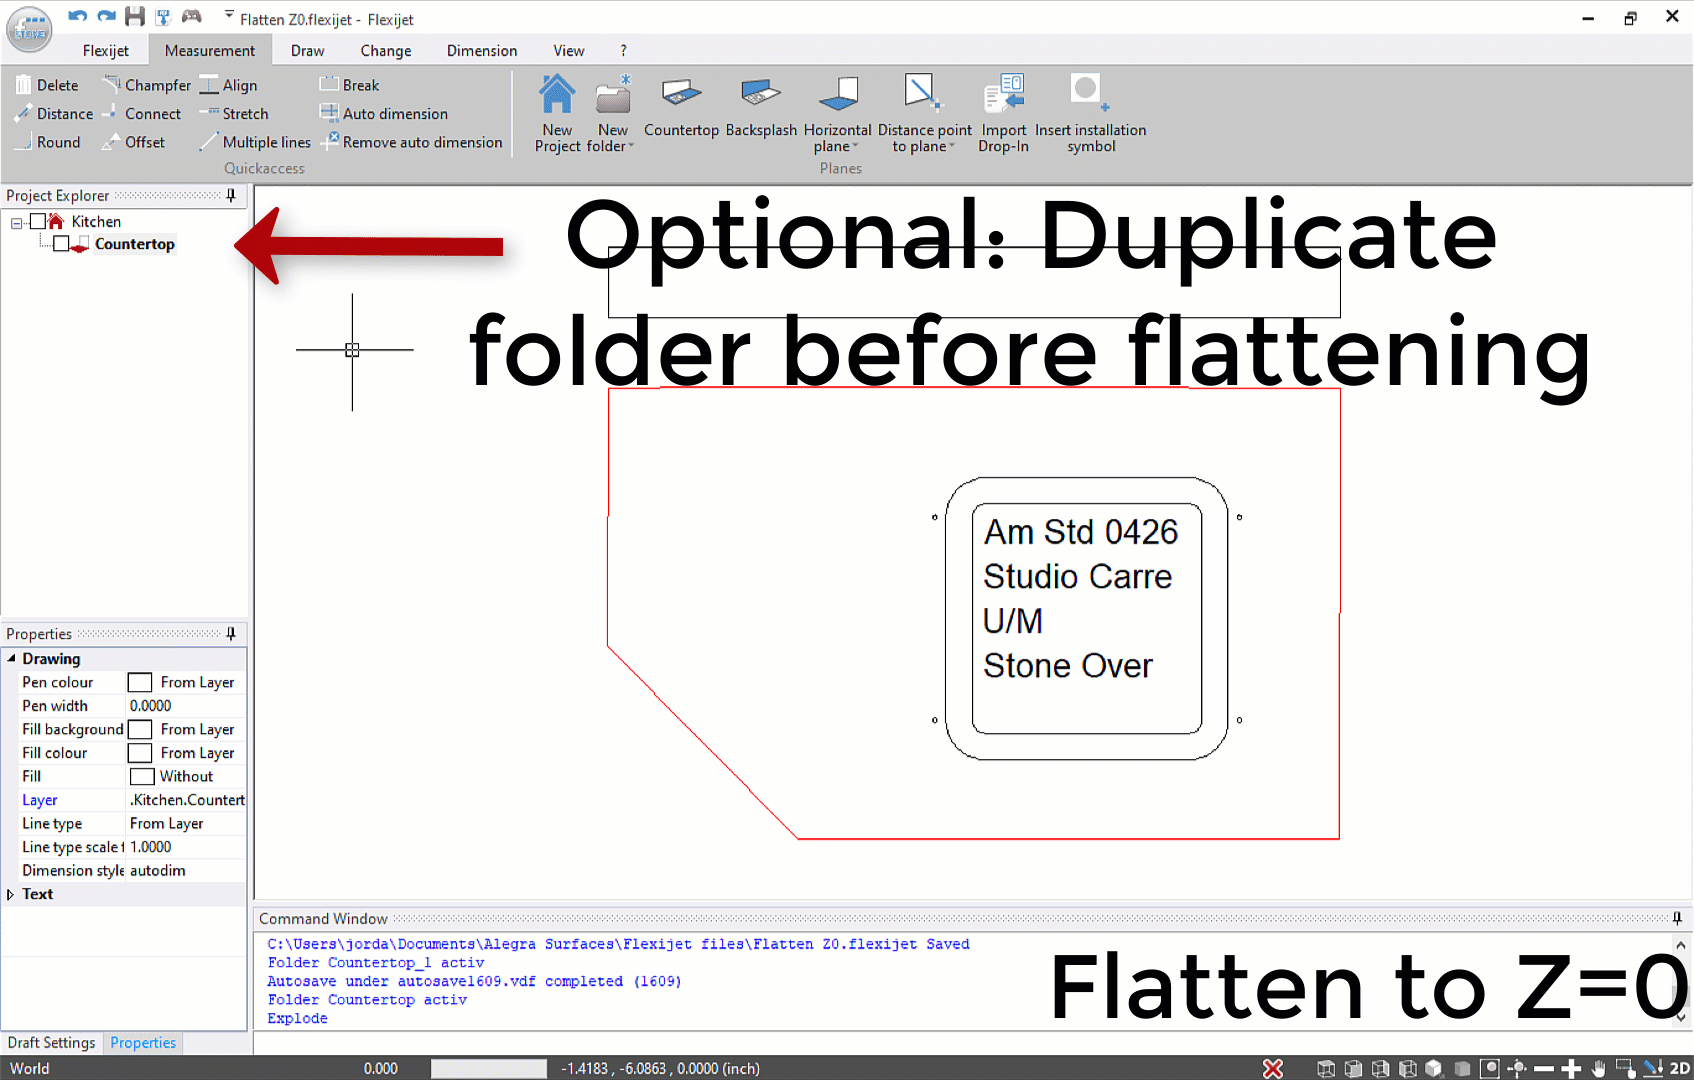
NOTE: performing this command will lose all 3D data in this folder! Recommend Duplicating this folder by right-clicking and selecting ‘Copy and Paste Folder’/‘Duplicate folder’ before flattening to Z=0!
GIF: Exporting an individual folder

GIF: Exporting the entire project
Post your comment on this topic.