If you have a compatible camera ( see Camera Compatibility), the camera shutter can be triggered directly by clicking on the camera icon button from within the application (Preset Documentation and Cue List). The resultant photograph will then be imported directly in to the application.
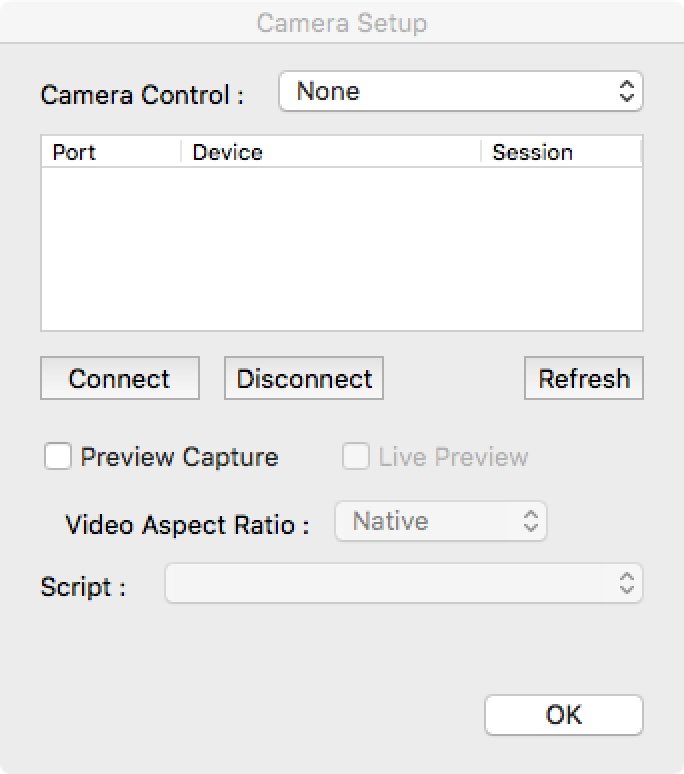
To enable this functionality the camera must first be enabled in the menu Setup->Camera....

| Camera Control | Select a control module to match your make of camera. |
| Port | The computer port the camera is connected to (most commonly USB). |
| Device | Typically The camera make and model. |
| Session | Will display the status of the camera connection. |
To use the camera it is first necessary to select the camera control from the drop-down list of camera drivers. When the camera is now connected and turned on, it should appear in the list of available cameras. Select your camera (by clicking on its name), and then connect to it using the Connect button. If the connection is successful, ‘Open’ will appear in the session column besides the camera.
If you are using a video capture device or camera, see Video Still Image Capture
If you wish to use an iOS device, see Capturing from an iOS Device.
Once connected pictures may be taken and imported directly in to Preset Documentation or Cue List by clicking on the camera icon button.
As each photograph is taken, it is downloaded from the camera and saved onto your computers hard drive. Within the computer users Pictures folder, a CameraDownloads_MLA is created and inside that folder will be a folder with the name of the Moving Light Assistant show document name. For example, if your show document name was Wild Party, the photos would be saved to the folder username/Pictures/CameraDownloads_MLA/Wild Party. Some cameras, when operated in tethered mode, do not store a copy of each photograph on the camera’s memory card. The camera downloads folder may be the only repository of these photographs. Once a photograph has been brought in to the show file, the copy in the camera download folder can be deleted if required.
There is a checkbox option in the setup window to preview each photograph taken before deciding whether or not to include it in the show file.
The camera must be set-up to take photographs in jpeg format. A low resolution will usually be adequate, and will help to keep the overall show file size down.
The ‘Camera Setup dialog’ does not need to be kept open while capturing images from a tethered camera, and is only used to choose and connect to a camera. Once this has been done, the dialog should be closed. The status of the camera is shown in the status bar. An icon will show if the camera is connected (Green = connected, Red = Disconnected). As images are downloaded from the camera, the file name will be shown in the status bar.
Script Triggers
To allow control of cameras not directly supported by Moving Light Assistant, it is possible for a script to be triggered when a photo needs to be taken. In the ‘Camera Setup dialog’, there is a script trigger item in the ‘Camera Control’ drop-down menu.
When selected, the ‘Script’ menu at the bottom of the dialog will be enabled for you to select which script should be run when a photo is to be taken.
On macOS, there is a function available to scripting (RunAppleScript) that can send AppleEvents to other applications running on the same machine. For example you could send an AppleEvent that tells Adobe Lightroom to capture a picture. When used in conjunction with the Moving Light Assistant ‘Image Watch Folder’ capability, this will allow the photo taking process to work in the same way as a camera connected directly to Moving Light Assistant. Using the camera manufacturer’s own control software, depending on how they support AppleEvents or keyboard shortcuts, it may be possible to tell the camera to take a photo and download it to your computer to a specified folder.
In the Moving Light Assistant scripts folder, there are scripts that work with Canon’s EOSUtility 2, macOS Image Capture application, Adobe’s Lighroom, or to simply take a screen shot.
Example using Adobe Lightroom
- Connect your camera to your computer.
- In Adobe Lightroom, choose from the
File Menu, Tethered Capture->Start Tethered Capture.
Set the ‘Session Name’ to the name of your show, for example. - Set the destination folder to be
username/Pictures/CameraDownloads_MLA/
So if your show name was Wild Party, the photos would be saved to the folder username/Pictures/CameraDownloads_MLA/Wild Party.
- Click OK to close the dialog and a control bar should appear to enable you to control your connected camera. You can click the capture button to check your camera is working.
- In Moving Light Assistant, Choose the menu
Setup->Image Watch Folderand in the ‘Image Watch Folder’ window, choose the same folder that you set as the destination in Adobe Lightroom (with the addition of the show name). The ‘Image Watch Folder’ floating window needs to remain open for as long as you want the folder watched.
- Open the ‘Camera Setup’ dialog
menu Setup->Cameraand change the ‘Camera Control’ drop-down menu to ‘Script Trigger’. From the enabled ‘Script’ menu, choose the ‘macOS LightroomCapture’ script.
- Click OK to close the ‘Camera Setup’ dialog.
In the main document window status bar, the ‘Camera Status’ should now be green. At this point, you should be able to click on the green camera icon in the status bar to take a test picture. If the photo the appears in a dialog in Moving Light Assistant then everything is set up to go.


