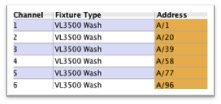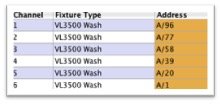
The Patch toolbar button opens a dialog that allows you to patch or un-patch fixtures. The part of the fixture that will be patched or un-patched will be determined by the column in which the fixtures cell is selected.
Moving Light Assistant supports up to five different patches per fixture:
- Fixture start DMX Address
- An external Intensity DMX Address (as in the case of a Vari-Lite VL5)
- An external Colour DMX Address (i.e. a scroller)
- An external Beam DMX Address (i.e. a gobo rotator)
- Supply DMX Address (i.e. a switchable non-dim supply for the fixture)

Patch selected fixtures
‘Patch selected fixtures’ will patch either a single fixture, or a range of fixtures depending upon what has been selected in the Rig Data spreadsheet. Enter the DMX Universe and DMX Address for the first fixture; it will then increment the address as it patches each selected fixture in the spreadsheet. It will patch fixtures in the order the fixtures appear in the spreadsheet, so using different filtering and sorting can allow you to change the order the fixtures will be patched.
The ‘Patch Reverse’ checkbox will start patching the first address to the last selected fixture and increment the address working towards the first selected fixture.
 |
 |
Increment by
The ‘Increment by’ option allows you to choose if the address is incremented by the number of DMX slots for the fixture, or by a specified offset. Note that if the offset is less than the number of DMX slots taken by the fixture, you will end up with overlapping DMX addresses.
Unpatch selected fixtures
‘Unpatch selected fixtures’ will simply un-patch the selected fixture part.
Change Universe
This option allows you to change only the Universe for the selected addresses. Enter the new Universe ID in the DMX Universe edit field.
Click Patch
‘Click Patch’ is a special mode where upon clicking OK to dismiss the dialog, you can patch a fixture (starting at the DMX Universe and DMX Address you specified) by clicking on the Address cell of the fixture (or Intensity, Colour, Beam or Supply Address cell). The mouse cursor will change to a number to show the Address the fixture will be patched to. This allows you to easily patch fixtures in a non sequential or an irregular order. While you are in ‘Click Patch’ mode, at the bottom right of the window ‘Click Patch’ will be displayed in red. To exit ‘Click Patch’ mode, hit the Escape key on the keyboard.
An error message will pop up when you hit the OK button if you have entered any invalid values in the edit fields.


