You can either import directly from the USB memory stick, or copy the ‘report.tar.gz’ archive to the computer’s hard drive.
- Create a new show document, or open the show document you wish to import the data into.
- From the
Filemenu, choose ‘Import Console Data’, ‘grandMA Series 1…’. The import dialog will open.

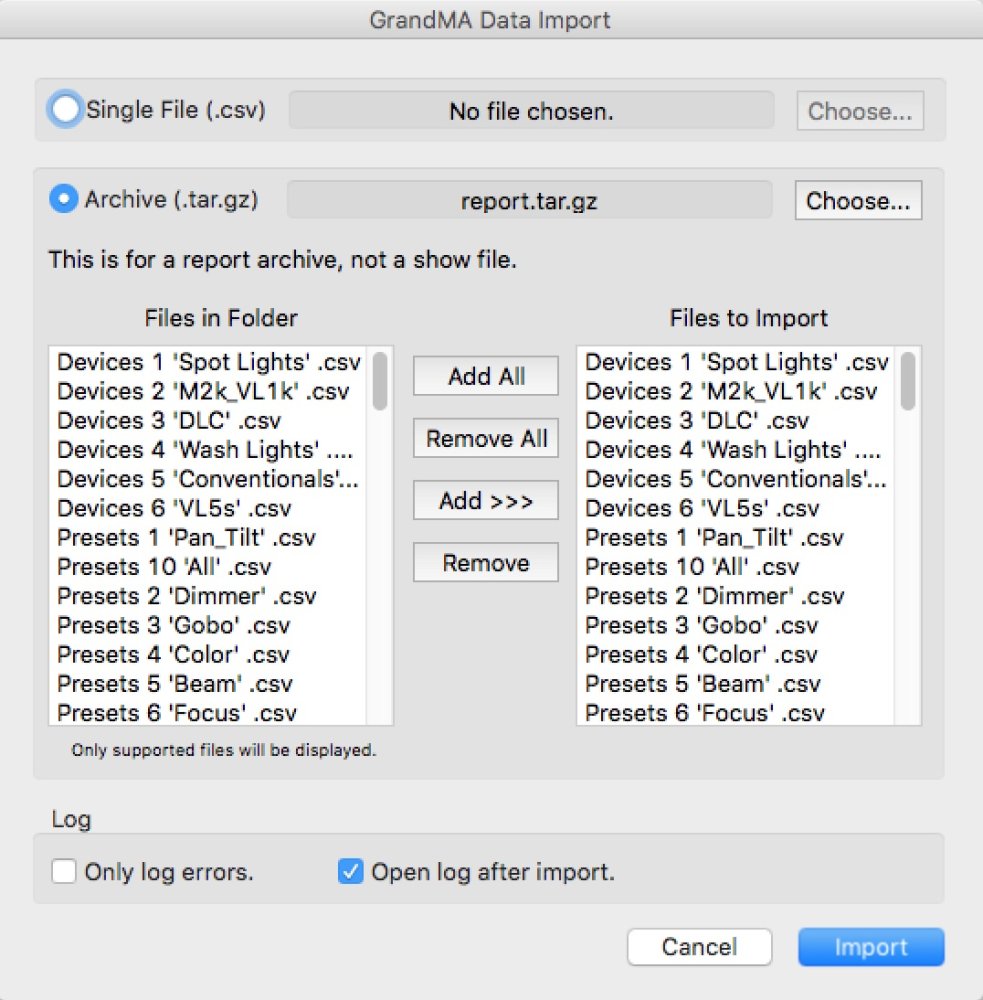
- By default, the dialog will be set to import an archive (.tar.gz). This is normally the best approach. Click the Choose… button to select the archive of the exported data. Unless you have renamed it, the archive will be called ‘report.tar.gz’.
- Once you have chosen the archive, it will be decompressed and the ‘Files In Folder’ list (on the left) will populate with all the files that can be imported. Only the files listed in the right-hand column (‘Files To Import’) will actually be imported. You must now select which files from the folder you wish to import. To move an individual file, you can simply click (to select a file) and drag it to the right hand column, or click the Add>>> button. You can remove files from the right-hand column, by clicking on the file and clicking the Remove button. You can add all the files by simply click the Add All button. Clicking on the Remove All button will do as you expect and remove all the files from the right-hand column. Generally you want all the files, so click the Add All button to add all the files to the ‘Files To Import’ list.
- Click Import to start the import. A progress dialog will appear while the import is done. This may take some time depending on the size of the show.
Results from the import are logged in the ‘Import Log’ tab under the Console Data tab.
If you wish to import a single file, click on the ‘Single File (.csv)’ radio button. Click the Choose… button in the single file area and then select the CSV file you wish to import using the standard ‘Open’ dialog. Once that is complete, click the Import button to start the import. At present, only Devices, Presets and Sequence files can be imported. If you try to import any other type, nothing will actually be imported.
Note that during the import if a sequence file has the same name as an already previously imported sequence file, you will be prompted with dialog warning that the imported data will overwrite the data already held in the database. Click Cancel to not import that file. In the dialog, clicking the Yes to All button will continue overwriting without prompting for each conflict it finds.
Importing Presets and Devices data will remove preset or device data of the same type automatically. If this has occurred it will be logged in the import log.
There are two checkboxes towards the bottom of the dialog which control the logging operation.
‘Only Log Errors.’
Only errors will be logged.
‘Open Log after import.’
Will automatically open the log after the import is completed.


