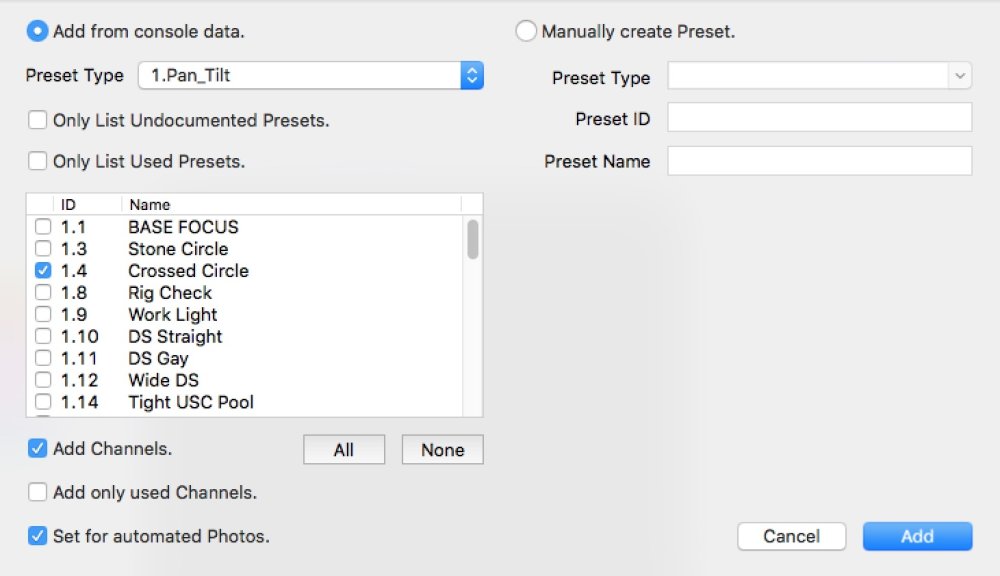
Clicking on the Add Presets button will bring up the following dialog:

Presets can be added from the imported console data or manually created. Creating a preset manually is useful if you are documenting a show on a console that is not supported by Moving Light Assistant. It can also be useful if you need to document a preset and have not had time to re-import the console data.
A preset can exist in the ‘Preset view’ preset list multiple times, by adding it more than once. This is useful if you wish to separate the channels in a single preset into multiple entries in the list.
It is also possible using Add Presets to add groups from the console data. This can be useful if you wish to document conventional focuses with Moving Light Assistant.
Create Preset from Console Data
If console data has been imported, Moving Light Assistant can extract preset information automatically from that data.
- Select ‘Add from console data’.
- In the ‘Preset Type’ drop-down list, select the type of preset to be added.
The contents of this menu will vary by the type of console used, and the data that was imported. If group data has been imported, it is also possible to add a group to the Preset Documentation.
A list of all the available presets of that type will be shown in the list box below.
Only List Undocumented Presets
Check this checkbox if you only wish to see the presets that do not currently exist within the Preset Documentation Preset List, i.e. they have not previously been added for documenting.
Only List Used Presets
Check this checkbox if you only wish to see presets that are actually used in a Cue List, in the Preset List box.
Depending on how large your show is, there will be a delay when you check this checkbox as Moving Light Assistant has to look through all the presets (of the preset type specified), and all the channels, in all the cues, to work out which presets are used.
This feature is useful so you do not end up spending time documenting presets that are not used in the show.
In the Preset List box, using the check boxes against each preset, select the presets to import. Alternatively, use the All or None buttons to select all the presets, or clear all the preset checkboxes.
Add Channels
Adds all the channels recorded in each preset. By default this is checked, as this is what you normally would want to do. If you did not want all the channels, it is best to add them all and then delete the unwanted channels later.
Add only used Channels
When checked, only channels that actually use the preset in a Cue List will be added to the preset. Again, this is useful so that time is not wasted documenting channels that do not actually use a preset in the show. Checking this option will increase the time to complete adding the presets when the OK button is clicked, as Moving Light Assistant has to look up in the console data if a channel uses the preset in any of its cues.
Set for automated photos
In the ‘Presets view’ Channel List, there is an ‘Auto’ column. This is frequently used to determine which channels you want to photograph when running scripts that photograph presets. Checking this check box will set the ‘Auto’ checkbox to checked, the others will be set to unchecked.
Click Add to create the new preset(s). The presets will be added to the Preset List.
Manually Create Preset
If you do not have any imported console data (or old data from a previous import), you can still add a preset, but you will have to fill in the ‘Preset Type’, ‘Preset ID’ and ‘Preset Name’ yourself.
- Select ‘Manually Create Preset’.
- Enter a ‘Preset Type’ from the drop-down list, or enter a new type.
New preset types entered will be available in the drop-down list for later use. Suggested preset types include Pan&Tilt, Preset, Beam, Edge, Colour etc.
- Enter a unique number for the ‘Preset ID’.
Decimal numbers are accepted. It is a good idea to use the same numbering system that the console uses. For example, grandMA consoles use a ‘Preset Type ID’ and then the ‘Preset ID’ separated by a dot – 1.7 for a Pan&Tilt preset (ID 7) and 10.27 for an All preset (ID 27). The ‘Preset Type ID’ may be different in your console show file. The ETC EOS family of consoles do not have a ‘Preset Type ID’, so the ‘Preset ID’ would just simply be the preset number.
- Enter a name for the Preset.
This can be any descriptive name you choose, although generally you would make it the same as the name on the console.
- Click Add to create the new preset(s). The preset will be added to the preset list.


