Unless you are importing rig data from an external application such as Lightwright®, or data from a lighting console, the rig data entry for every new show is begun by adding fixtures.
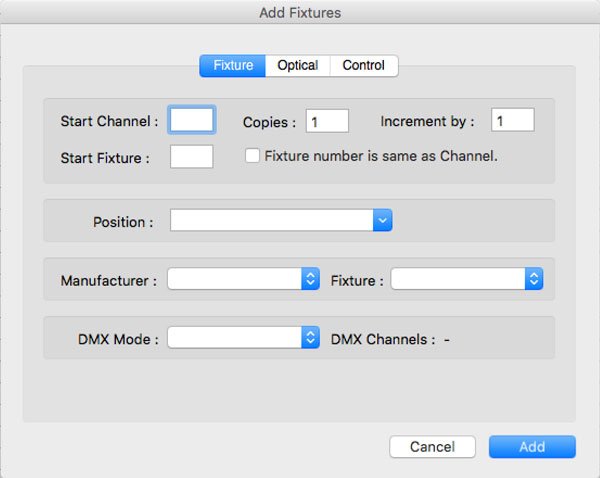
To add a fixture or a range of fixtures, click on the Add Fixtures toolbar button. The following dialog will appear:

‘Add Fixtures’ is also available under the menu Edit->Add Fixtures.
Add Fixtures – Fixture
Fixtures are selected from the Moving Light Assistant library of fixtures. Moving Light Assistant comes with a large library of pre-defined fixtures from a wide variety of manufacturers. Existing fixtures can be edited, or new fixtures added via the menu Manage->Fixture Profile Library.
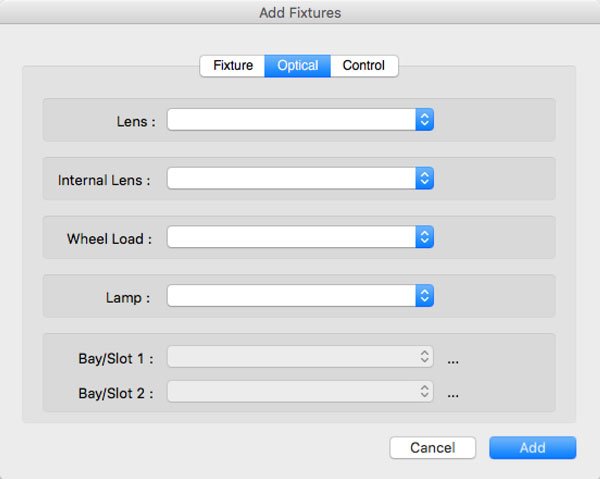
The ‘Add Fixtures’ dialog has three tabs, Fixture, Optical, and Control. The ‘Fixture’ tab is selected by default.
At the very simplest level, it is only necessary to select a fixture manufacturer and then a specific fixture, and click Add, to add a fixture to the Rig Data. All other options will either be left blank, or set to the default option as defined in the Fixture Profile Library. If it is desired, more information can be specified at the time of adding fixtures.
DMX Mode
Once a fixture has been selected, the DMX Mode will be set to the default DMX mode defined by the fixture profile. You can select an alternate mode (if alternate modes are defined) from the list of available modes in the drop-down list. The number of DMX Channels required (the DMX ‘footprint’) for the mode selected will be displayed for information.
Position
This is the hanging position of the fixture being added.
If hanging positions have already been defined then the position may be chosen from the drop-down list of available positions. If positions have not been defined, or a new position is required, then type directly in to the text box. This new position will then be added to the positions library, and be available for future use.
The positions library can be accessed from menu Manage->Positions.
Channel and Fixture Numbers
The Channel or Fixture Number may be entered in the appropriate field. If ‘Fixture Number is same as Channel’ is checked, the Fixture Number field will be automatically populated with the same number as the Channel Number. Alternatively, if you wish, you may enter a separate number for the Fixture Number, or leave it blank.
The choice to use Fixture Numbers may be a personal one, or may be steered by the choice of lighting console used. Moving Light Assistant can support both, but will always use the Channel Number as the primary means of identifying fixtures.
Adding Multiple Copies of a Fixture
It is possible to add multiple copies of a fixture, if required. Simply enter the number of copies required in the ‘Copies’ field. If a channel number has been entered for the first fixture, it is possible to automatically assign channel numbers to the other copies by entering a value in the ‘Increment by’ field.
Add Fixtures – Optical

The fixture optical options defined in the fixture profile will determine which optical options are available. The default options defined in the profile will be selected by as standard, other options may be selected from the drop-down lists. It is not possible to directly enter information in to these fields in this dialog. The optical options must first be defined in the fixture profile.
For more information on fixture optical options, refer to the section on the Fixture Profile Library.
Add Fixtures – Control

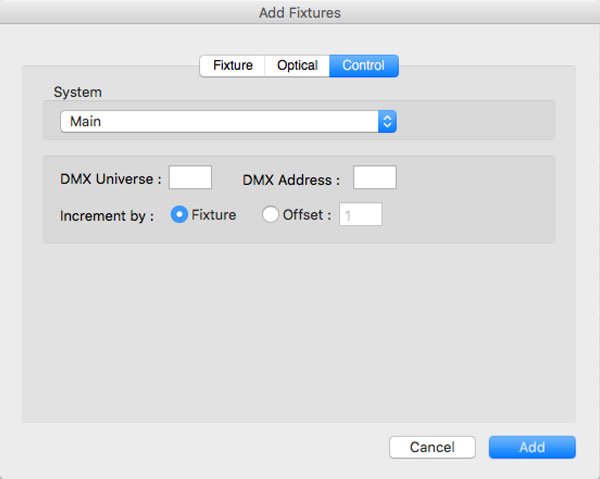
The ‘Control’ tab allows you to provide DMX patch information at the time of adding fixtures. Only the fixture DMX address can be entered here, (not the Beam, Colour, Intensity or Supply Address).
Specify the ‘System’ that the fixtures are connected to. By default, the ‘System’ will be specified as ‘Main’. If other systems have been defined in menu Manage->Systems, they will be available from the drop-down list.
Specify the DMX Universe and DMX Address. These values can be entered in any format you wish, and will be converted to the default format as defined in menu File->Preferences->Console. For example, a DMX Universe entered as ‘3’ will be converted to ‘C’ when displayed in Rig Data if the preferred DMX format is to use letters for universes. Universe 0 cannot be entered unless it is first enabled in File->Preferences->Console.
When adding multiple fixtures, you can define how to increment the DMX Address, either by the number of fixture DMX slots (Fixture radio button) or manually enter the DMX Offset (Offset radio button). The DMX offset in the offset field will be based upon the DMX mode selected under the Fixture tab.
Use of this feature can greatly speed up rig data entry where many fixtures have identical configurations, with perhaps only the channel number and DMX address changing.


