The grandMA2 exports its data as a series of XML files. To make the process of exporting from the console easier, a macro has been created that can be imported into your grandMA2 show file that will export all the information that Moving Light Assistant needs.
Steps to Import Macro into Console
Within the Moving Light Assistant installation folder, there is a ‘grandMA 2 Support’ folder. Within this folder is a ‘gma2’ folder that should be dragged onto a USB memory stick. Once this is done, eject the memory stick and insert the stick into the console (or the computer running grandMA2 onPC). To import the macro into your show file, do the following:
- Insert the USB memory stick with the macro on into the console or the computer running grandMA2 onPC.
- On the console (or onPC), press the Setup button.
- In the ‘Setup window’, under the Console tab (the first tab), press the Import Export button.
- Press Import.
- Press Macros.

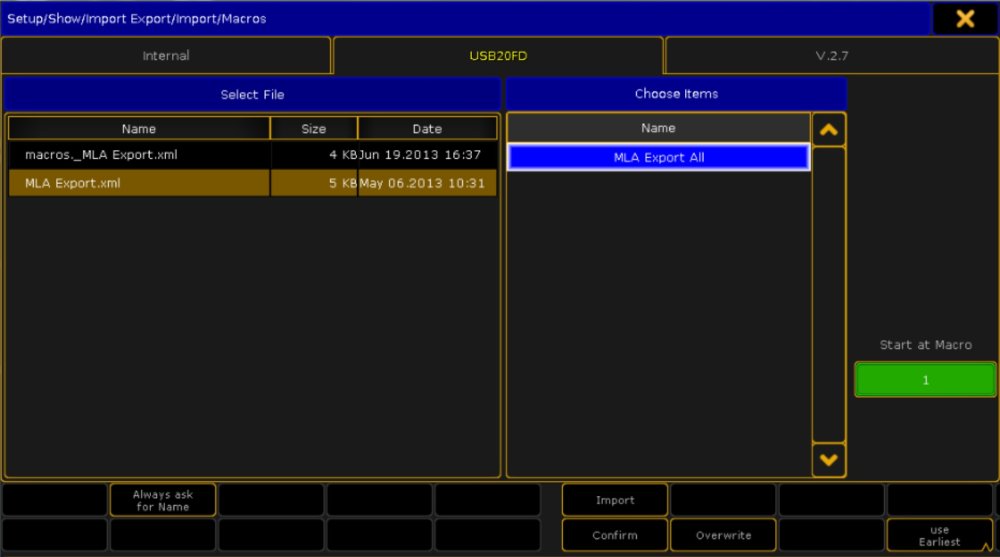
The dialog shown above will appear. You will need to choose your USB memory stick from the tab at the top of the dialog.
- Select the ‘MLA Export.xml’ file from the ‘Select File’ list, and then select the ‘MLA Export All’ item from the ‘Choose Item’ list.
The button on the right, ‘Start at Macro’ will show the number of the macro the selected item will be imported as. You can click on the button to change the number, or click the Use Earliest button if needed.
- Finally, click the Import button.
Exporting the Data
Once you have imported the macro into your show file, to use the macro, you a need to first select the USB memory stick to export to. There are two ways to do this. The first method is to press the Backup key and then select the USB memory stick from the drive tabs at the top of the window. The second method is to type SelectDrive 4 on the command line. Now running the macro (either by pressing the macro in the ‘Macro Pool’, or typing the macro command on the command line). The macro will take a few minutes to complete. Once the macro has completed, remove the USB stick and insert into the computer running Moving Light Assistant.
Modifying the Macro
There may be times you need to modify the macro. The macro will only export the first 30 fixture types. If there are more than 30 fixture types you will need to add commands to the macro.
Add a line to the macro:
Export FixtureType 31 "mla_fixture_Type_31"
You will need to change the fixture type and the file number, in this case to 31 (incrementing for each line you add for each fixture type).
You can also edit the XML file directly before you import into the console if you wish. Add the following text, making the same changes to the fixture type and file number:
<Macroline index="41">
	<text>Export FixtureType 31 "mla_fixture_Type_31"</text>
</Macroline>
You will also need to update the <Macroline index=”41”> for all the lines after the added line so that the index number is numerically sequential and that there are no duplicates or gaps.
The macro will export the first 999 preset objects for each preset type. If you have more than 999 presets you will need to adjust the macro:
Export Preset 0.1 thru 0.999 "mla_presets_all"
to perhaps
Export Preset 0.1 thru 0.2000 "mla_presets_all"
You can either add the line to the macro on the console, or edit the XML file as outlined for fixture types above.
Another change you may need to make is to export any preset types you have created yourself. For example, if you have added a preset type number 11 called ‘images’, you may want to add:
Export Preset 11.1 Thru 11.999 "mla_presets_images_11"
You can either add the line to the macro on the console, or edit the XML file as outlined for fixture types above.


