
Once features are traced, a deep learning model can be trained. This example shows how to train a deep learning model and assumes tracing has been completed as shown in either of the tracing examples.
Downloads
You may download the sample session file and reference images to use as learning tools and follow this example.
⇩ Session File (unzip > open .ssn2 file in AI Session Processor)
Load Images
Launch the AI Session Processor.
If you already have a Session file saved, load it using Load Session, or by dragging and dropping. Session files are cross-compatible between the AI Session Processor and Session Processor.

OR
Drag and drop reference images to “Reference Images” panel to add.

Drag and drop B/W tracings to “B/W Images” panel to add as Layer. Name Layer when prompted and click “OK”.


Repeat for as many Layers as needed.
If necessary, use the dropdown arrow next to the + followed by Add Inverse of All Layers to add a background Layer. Name the Layer and click “OK”. You’ll usually choose “No” when asked if you want to erode after inversion. This will add all undefined pixels as another Layer.


Configure Settings
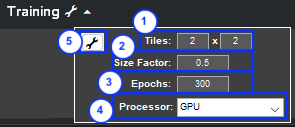
1. Tiles
Grid spacing to split each image into tiles prior to training, defined as columns x rows. This reduces memory load on the GPU and provides more data to the training algorithm, which tends to produce better results. (Example: Tiles = 3×2 splits each image into 6 sub-images, 3 columns across by 2 rows down)
2. Size Factor
Resize factor for training images (0-1). This reduces GPU memory load and significantly speeds up training times. A factor up to 0.5 can often be used and still provide adequate precision.
3. Epochs
Number of passes through all the images to run training for. The below table offers some recommendations based on your amount of training data:
| Number of Training Sub-images | Epochs |
|---|---|
| < 200 | 500-700 |
| 200-500 | 300-500 |
| 500-1000 | 100-300 |
| > 1000 | 50-100 |
4. Processor
- GPU: Train model on the GPU (strongly recommended — see Deep Learning System Requirements for more information). Active GPU is set in “GPU Computation” panel in File > Preferences.
- CPU: Train model on the CPU
5. Advanced Settings
Access to additional parameters to help tune the trainer for model accuracy, model robustness, and training performance. See Advanced Settings for full documentation.
Train Model
Click Train New to begin training. It may take several seconds to initialize. When training begins, progress percentage and time remaining will display above the “Training” panel.

You may click Stop Training at any time to stop the training. The current state of the model will be preserved and you will be able to save it.
When training is complete, click Save Model to save model as a .dlm (MIPAR Deep Learning model) file.

See Applying for information on applying the model.
Need more help with this?
Chat with an expert now ››