All objects added to composite shot timelines exist as layers. All layers, on all composite shot timelines, share some common controls.
Expanding Layers ![]()
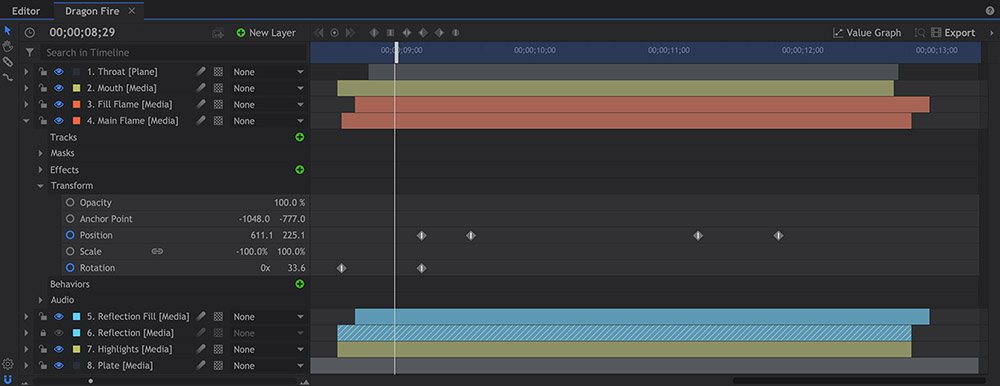
Layers on the timeline can be expanded to reveal more details using the triangular arrow icon. Each layer contains sub-groups so that you can quickly find the details you need. Tracks, masks, effects and transform data are all grouped separately.
Some layers will have additional groups. For example, 3D layers include a Material group for adjusting their 3D lighting behavior.
Customizing Settings
A layer’s settings can be adjusted on the timeline or in the Controls panel. While all layer controls can be seen simultaneously on the timeline, only the currently selected layer is displayed in the Controls panel. This allows you to focus on the controls of a specific layer, and in some cases makes room for a richer controls interface. Double-clicking a group or property in the timeline or controls panel will open it in the other area.
For more information about changing settings over time, see Animating with Keyframes.
Layer Properties
All layers have a layer properties group in the controls panel. Many of these options are also available on the timeline, using the icons shown. The specific options available will vary depending on the type of layer, but common options include:
![]()
![]() Lock: Toggles the editable state of the layer. When a layer is locked, it cannot be altered or edited in any way, unless it is first unlocked.
Lock: Toggles the editable state of the layer. When a layer is locked, it cannot be altered or edited in any way, unless it is first unlocked.![]()
![]() Visible: Toggles the layer’s visibility on and off. Invisible layers will not appear in the viewer and will not be included in any exports., but can still be used as a reference for other layers and effects.
Visible: Toggles the layer’s visibility on and off. Invisible layers will not appear in the viewer and will not be included in any exports., but can still be used as a reference for other layers and effects.- Mute: If the layer contains audio, the Mute option will be displayed. Tick the box to silence all audio contained in the layer.
- Show Waveform: For layers containing audio, enabling this option displays the waveform on the timeline.
![]()
![]()
![]() Dimension: Switches the layer between 2D and 3D. Embedded composite shots, 3D models and particle simulators also have the 3D unrolled option. More information can be found in The Render Pipeline.
Dimension: Switches the layer between 2D and 3D. Embedded composite shots, 3D models and particle simulators also have the 3D unrolled option. More information can be found in The Render Pipeline.
![]() 2D: When set to 2D layers behave like a flat sheet of paper, always facing the camera. When the layer is created from a 3D source, such as a 3D model or a particle simulator, the 3D contents of the layer can be edited internally, but can not interact with any other layers. For example, you can orbit a camera around a 3D object to change the angle that is visible, but the rendered result of the layer is a 2D element, and its interactions with other layers is determined solely by its position in the layer stack (Z-depth is not a factor).
2D: When set to 2D layers behave like a flat sheet of paper, always facing the camera. When the layer is created from a 3D source, such as a 3D model or a particle simulator, the 3D contents of the layer can be edited internally, but can not interact with any other layers. For example, you can orbit a camera around a 3D object to change the angle that is visible, but the rendered result of the layer is a 2D element, and its interactions with other layers is determined solely by its position in the layer stack (Z-depth is not a factor).
![]() 3D Plane: 3D plane takes the 2D version and renders it as a 3D plane inside the 3D space. In the case of videos, images and planes this is like having a flat piece of card, which can be rotated in any direction relative to the camera. With 3D objects and particle simulations it is like looking through a window onto a 3D scene. The 3D plane exists in 3D space, so its interactions are determined by its position in 3D space. In the case of 3D objects and particle simulations note that it is the flat 3D plane which exists in 3D space, not the plane’s contents.
3D Plane: 3D plane takes the 2D version and renders it as a 3D plane inside the 3D space. In the case of videos, images and planes this is like having a flat piece of card, which can be rotated in any direction relative to the camera. With 3D objects and particle simulations it is like looking through a window onto a 3D scene. The 3D plane exists in 3D space, so its interactions are determined by its position in 3D space. In the case of 3D objects and particle simulations note that it is the flat 3D plane which exists in 3D space, not the plane’s contents.![]() 3D Unrolled: 3D unrolled renders 3D content directly into the 3D space. Multiple 3D unrolled layers will accurately interact with each other in 3D space. This is the unified 3D space and enables powerful interactions – for example, you can position a green screened actor directly inside the cockpit of a 3D model helicopter, without needing any layering tricks.
3D Unrolled: 3D unrolled renders 3D content directly into the 3D space. Multiple 3D unrolled layers will accurately interact with each other in 3D space. This is the unified 3D space and enables powerful interactions – for example, you can position a green screened actor directly inside the cockpit of a 3D model helicopter, without needing any layering tricks.- Alignment: Provides various auto-alignment options. Along Motion Path aligns the layer according to its motion (this can be effective if your layer has a define ‘front’, such as an arrow shape). Towards Target Position keeps the layer aligned towards a specified point in space. Towards Layer keeps the layer aligned towards a specified layer.
- Blend: Changes how the layer is blended onto layer below.
![]() Motion Blur: Activates motion blur for the layer.
Motion Blur: Activates motion blur for the layer.- Parent: Links the layer’s transform to another layer. Ordinarily a layer’s transform is relative to the center of the scene. Parenting changes this so that the layer’s transform is relative to the selected parent layer.
- Include in Depth Map: Includes or excludes the layer when generating the depth map for the composite shot. This is important if the composite shot exists as a 3D Unrolled layer on another timeline.
- Depth Source Layer: For 3D models or 3D effects, this option selects another layer within the composite shot as the source of the depth map. The depth map acts like a mask, and the layer is only rendered where it is nearer to the camera than the information in the depth map.
- Promote Lights: On embedded 3D composite shots containing lights, enabling this option allows the lights to affect 3D layers in the parent composite shot.
Changing Layer Order
Once you’ve created more than one layer you can reorder them be dragging them up and down in the layer list (on the left side of the timeline).
You can move multiple layers at the same time by Ctrl- or Shift- clicking them.
Timeline Tools
![]() The Select Tool: The Select tool enables trimming and moving of layers. The icon will change based on the location of the cursor, indicating the function which will be used.
The Select Tool: The Select tool enables trimming and moving of layers. The icon will change based on the location of the cursor, indicating the function which will be used.
![]() Moving: To move a layer backwards or forwards in time, drag its colored duration bar on the timeline.
Moving: To move a layer backwards or forwards in time, drag its colored duration bar on the timeline.![]() Trimming: Dragging on the start or end of a layer will trim its duration. When a layer is trimmed you can see a dimmed representation of the layer’s original duration.
Trimming: Dragging on the start or end of a layer will trim its duration. When a layer is trimmed you can see a dimmed representation of the layer’s original duration.
![]() The Drag Tool:* The Drag tool is used to move the visible portion of the timeline, without altering its contents. It serves the same function as the scroll bars at the right side and bottom of the timeline, but is often a faster option, as you can select the tool with a keyboard shortcut (H), and adjust the view from anywhere, rather than needing to move the mouse to the scroll handle.
The Drag Tool:* The Drag tool is used to move the visible portion of the timeline, without altering its contents. It serves the same function as the scroll bars at the right side and bottom of the timeline, but is often a faster option, as you can select the tool with a keyboard shortcut (H), and adjust the view from anywhere, rather than needing to move the mouse to the scroll handle.![]() The Slice Tool: The Slice tool is used to cut layers into two separate layers. The layer will be sliced at the frame where you click.
The Slice Tool: The Slice tool is used to cut layers into two separate layers. The layer will be sliced at the frame where you click.![]() The Rate Stretch Tool: Using the Rate Stretch tool to change a layer’s in or out point will retain the contents of the layer and change its playback speed to fit into the newly defined space on the timeline. Retiming can be used to speed up or slow down playback for specific layers.
The Rate Stretch Tool: Using the Rate Stretch tool to change a layer’s in or out point will retain the contents of the layer and change its playback speed to fit into the newly defined space on the timeline. Retiming can be used to speed up or slow down playback for specific layers.
- For example, dragging the out point of a layer so that the layer on the timeline is twice as long will cause the layer to playback at half speed.
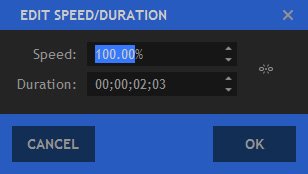
- You can also use the Speed/Duration option in any layer’s right-click menu to perform a more precise speed adjustment. This displays the Edit Speed/Duration window:
![]()
- The two properties, speed and duration, can be linked or separated using the chain icon at the right. The behavior is subtly different depending on the link state. When unlinked, as in the picture above, changing the speed will retain the layer’s in and out positions on the timeline while changing the playback speed of the layer’s content. Changing the duration will change the out point of the layer without affecting its playback speed. When the two properties are linked together, changing the speed will also automatically update the duration, moving the out point of the layer to accommodate the same contents at the new speed. For example, a 2 second layer on the timeline when changed to 50% speed will have a new duration of 4 seconds. Alternatively, you can change the duration and the speed will be automatically changed to fit the layer’s contents perfectly into the new duration.
![]() Snapping: The Snap button can be used to turn snapping on and off. Snapping ensures that layers connect directly with no blank frames in-between. Layers snap to other clips and to the playhead.
Snapping: The Snap button can be used to turn snapping on and off. Snapping ensures that layers connect directly with no blank frames in-between. Layers snap to other clips and to the playhead.
 The Slice Tool: The Slice tool is used to cut layers into two separate layers. The layer will be sliced at the frame where you click.
 The Rate Stretch Tool: Using the Rate Stretch tool to change a layer’s in or out point will retain the contents of the layer and change its playback speed to fit into the newly defined space on the timeline. Retiming can be used to speed up or slow down playback for specific layers.