
 Auto Stabalizer is available in the Pro tier.
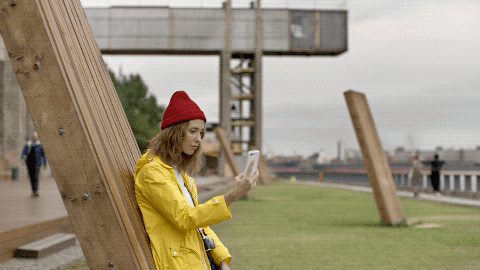
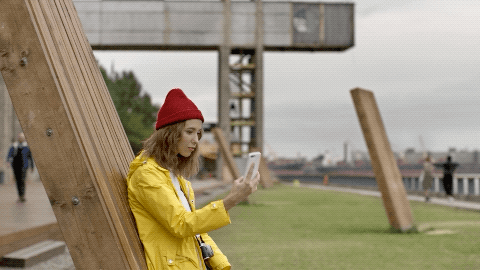
Auto Stabilize automatically removes unwanted shake from video clips filmed with a moving camera. This allows you to retain the overall motion of the camera, while suppressing any jitter that can distract from the contents of the shot. This allows you to create smoothly moving shots from shaky, handheld source video.
Using Auto Stabilizer
Since the effect is automatic, the most basic use case simply involves applying the effect to your video on the timeline, and waiting a moment for it to analyze the contents of the video. Once analysis is complete, the results will be calculated and applied automatically by the software.
- Add the Auto Stabilize effect to any video clip on the editor or on a composite shot timeline. HitFilm will being analyzing the layer automatically, to determine the motion data.
- Once the analysis is complete, HitFilm will calculate and apply the optimum smoothing using all reliable tracking points, to create stable, smooth movement. If you wish to adjust the smoothing, to control exactly how much of the original jitter is removed or retained, you can adjust the properties of the effect to do so.
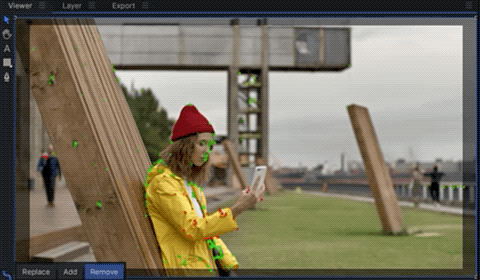
- If you wish to only use tracking features from a specific area of the video, you can drag around the desired area on the viewer to select the features within that area.
Controls
The controls displayed in the Controls panel and on the timeline vary based on the Mode selected. The default and primary mode is Stabilize, which automatically smooths the video with very little interaction from the user. The second mode is Feature Track, which analyzes the footage in the same way, but does not automatically apply it to the video. Instead, it leaves the user in control of how the motion tracking data is used.
Stabilize Mode
- Mode: Choose the mode used by the effect, which determines whether the stabilization is applied automatically or manually.
- Stabilize: Stabilize smooths the camera motion automatically, without requiring any interaction from the user. The results can be adjusted if the user desires.
- Feature Track: Feature Track analyzes the motion in the video, and stores it. The user can then choose which tracking features are used to create the smoothed motion path.
- Crop Window: In order for stabilization to be applied, the scale of the source video needs to be increased, so the edges to not become visible as the video’s position is altered to counteract the jitter. Crop Window determines how much the effect crops into the source video. Higher values mean more smoothing can be applied.
- Smoothness: Smoothness controls the strength of the motion smoothing. Lower values mean more of the original jitter is retained. The amount of crop applied will automatically be adjusted based on the Smoothness setting, to ensure as much of the source video as possible remains visible.
- Stabilize: Choose wether the viewer shows the final stabilized result, or a preview of the motion smoothing.
- On: Stabilization is applied, so you see the final result in the viewer.
- Off: Displays a preview of the effect, showing the crop area in relation to the original video. The track points are also indicated, and color coded to indicate their reliability.
![]()
Feature Track Mode
- Mode: Choose the mode used by the effect, which determines whether the stabilization is applied automatically or manually.
- Stabilize: Stabilize smooths the camera motion automatically, without requiring any interaction from the user. The results can be adjusted if the user desires.
- Feature Track: Feature Track analyzes the motion in the video, and stores it. The user can then choose which tracking features are used to create the smoothed motion path.
- Reset Tracking Features: Resets the feature selection to the default.
- Apply To: This menu allows you to select another layer from the timeline to which the smoothing will be applied.
- Create Point Layer: Automatically generates a new point layer on the timeline, and applies the smoothing to the point. This allows you to apply the smoothing to as many layers as you wish.
Viewer controls
The motion Track behavior viewer controls will appear in the bottom left corner of the Viewer when the effect is applied. The specific information displayed will change based on the current state of the Motion Track process.
- Please select video to be tracked: This notification indicates that you need to choose a video layer using the Motion From property in the controls panel.
- Footage Analysis: While the footage is being analyzed, the progress will be displayed.
- Replace: Click this button to ignore the area you previously drew around, and select a new area.
- Add: Click this button to retain the current selection, and add to the area which is tracked.
- Remove: Click this button to switch to subtractive mode. You can then drag around selected points to remove them from the selection.