
The Crop & Pan effect is used to change the framing of your source media. It provides two modes of doing this, as indicted by the title.
- Crop allows you to specify the portion of your media that you wish to see, and then auto-scales that area to fill your frame.
- Pan & Zoom adds animation abilities, so the position or size of the visible area can be altered over time.
When the effect is added to a clip, two buttons will appear in the bottom left corner of the Viewer, allowing you to choose which mode is used.
Controls Panel
The primary tools for controlling your crop are found on the viewer, but there are additional properties which can be accessed through the Controls panel. The viewer controls for each mode will be examined in detail further down this page.
- Aspect Ratio: Choose the aspect ratio of the crop area. Typically you will want this to match your timeline, but if you prefer a different shape, you can choose the aspect ratio you need here.
- Timeline: Constrains the crop area to the aspect ratio of the active timeline.
- Original: Constrains the crop area to the original aspect ratio of the clip being cropped.
- *16:9: Constrains the crop area to a standard 16:9 widescreen aspect ratio.
- 4:3: Constrains the crop area to the 4:3 aspect ratio of traditional television.
- 1:1: Constrains the crop area to a square aspect ratio.
- 9:16: Constrains the aspect to a vertical aspect ratio.
- Custom: Allows you to specify any aspect ratio you desire. using the Custom Aspect Ratio controls which appear when this option is selected.
- Width: Specify the width pf the crop area in pixels
- Height: Specify the heigh of the crop area in pixels.
- Autozoom: Determines the size of the cropped area when the effect is applied.
- Enabled: The crop area is scaled up to the largest size which will fit within your timeline resolution.
- Disabled: The original scale is used, so the crop area remains at its original size and position, and all portions of the layer outside the crop area are removed.
Crop Mode
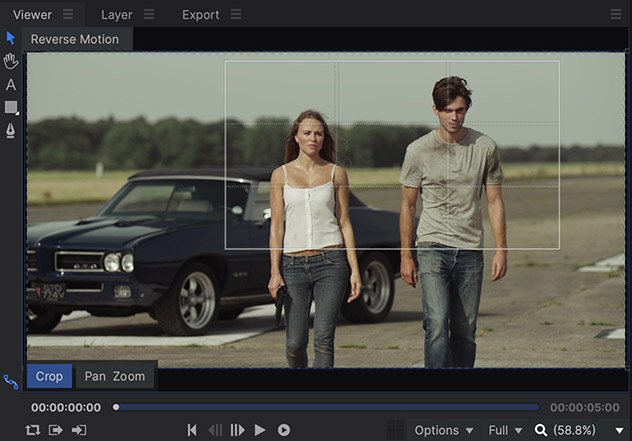
Crop, the default mode of the effect, overlays a white rectangle onto the viewer, which is the Crop Boundary. The area within the Crop Boundary is the Crop Area. Drag the edges or corners of the Crop Boundary to resize it and define the portion of the source media which you want to be visible. Here the white Crop Boundary has been resized and positioned to focus the shot on the two actors.
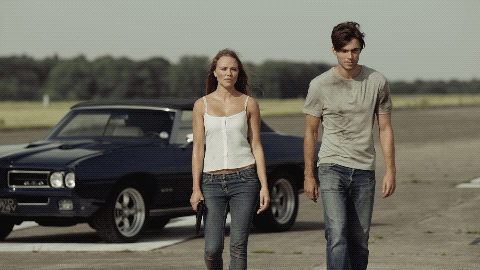
Once you click out of the effect controls, the crop will be applied. In this instance, compare the original clip on the left with the results of our crop on the right.

Pan & Zoom Mode
If you don’t want the crop area to remain the same size, or in the same position, throughout the duration of the clip, you can switch to Pan & Zoom mode to animate the crop area. When Pan & Zoom mode is enabled, two Crop Boundaries will be displayed on the Viewer. The green crop boundary is the Start Crop, and the red boundary is the End Crop. HitFilm will automatically generate the animation to move from one crop to the other. Click inside of either boundary to select it for editing.
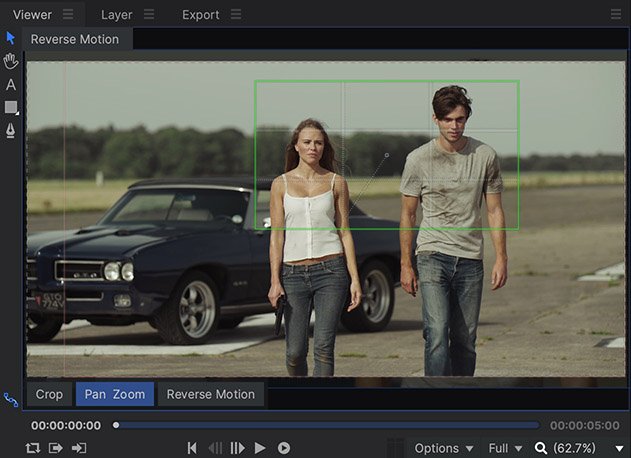
- Green Crop Boundary: The green boundary defines the crop which will be applied on the first frame of your layer. Click inside the green box to select it for editing, and the playhead will automatically jump to the first frame of your layer.
- Red Crop Boundary: The red boundary defines the crop that will be applied on the final frame of your layer. Click inside the red box to select it for editing, and the playhead will automatically jump to the last frame of your layer.
In this example, we have started with a similar framing to our crop example above, as shown by the green box around the two actors. The larger red box is nearly the full size of the original media, so HitFilm will gradually animate the position and size of the frame to reveal a wider shot.
When the Pan & Zoom mode is active, two additional buttons are displayed on the Viewer.
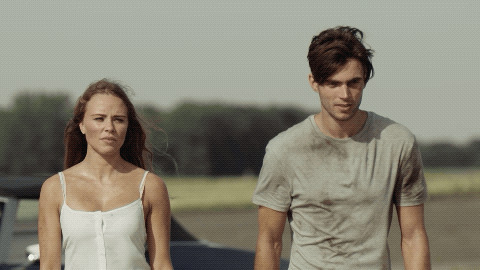
- Reverse Motion: Click this button to swap the Start Crop and End Crop, so that the motion of your pan & zoom is reversed. In our example, this would create a shot which starts wide, then moves in closer on our two actors.
- Add Keyframe: When the playhead is moved to any frame between the first and last frames of the layer, this button will appear. In some instances, start and end keyframes may not be enough. Move the playhead to any other frame where you want to add an additional keyframe, and click this button. A new white crop boundary will appear, and you can edit the crop for that frame.