
There are several ways to add clips to your timeline.
If you want to preview or trim clips before adding to the timeline, see Trimming assets.
Placing Clips
Media assets can be dragged directly from the Media panel onto the timeline. A green outline will be displayed showing where the clip will be dropped. While you are positioning the clip the Viewer panel displays adjacent frames from any other clips on the timeline, so that you can accurately position the new clip within an existing sequence.
Adding a clip uses an Overlay Edit, whereby the new clip is placed at your chosen position, replacing any clips on the occupied frames.
Holding SHIFT while adding a clip uses an Insert Edit. Any clips that are already in the chosen area are sliced at the in point of the new clip and moved to the right, with the new clip being placed in the gap.
When placing a media asset which includes both audio and video content, holding ALT (OPT on Mac) will place only the video or only the audio, depending what type of track the cursor is positioned over when you release the mouse button.
The New Clip Menu
Non-media assets can be created and added to the timeline using the New Clip menu found at the top of the timeline.
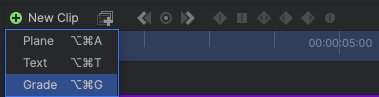
- Plane: Creates a colored rectangular shape and adds it to the timeline at the playhead, on the lowest empty video track. Planes are also listed in the Media panel for easy re-use. Planes serve as excellent empty hosts for other effects. Also known as ‘solids’.
- Text: Creates a text clip and adds it to the timeline at the playhead, on the lowest empty video track.Text clips can be freely positioned and customized heavily using effects.
- Grade: Creates a grade clip and adds it to the timeline at the playhead, on the lowest empty video track. Grade clips allow you to apply effects to all clips and layers below them, making it easy to apply effects to multiple clips at once. They are effective for applying an overall look to all of the clips in your sequence at once.
Snapping ![]()

The Snap button can be used to turn snapping on and off. Snapping ensures that clips connect directly with no blank frames in-between.
Clips snap to other clips and to the playhead.
You can also jump the playhead to the start or end of clips using the Page Up and Page Down keys.
- Page Up: Advances the playhead to the frame containing the next edit.
- Page Down: Moves the playhead backward to the frame containing the nearest preceding edit.
Automatically Creating New Tracks
You can automatically create a new track when placing a new clip by dropping it onto the blank area above or below the numbered video and audio tracks. This will create a new track and place the clip onto it.
For more information on working with tracks, read the Using audio and video tracks chapter.