
Organizing Assets in the Media Panel
The Media Panel features several tools for keeping your imported media organized, even in complex projects.
Listing Modes ![]()
![]()


The Project Media listing can be switched between a list view or a thumbnail view. Thumbnails can be useful for identifying videos and images at a glance, while the list view allows more items to be visible at once.
Searching Project Media ![]()

If you are looking for a specific asset and know its name, you can type it into the Search bar. As you type the list will be dynamically updated to display all matching results.
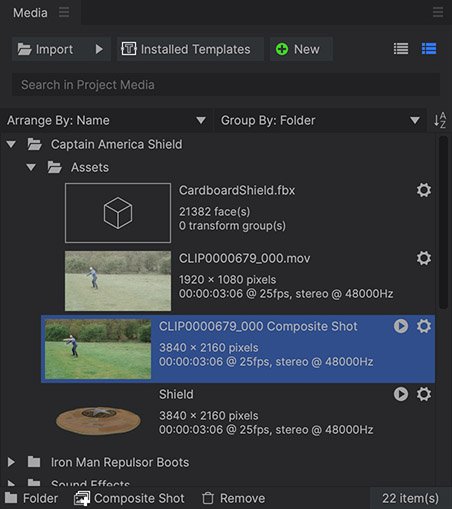
Arranging and Grouping ![]()

The assets in your Media panel can by arranged by name or by file type, and can be grouped by folder or media type. The order of the list can be flipped using the sort button.
- Arrange By: Choose how the files are alphabetized.
- Name: Alphabetizes all project media by file name.
- File Type: Alphabetizes the project media by file type, grouping each file type together.
- Group By: Choose how the project media will be organized.
- Folder: Uses folders manually created by the user, so you can set up any organization you prefer. You can create folders using the Folder button at the bottom of the media panel.
- Media: Uses a default folder system to organize each type of media into a separate folder.
- Sort: The Sort button toggles the list between an A-Z listing, and a Z-A listing.
Deleting Media
Media assets can be deleted individually or en masse.
- Deleting Individual Assets: Select the asset you wish to remove, and press the Delete key. Or, right-click the asset and select Remove from the menu.
- Deleting Multiple Assets: Use shift-click to select multiple items in sequence, or use CTRL+Click to add items individually to the selection. Then use the Delete key or the right-click option to delete them.
- Deleting Unused Media: You can delete all unused media assets at once, to help simplify and organize your media panel. Right-click anywhere in the media panel and select Remove Unused from the contextual menu.
Creating and Using Folders ![]()

You can create folders within the Media panel. Specific assets can then be moved into folders, allowing you to create your own organization of assets.
- Folder Button: A new folder can be created by clicking the Folder button.
- Drag and Drop: You can also drag an asset or multiple assets onto the New Folder button to create a new folder and automatically move the assets inside.
- Renaming Folders: Folders and assets can be renamed from their right-click menu or by pressing F2.
Syncing Video and Audio
If your video and audio are recorded in separate files, you can sync them in the HitFilm media panel. See Audio and Video Sync for instructions and more information.
Organizing Media on the Timeline
Color Labels
Media on your timelines can be organized using color labels. You can apply a color label to any item on any timeline, which is a useful way to quickly identify specific classes of media at a glance. For example, you could color all point layers in a composite shot one color, or color all the clips associated with a specific scene on the Editor one color. You have full control over the color labels, so you can use them to organize your clips however you like.
Color Labels on the Editor
You can add a color label to any video clip, still image, audio clip, or other asset on the editor timeline.
- Select the item or items you want to apply the color label to.
- Right-click on the selection to open the contextual menu, and position the cursor on Label to open the submenu of color labels.
- Click on the color you wish to use to label the selected items.
Color Labels in Composite Shots
You can add a color label to any layer in a composite shot.
- Select the layer or layers you want to apply the color label to.
- Right-click on the selection to open the contextual menu, and position the cursor on Label to open the submenu of color labels.
- Click on the color you wish to use to label the selected items.
Editing Color Labels
There are 16 separate color labels available in HitFilm. By default, the first 9 are assigned numbered shortcuts. Select any clip and press a number from 1 to 9 to immediately apply the corresponding color label to that item. Pressing 0 will remove the color label from the selected item.
- 1 through 9: Pressing any number from 1 to 9 while a timeline item is selected will apply the corresponding color label to the selection.
- 0: Pressing 0 while a timeline item is selected will remove the color label from the selection.
You can customize the color used for each of the color labels in the Options panel of HitFilm. In addition to the standard process of opening the File menu to access the options, the Label options can be accessed from the timeline as well.
- Right-click any clip to open the Contextual menu, and position the cursor on Label to open the submenu of color labels.
- Choose Edit Labels… from the menu.
In addition to being able to change the name or color associated with each label, you can also set defaults in the Options, if you wish to label media by type.
Defaults
If you want to use labels to identify specific kinds of media in your projects, you can setup defaults here, so you don’t need to apply labels individually to each timeline item. There is a listing for each kind of timeline item, so you can customize each one to your own preference.
To set a default:
- Locate the kind of item to which you want to apply a label.
- Open the menu next to that item.
- Select the color label you wish to use.
- Click OK at the bottom right of the Options window to apply your changes.
Once this is done, each time you add a new item to any timeline of that kind, it will automatically receive your chosen color label.
Labels
Each of the 16 color labels has a name and a color swatch. If you want to use your own customized names or colors, you can easily do so.
- Name: To edit the name of a label, double-click the existing name, then type in the new name you want to use.
- Color: To edit the color of a label, double-click the color swatch to open the color picker. Select the new color you want to use, and click OK to close the color picker.