
Composite shot timelines can be created in a variety of ways, so no matter where you are in the software or in your workflow, you can readily create a new timeline when needed. Composite shots can be created from scratch, or created from existing media.
Creating New Composite Shots ![]()
There are two ways to create a new composite shot in the Media panel:
- Click the New button in the Media panel, and select Composite Shot from the menu.
- Use the keyboard shortcut Shift+CTRL+N to create a new composite shot.
Using either of those commands will open the Composite Shot Properties dialog shown below, where you can choose the settings to be used by your new timeline.
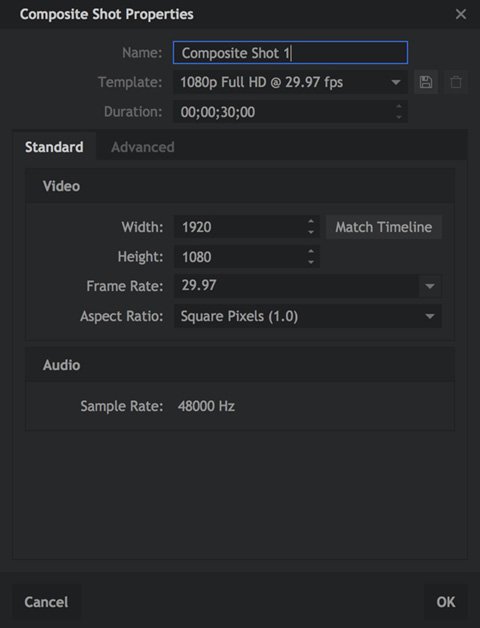
- Name: Enter the name you wish to use for your composite shot. By default they are numbered sequentially, but it is recommended that you change the names to reflect the contents of each timeline. As you get more and more timelines in your project, this makes it easy to identify and locate whichever one you need.
- Template: If you wish to create a timeline using a standardized format, you can choose the appropriate template from this list.
- Save Template: You can create your own templates by setting the Video and Audio settings to your desired values, then clicking the Save icon to the right of the Template menu.
- Duration: Enter your desired duration for the timeline. The default value can be set in the HitFilm Options, but you can edit the duration of each timeline individually at any time.
Standard Tab
Video
- Width: If you wish to create a comp at a resolution that is not available as a template, you can manually enter the width, in pixels, here.
- Height: If you wish to create a comp at a resolution that is not available as a template, you can manually enter the width, in pixels, here.
- Frame Rate: Edit the frame rate used by your composite shot here.
- Aspect Ratio: Edit the pixel aspect ratio used by your composite shot here.
Audio
- Sample Rate: Enter the sample rate to be used by your composite shot here. If your comp will contain video, this should match the sample rate of the video in most cases.
Advanced Tab
The advanced tab of the composite shot properties window contains settings for fog and motion blur. Fog is used to create a fall-off in 3D scenes, while motion blur can be optionally applied to any moving item.
Once a composite shot is created, it is then listed in the Media panel and its timeline will open.
Composite Shots From Media Assets
Composite shots can also be created by using an asset in the Media panel as the source. Simply choose Make Composites Shot from an asset’s menu to create the composite shot using its properties.
The new composite shot’s details will be displayed so that you can check them, then the new timeline will open and the composite shot will be listed in the media panel, with the source media already in place as a layer.
Converting Layers to Composite Shots ![]()
A layer in a composite shot can be converted into a new composite shot. This can be done from a layer’s menu or by clicking the Make Composite Shot button on the timeline.
The selected layer is replaced on the timeline with the new composite shot, with the original layer moved inside the new composite shot as its first layer.
When converting a layer to a composite shot you are presented with the following options:
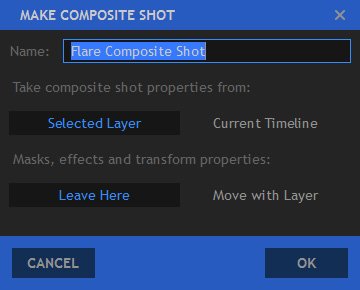
- Name: The new composite shot needs a name. It’s a good idea to have a clear naming policy to keep track of your work, especially if your project has many VFX shots.
- Take Composite Shot Properties From
The new composite shot can take its core properties from the Selected Clip or from the Editor Timeline. This is useful if you are creating a composite shot from a video or image which is a different size to your actual project.- Selected Clip: Uses the Width, Height, Frame Rate and Aspect Ratio of the source clip, and applies them to the new Composite Shot.
- Editor Sequence: Uses the Width, Height, Frame Rate and Aspect Ratio selected in the Project screen, and applies them to the new Composite Shot, so that it matches the Editor Sequence settings perfectly.
- Effects and Transform Properties
If you have already applied effects to the clip or adjusted its transform properties you can choose what to do with them.- Leave Here: applies the effects and transform settings to the new composite shot on the editor timeline. These will therefore be applied after the composite shot itself has been rendered.
- Move with Clip: keeps the effects and transform settings with the original clip, which is then placed inside the new composite shot as a new layer.
For more information about using composite shots inside other composite shots, see Embedding Composite Shots.
Converting Clips to Composite Shots on the Editor Timeline
Composite shots and the editor timeline closely interact. Any clip on the editor timeline can be converted to a composite shot. For details see Using Composite Shots in the Editor.