
Layers can be switched between 2D and 3D. See Working with Layers for details about switching dimensions. Once a layer is switched to 3D it gains the Materials group, which defines how the layer interacts with 3D lights and other 3D layers.
See Lighting a 3D Scene for more details on lighting a 3D scene.
3D model layers have additional material properties. See Importing 3D Objects for more information.
Material Options
A 3D layer has multiple options for adjusting its material.
Illumination and Shadows
- Illuminated: Controls whether a 3D layer is affected by 3D lights. Exact behavior of the layer under different light types can be customized.
- Ambient: Determines how much the layer is illuminated by ambient lights.
- Diffuse: Determines how much the layer is illuminated by point, directional and spot lights.
- Specular: Adjusts the strength of specular highlights when illuminated by point, directional and spot lights. A low specular value will create a more matte surface.
- Shininess: Adjusts the size of the specular highlight. A low shininess creates a large, diffuse highlight while a high value creates a smaller, defined highlight.
- Emissive: Causes the layer to emit a visible color even when not under direct lighting. Therefore the layer will still be visible in darkness, acting like a light-emitting source (eg neon).
A layer can be set to receive shadows. These shadows will only be cast from layers which have Cast shadows activated.
You can also set a layer to cast shadows even when the layer’s visibility is turned off. This makes it easier to create a shadow pass, in which you can cast shadows onto a white background for further compositing purposes, such as blending the shadow pass into live action footage.
Reflections
Only 3D model layers can receive reflections, but all 3D layers can cast reflections. A 3D model will only reflect layers which have Cast Reflections activated.
As with shadows, you can also cast reflections even when the layer itself is not visible. This is very useful for creating ‘bounce boards’, similar to using a reflector on set to provide fill light. In HitFilm you can create solid color planes, set to be invisible, which cast reflected light onto your 3D models. By having the casting layer be invisible you can position the ‘bounce board’ anywhere you like without it being visible in shot.
Ambient Occlusion
Layers can shade each other based on proximity. This replicates the absence of light that occurs where surfaces meet in the real world (this can be observed by the naked eye in the corners of rooms).
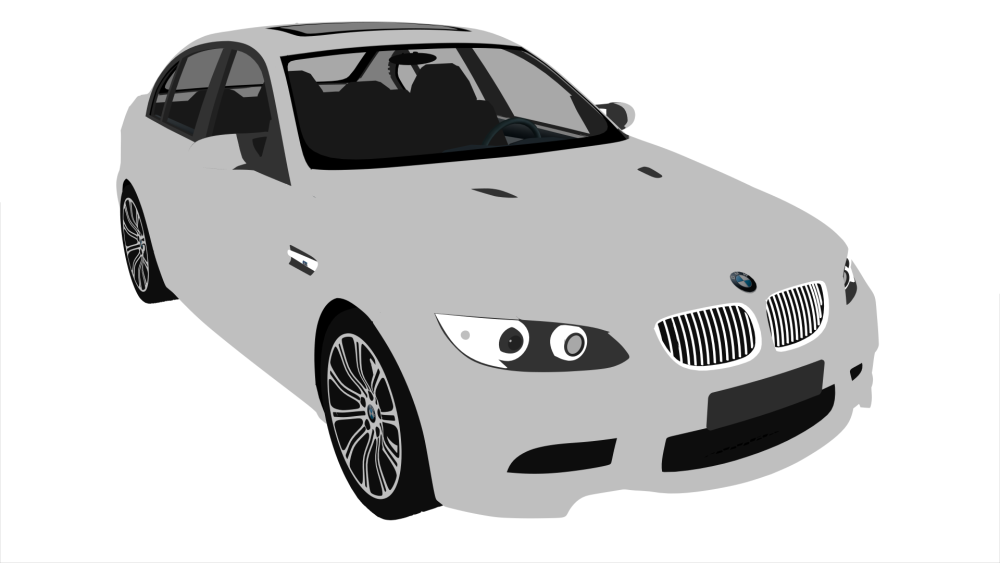
This example is of a 3D model but the same principles apply to other 3D layers. Compare this image without ambient occlusion:
With this image showing ambient occlusion on the vehicle:
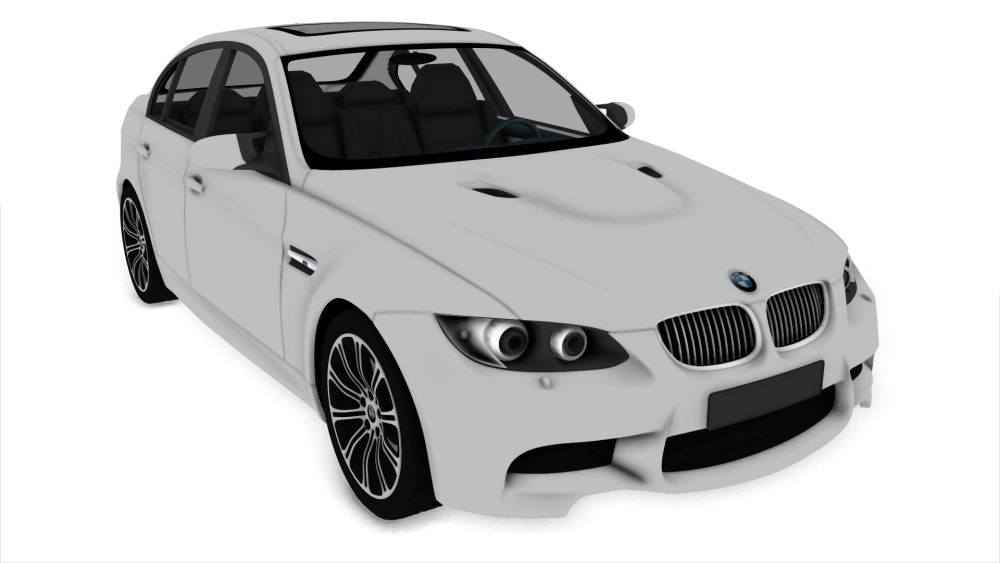
The ambient occlusion in the second image highlights detail by shading areas where different surfaces are in close proximity. There is also subtle ambient occlusion being cast onto the white floor around the wheels. Ambient occlusion can then be combined with illumination and shadows cast from actual 3D lights.
Layers can be set to receive and cast ambient occlusion separately.
Once ambient occlusion is activated, additional options are displayed for customizing the appearance of the occlusion.
The Depth Scale can be used to adjust the appearance of ambient occlusion for different scale models.
If you experience visual glitching with some models, try increasing the Blur Radius or Samples.