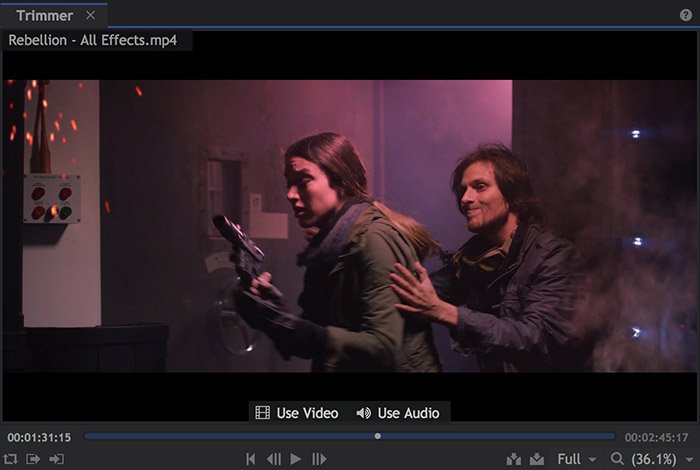
The Trimmer allows you to view media directly from the Media panel, regardless of whether the media has been used on any timelines within your project. This is useful for a variety of purposes.
After importing video files, you can preview the contents of each one to organize them in preparation for editing, or to identify the takes that you want to use in your edit. During editing, the Trimmer can be used to identify a specific section of a media asset before adding it to your timeline as a clip. This makes it easy to remove the start and end of a take, retaining the portion between ‘action’ and ‘cut’.
If you have already added a clip to the timeline, and need to trim it, you can also double-click the asset on the timeline to re-open it in the Trimmer, and adjust its In and Out points. Any adjustments you make will immediately be reflected on the timeline as well.

Playback on the Trimmer functions similarly to the Viewer, using similar playback tools. However, while playback is the primary function of the viewer, the trimmer has additional tools specifically for selecting portions of your clips and adding those portions to the timeline.
Playback Controls
Along the bottom of the Trimmer are the playback controls.
Loop Playback ![]()
When activated, playback will loop once the playhead reaches the end of the timeline or the end of the work area.
The work area can be defined using the Set In and Out point buttons with the playhead at the desired frames. This can be particularly useful for looping playback around a specific cut or visual effects sequence.
Set In and Out Points ![]()
![]()
The in and out points define the start and end of the work area. This region of the asset is used when looping playback, and to define the section of an asset that you wish to add to the timeline.
Playhead Control ![]()
![]()
![]()
![]()
The timeline playhead determines which frame is displayed in the viewer. The playhead can be controlled from the Viewer.
Move Playhead to Start: Instantly jumps the playhead to the beginning of the timeline. You can also press the Home key.
Previous Frame and
Next Frame: Move the playhead by a single frame.
Play: Plays the timeline forwards. Realtime playback may require use of proxies or the timeline cache, depending on the complexity of the timeline.
Playback can also be controlled using the standard keyboard shortcuts J, K and L.
- J plays backwards. Pressing J repeatedly will double the playback speed.
- K stops playback.
- L plays forwards. Pressing L repeatedly will double the playback speed.
The In and Out buttons in the Trimmer (explained above) are used to specify the section of the asset which you wish to use. You can also use the keyboard shortcuts I (for In) and O (for Out) while playing the asset, to set the in and out points.
Adding Assets to the Timeline
You can drag from the Trimmer directly onto the timeline, allowing you to position the new clip precisely. A green outline displays the drop location on the timeline.
If your source asset contains both audio and video elements, by default both will be included when you add the asset to the timeline. If you wish to only add one or the other, you can do so using the following tools.
- Use Video: Click on the Use Video button and drag to a video track of the timeline to add only the video from your source clip to the timeline, without the audio. You can also hold the Alt key (Option on Mac) while dragging from anywhere in the trimmer to add only the video.
- Clicking and releasing on the Use Video button will display the video portion of the source asset in the trimmer panel.
- Use Audio: Click on the Use Audio button and drag to an audio track of the timeline to add only the audio from your source clip to the timeline, without the video. You can also hold the Alt key (Option on Mac) while dragging from anywhere in the trimmer to add only the audio.
- Clicking and releasing on the Use Audio button will display the audio waveform of the source asset in the trimmer panel, if you wish to reference the waveform or use it to set the in or out points.
Inserting and Overlaying Clips ![]()
![]()
Alternatively to dragging the clip from the viewer to the timeline, the Insert and Overlay buttons on the Trimmer can be used.
- Insert places the clip at the playhead’s position, moving affected clips out of the way. Any existing clips on the timeline will be moved to the right to make space for the new clip. If the playhead is in the middle of an existing clip it will be automatically sliced at that position.
- Overlay adds the clips at the playhead’s position, replacing any existing clips which are occupying the affected frames.


