
HitFilm can import a wide variety of media formats, some of which are more suited to editing than others. HitFilm can create proxy media to ensure a smooth editing experience regardless of the formats being used. Proxy files use a format well suited to editing, and are used in place of your original media files during the editing process. Proxies are never used for export; when you export your project or timeline the original media files are always used to ensure the best possible quality.
A proxy is a copy of your source media, encoded using the H.264 codec at a reduced resolution, with compression settings designed to ensure the file can be read quickly. HitFilm can seamlessly swap the original media and the proxy whenever needed. During the editing process the proxy is used to ensure best performance, and at export the original full-resolution media is used to ensure best quality. You retain complete control, so you can also use the original media during editing if you prefer.
Proxies can be generated automatically or manually. For full details of the available proxy settings, see Proxies and Pre-Renders Options.
The current proxy state of each clip is indicated in the Media panel.
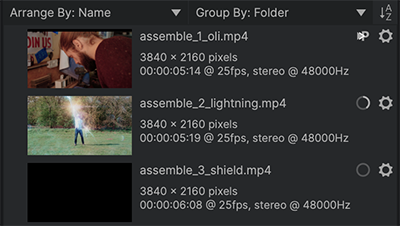
![]() Proxy Queued: This icon indicates clips which have been queued for proxy, but whose proxies have not begun rendering.
Proxy Queued: This icon indicates clips which have been queued for proxy, but whose proxies have not begun rendering.![]() Proxy in Progress: While the proxy for a clip is rendering, this progress wheel indicates the progress of the transcoding process.
Proxy in Progress: While the proxy for a clip is rendering, this progress wheel indicates the progress of the transcoding process.![]() Proxy Complete: This icon indicates that the proxy for a clip is completed.
Proxy Complete: This icon indicates that the proxy for a clip is completed.
Working With Proxies
The workflow for using proxies functions primarily behind the scenes. It primarily involves a single step, after which the system functions automatically whenever you use HitFilm.
Configuring Proxies
- Open the Options (File > Options) and select the Proxies and Pre-Renders tab.
- Select your preferred default option from the Create Proxies menu.
- None: No proxies are created by default. Individual files can still be proxied at any time, through the Media panel.
- For Performance: A proxy optimized for best performance will be created for each media file that is imported.
- For Quality: A proxy optimized to retain the original visual quality will be created for each media file that is imported. Quality proxies will be larger than performance proxies, but will still provide acceptable editing performance.
- Next to Proxy Directory, click the Select Folder button to define the location where your proxies will be stored.
- If you wish to use the default location, you can skip this step.
- If you prefer to store your proxies on a secondary drive, or a specific location on your system drive, choose your desired location.
- Select your preferred default option from the Create Proxies menu.
Once you have configured your desired Proxy settings, then proxies will automatically be created, using those settings, when media files are imported into HitFilm. The process of creating proxies occurs in the background, so you can ignore it and continue working in your project. As soon as the proxy file is completed, any instances of the media on your timelines will be rendered using the proxy.
Manually Controlling Proxies
You can easily adjust the proxy settings for any individual clip, regardless of what default settings you have selected. The proxy settings for any clip can be manually changed in the Media panel, or on the timeline.
- Media Panel: Changing Proxies in the Media Panel
- Right-click the clip in the media panel, and hover the mouse over Proxy.
- Select the proxy option you wish to use for that clip. Any existing proxy will immediately be deleted, and a proxy using the new setting will be created.
- Timeline: Working With Proxies on the Timeline
- Right-click the clip on the timeline, and hover the mouse over Proxy.
- Select the proxy option you wish to use for that clip. Any existing proxy will immediately be deleted, and a proxy using the new setting will be created.
- Use Proxy: Toggling Between Proxy and Source Media on the Timeline
- Right-click the clip on the timeline and select Use Proxy. When enabled, a checkmark will appear next to the listing in the menu, and the proxy will be used on the timeline. When disabled, there will be no checkmark shown next to the listing in the menu, and the original source media will be used on the timeline.