
The Cook-Torrance illumination model provides greater control and is more suitable for metal surfaces. Bounced light is scattered across the surface, as if reflecting off multiple ‘microfacets’, rather than a focused, singular bounce as with Phong.
The Fresnel value determines how light is scattered off the surface. Several metal presets are provided to make it easier to choose a suitable material. Each preset is defined by the real-world properties of the metal it represents, making it easier to generate convincing materials on your model.
Roughness determines the spread of the specular highlight. A low roughness creates a defined, sharp highlight, while a high roughness diffuses the specular highlight across the surface, moving towards a more matte material.
Specular Reflectance adjusts the intensity of the specular highlight.
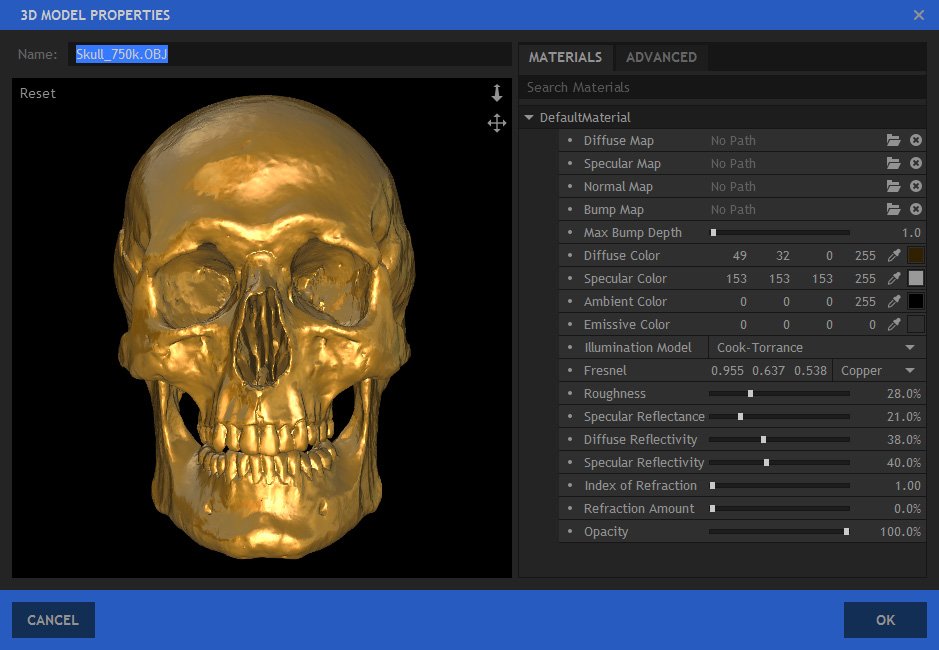
In this example a copper fresnel is being used to generate a more realistic metallic appearance:
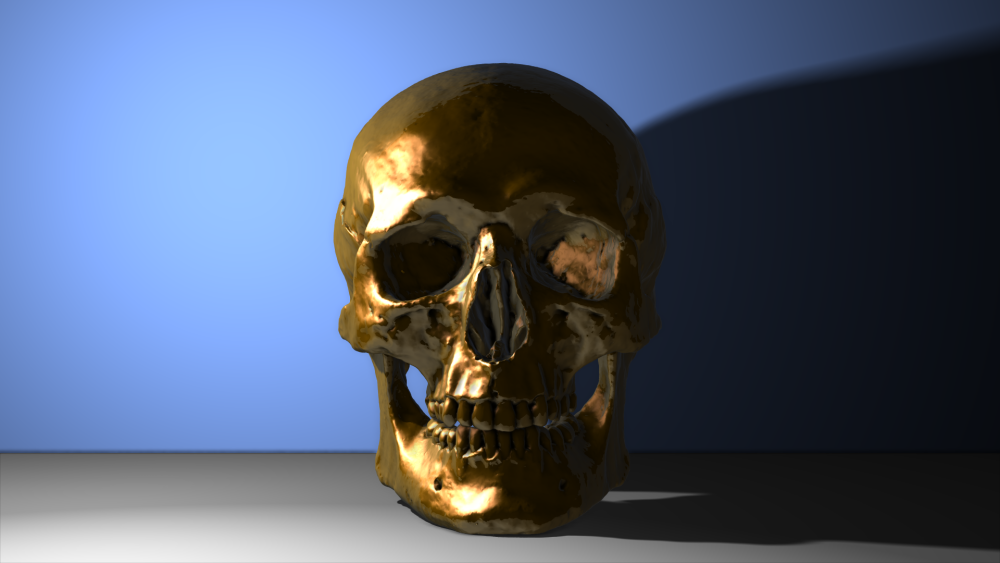
Here is the same setup in a more natural lighting scenario:
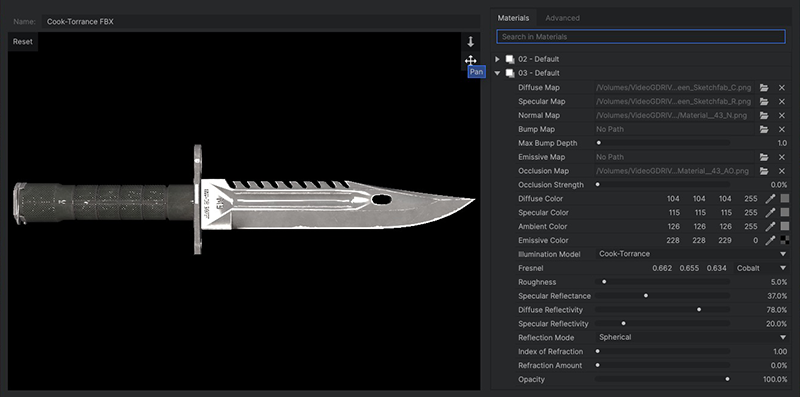
Cook-Torrance Material Properties
- Diffuse Map: A Diffuse Map defines the primary texture on your model. The image is mapped onto the model’s surface, so the details in the map appear to be painted onto the model’s surface. Click the folder icon
![]() to open a browser and select a diffuse map image. Click the X to remove the image.
to open a browser and select a diffuse map image. Click the X to remove the image. - Specular Map: A Specular Map defines how shiny different areas within the material will be. With no map, the entire material will be consistently shiny. Click the folder icon
![]() to open a browser and select a diffuse map image. Click the X to remove the image.
to open a browser and select a diffuse map image. Click the X to remove the image. - Normal Map: Normal Maps are used to increase visual detail of a model without negatively impacting performance. They must be generated by 3D modeling software. Click the folder icon
![]() to open a browser and select a diffuse map image. Click the X to remove the image.
to open a browser and select a diffuse map image. Click the X to remove the image. - Bump Map: Bump Maps perform a similar function to Normal Maps, but in a simplified way, using greyscale to indicate bump height. Click the folder icon
![]() to open a browser and select a diffuse map image. Click the X to remove the image.
to open a browser and select a diffuse map image. Click the X to remove the image. - Max Bump Depth: Bump maps are greyscale, with pure black areas being the lowest, and pure white areas being the highest. This setting defines the height of the white areas, then all gray values are mapped into the difference between the black height (the model’s actual surface) and the white height.
- Emissive Map: Emissive maps are used to define areas of the model which will emit their own light.
- Occlusion Map: An occlusion map is a greyscale image, with white indicating areas that should receive full indirect lighting, and black indicating no indirect lighting.
- Occlusion Strength: Controls how much occlusion is applied to the model, in the cracks and corners of its surface.
- Diffuse Color: Alters the base color of the material under a point, spot or direction light. The luminance of this color determines the brightness of the diffuse texture map. Click the swatch to open a color picker and chose any color. You can also use the eyedropper to select a color from the Preview, or manually enter the RGB values for your desired color.
- Specular Color: Determines the color used for the material’s specular highlights. Specular highlights are only visible if there is a 3D light source in the scene. Click the swatch to open a color picker and chose any color. You can also use the eyedropper to select a color from the Preview, or manually enter the RGB values for your desired color.
- Ambient Color: Defines the color of the material under an ambient light source. Click the swatch to open a color picker and chose any color. You can also use the eyedropper to select a color from the Preview, or manually enter the RGB values for your desired color.
- Emissive Color: The color of the material regardless of the lighting setup. Even when the model is unlit or shadowed, it will still emit this color. This is useful for simulating light sources, such as neon objects or lights on a vehicle. Click the swatch to open a color picker and chose any color. You can also use the eyedropper to select a color from the Preview, or manually enter the RGB values for your desired color.
- Illumination Model: You can change to a different illumination model here, if you wish.
- Phong: Phong is effective for very smooth surfaces with a single specular highlight, such as plastics or paint.
- Cook-Torrance: Cook-Torrance is a physically based renderer more suitable for metals, with a rougher surface that distributes the light less evenly.
- Metallic-Roughness: The Metallic-Roughness workflow is a system of physically-based rendering which defines materials using a base color and their reflective characteristics, which are defined as metallic or dielectric.
- Specular-Glossiness: The Specular-Glossiness workflow is system of physically-based rendering which defines materials using a base color and their specular and reflective characteristics.
- Fresnel: *Adjusts reflectivity based on the angle at which light hits the surface. The larger the angle at which the light hits, the more reflective the surface. The values here specify the reflectance value for each color channel. The menu of metal types offers convenient presets for different common metals. These values are very consistent in nature, so in most cases it is best to use the physical values for a given property, rather than editing the values yourself.
- Roughness: Adjusts how rough the surface of the metal is, and thus how much of the light is reflected in a diffuse fashion, rather than being reflected specularly.
- Diffuse Reflectivity: Diffuse reflectivity refers to light being reflected in all directions. It does not produce a direct reflection, but causes the object to be illuminated by surrounding objects.
- Specular Reflectivity: Specular reflectivity is what we normally think of when we talk about reflections – seeing a visible reflection of an object on the surface of another object. Increasing specular reflectivity allows the material to reflect nearly objects in the 3D space.
- Reflection Mode: Select the mode used to calculate the reflectivity.
- Spherical: Uses a spherical reflection.
- Planar: Uses planar reflections.
- Index of Refraction: Refraction occurs when light is deflected while passing through a semi-transparent object, causing a vertically inverted version of the scene to be reflected onto the surface of the material. The Index of Refraction sets the amount of refraction, which differs depending on the density of the material the light is passing through. Water has a refraction index of 1.7 while glass typically starts about 1.55, for example.
- Refraction Amount: This value defines the visibility of the refraction.
- Opacity: Determines the overall opacity of the material. Reduce the opacity to replicate transparent or semitransparent materials such as glass.