
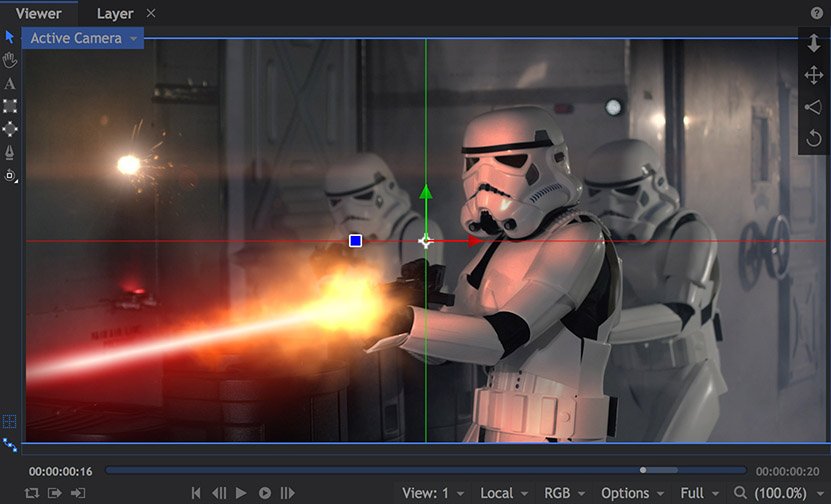
The Viewer is where you see the results of your editing and compositing. It’s also where you’ll make many of your compositing decisions, adjusting layers and masks directly instead of using the Controls panel. The Viewer is linked to your currently active timeline. The Viewer’s contents and available tools will vary depending on your chosen timeline.

The image above shows the Viewer for a composite shot timeline, along with its associated tools and controls. When working on the Editor, there will be fewer tools available.
Playback Controls
Along the bottom of the Viewer are the playback controls. These are used to view the results of your timeline edits or access specific frames of your timeline.

- Export Frame..: Opens the Export Frame dialog, where you can select the settings used to export a still image of the current frame.
![]() Loop Playback: When activated, playback will loop once the playhead reaches the end of the timeline or the end of the work area.
Loop Playback: When activated, playback will loop once the playhead reaches the end of the timeline or the end of the work area.
- The work area can be defined using the Set In Point and Set Out Point buttons with the playhead at the desired frames. This can be particularly useful for looping playback around a specific cut or visual effects sequence.
![]() Set In Point: Sets the first frame of the work area. The work area is used when looping playback and when exporting your project. This makes it easy to export specific sections of a project, rather than entire timelines.
Set In Point: Sets the first frame of the work area. The work area is used when looping playback and when exporting your project. This makes it easy to export specific sections of a project, rather than entire timelines.![]() Set Out Point: Sets the last frame of the work area. The work area is used when looping playback and when exporting your project. This makes it easy to export specific sections of a project, rather than entire timelines.
Set Out Point: Sets the last frame of the work area. The work area is used when looping playback and when exporting your project. This makes it easy to export specific sections of a project, rather than entire timelines.![]() First Frame: Instantly jumps the playhead to the beginning of the timeline. You can also press the Home key.
First Frame: Instantly jumps the playhead to the beginning of the timeline. You can also press the Home key.![]() Previous Frame: Movers the playhead backward a single frame.
Previous Frame: Movers the playhead backward a single frame.![]() Next Frame: Move the playhead forward a single frame.
Next Frame: Move the playhead forward a single frame.- Play:
![]() Plays the timeline forwards. In some cases, realtime playback may not be possible, depending on the format of your video files and the complexity of the timeline. In these cases, realtime playback can be achieved using the cache, proxy or pre-render features.
Plays the timeline forwards. In some cases, realtime playback may not be possible, depending on the format of your video files and the complexity of the timeline. In these cases, realtime playback can be achieved using the cache, proxy or pre-render features.
- Playback can also be controlled using the standard keyboard shortcuts J, K and L.
- J: plays backwards. Pressing J repeatedly will double the playback speed.
- K: stops playback.
- L: plays forwards. Pressing L repeatedly will double the playback speed.
Viewer Playhead & Duration Bar
The duration bar represents the total duration of your currently selected timeline.

- Work Area: The lighter line shows your work area, which you can change using the In and Out controls. Frames outside the work area will appear darker on the duration bar.
- By dragging the circle you can move the playhead through your timeline. This is particularly useful if your timeline is currently zoomed in to a specific area, as you can watch another part of the timeline without having to move or scale your track or layer view.
- Time Displays: To either side of the Viewer are time displays. You can set each separately to display as a timecode (in the format Hours:Minutes:Seconds:Frames) or as a framecount by right clicking and selecting from the menu.
- Current Time: On the left the Current Time is shown, based on the position of your playhead.
- Total Duration: On the right the Total Duration of your current timeline is shown.
Viewer Tools
At the top-left of the Viewer there are several tools which allow you to interact with the viewer’s contents.
![]() Select: The Select tool is used for interacting with layers and effects on the Viewer. With the Select tool active you can select and transform layers and move position points.
Select: The Select tool is used for interacting with layers and effects on the Viewer. With the Select tool active you can select and transform layers and move position points.![]() Hand: This pans the view around the Viewer. This is useful if your content does not fit into the Viewer panel, such as when you are zoomed in or are working in HD on lower resolution monitors.
Hand: This pans the view around the Viewer. This is useful if your content does not fit into the Viewer panel, such as when you are zoomed in or are working in HD on lower resolution monitors.
- When the Hand tool is active you will not be able to interact with layers or effects. As an alternative to selecting the hand tool, you can click and hold the right mouse button while the cursor is over the viewer, then drag to reposition the view within the viewer panel.
![]() Text: Used to create or edit text clips. You can create a new text clip on the Editor at the playhead position in one of two ways:
Text: Used to create or edit text clips. You can create a new text clip on the Editor at the playhead position in one of two ways:
- Open Text: Select the Text tool and click on the Viewer where you want to add the text to create an open text layer.
- Text Box: Select the text tool, then click and drag on the viewer to draw a text box to create paragraph text. The text will auto-wrap to a new line when it reached the edge of the box.
- See Creating Text & Titles for more information.
![]() Ellipse Mask: Creates round or elliptical masks, to remove or retain specific areas of a layer.
Ellipse Mask: Creates round or elliptical masks, to remove or retain specific areas of a layer.![]() Rectangle Mask: Creates square or rectangular masks, to remove or retain specific areas of a layer.
Rectangle Mask: Creates square or rectangular masks, to remove or retain specific areas of a layer.![]() Freehand Mask: Uses a pen tool to create masks of any shape, to remove or retain specific areas of a layer.
Freehand Mask: Uses a pen tool to create masks of any shape, to remove or retain specific areas of a layer.
- See Masking for complete details on all masking tools.
![]() Orbit: When you’re working in 3D in a composite shot timeline, the orbit tool can be used to orbit the camera or view around wherever you click or a specific selected layer. You can switch between the two orbit modes by holding down on the Orbit button to display the menu.
Orbit: When you’re working in 3D in a composite shot timeline, the orbit tool can be used to orbit the camera or view around wherever you click or a specific selected layer. You can switch between the two orbit modes by holding down on the Orbit button to display the menu.
- For more information see Working in 3D.
Viewer Menus and Display Options
The Viewer can be customized to display specific information.
The Viewer can be scaled using the Scale menu to the bottom-right. When the content of the Viewer is too large to fit into the interface you can pan around the view by right clicking and dragging on the view or using the Hand tool. The Scale To Fit option is most useful, as it will auto-scale the viewer to fit into whatever space you have available, allowing you to see the entire frame. The 100% view option is useful for seeing exactly what your frame will look like at actual size. You can also adjust the scale using the scroll wheel on your mouse.
There are several menus at the bottom right of the Viewer.
For information on the View menu see Working in 3D.
The Options Menu
- Color Bit Depth: Select the color bit depth (per channel) at which the Viewer image is rendered. Higher values provide greater quality, but can take longer to process.
- 8-Bit Integer: is limited to 8 bits per channel, restricting colors between 0-255 values. 8-bit integer will render more quickly than 16-bit float.
- 16-Bit Float: allows for increased dynamic range, retaining detail in highlights and shadows. 16-bit float will take longer to calculate and render, but produces higher quality results.
- 32-Bit Float: allows for very high dynamic range, retaining maximum detail in highlights and shadows. This is particularly useful during grading or when designing visually extreme effects. 32-bit float will take longer to calculate and render, but produces the highest quality results.
- Floor Plane: Turns the 3D reference grid on and off. This option will only be present on Composite Shot timelines which contain a 3D camera.
- Show Motion Path: Animated layers display a line representing the movement over time. This can be turned on and off.
- Show Effect Controls: Many effects in HitFilm feature visual controls on the Viewer, so the effect can be adjusted directly in the Viewer. This option toggles those controls on or off.
- Background Color: The Viewer usually renders a black background. This can be changed to a different color, which can be useful during compositing to ensure you do not have any ‘holes’ in your scenery.
- Checkerboard Background: in 2D views this is on by default. A checkerboard pattern is displayed in transparent areas of the frame. This pattern is not visible when you Export, but can be used in the Viewer to identify transparent areas of the frame which would otherwise be hard to spot.
- Channels: The channels menu switches the Viewer between different color and alpha channels.
- RGB: The full rendered output. This is what is exported.
- RGB Straight: All RGB color channels without alpha transparency. Note that fully transparent areas may be displayed with unexpected coloring.
- Alpha: Only the alpha (transparency) channel. White areas represent fully opaque and black areas represent fully transparent. Very useful for checking mattes during compositing.
- Red/Green/Blue: Shows only the selected color channel.
- Controls Alignment: Select the axis orientation upon which the viewer controls will be based.
- Local: The controls are based on the orientation of the local clip.
- World: The controls within the viewer are calculated from HitFilm’s master XYZ orientation, as represented by the floor plane.
- View: The controls are based on the current view’s alignment.
- Full Screen Preview: Toggles the Full screen preview on and off. You must select a screen in the Set Screen menu below first, so HitFilm knows which screen to display the Full Screen Preview on.
- Set Screen: This menu shows all available displays on your system, so you can choose the one to be used for the Full Screen Preview.
The Quality Menu
The Quality menu turns various rendering features on and off. Note that these options do not affect the export render; they only have an impact in the Viewer. Settings for playback and pause are separated, so you can select a High Quality Profile for use when the timeline is paused, then use a lower Quality Profile during playback, to aid with smooth playback. You can set up four specific Quality Profiles with your own preferences of what features are included, from the Quality Profile tab of the Options screen, and select from four Resolution options, from Antialiased to Quarter. Then you can assign Playback and Pause to use any of these four options. The specific options are detailed below.
Playback Quality
You can set up four quality profiles in HitFilm, for use with video playback and paused images in the software. These options only affect playback within the program, and will not affect exported files. Each profile can store a separate set of viewer option settings, so you can quickly switch between Final, Draft, Quick, and Fastest.
The options for each profile can be edited by opening the File menu, clicking the Options button, and then selecting the Quality Profiles tab. These profiles are used for both Playback Quality and Paused Quality. The defaults are listed below, but you can customize all four profiles however you prefer.In this tab, there are 6 options you can turn on or off for each of the four profiles. The defaults are listed below, but you can customize all four profiles however you prefer.
- 2D Effects: Toggles rendering of 2D effects on and off. By default, this option is enabled in Final, Draft, and Quick modes.
- Lights: Toggles rendering of 3D Lights on and off. By default, this option is enabled in Final and Draft modes.
- Shadows: Toggles rendering of 3D Shadows on and off. By default, this option is enabled in Final and Draft modes.
- Reflections: Toggles rendering of Reflections on and off. By default, this option is only enabled in Final mode.
- Motion Blur: Toggles rendering of Motion blur on and off. By default, this option is only enabled in Final mode.
- Depth of Field: Toggles rendering of Depth of Field on and off. By default, this option is only enabled in Final mode.
Playback Resolution
Adjusting the resolution can dramatically affect performance speed. Changing Playback Resolution will only affect playback within the program, and will not affect exported files. The setting you choose here determines the resolution at which the source media is sampled and processed, before being displayed in the Viewer. For example, selecting Half resolution reduces both the vertical and horizontal resolution by half, and effectively reduces the processing required for each frame by 75%. This can dramatically speed up performance.
- Antialiased: Processes the video at full resolution and applies the antialias settings you have selected in your Project screen. This settings gives maximum quality, and the longest processing times.
- Full: Processes the image at full resolution, but does not apply antialiasing. Quality is still high, but some stair-stepping may be visible along diagonal lines.
- Half: Reduces horizontal and vertical resolution of the source media by half before it is processed, resulting in faster performance.
- Quarter: Reduces horizontal and vertical resolution of the source media to ¼ of its original value before it is processed, resulting in reduced visual quality and faster performance.
Paused Quality
You can assign your video to use a different quality profile when paused than it uses during playback.Typically you will waht the Paused Quality set higher, so you can view a high quality image while editing, but reduce the processing load during playback.
The options for each profile can be edited by opening the File menu, clicking the Options button, and then selecting the Quality Profiles tab. In this tab, there are 6 options you can turn on or off for each of the four profiles. These profiles are used for both Playback Quality and Paused Quality. The defaults are listed below, but you can customize all four profiles however you prefer.
- 2D Effects: Toggles rendering of 2D effects on and off. By default, this option is enabled in Final, Draft, and Quick modes.
- Lights: Toggles rendering of 3D Lights on and off. By default, this option is enabled in Final and Draft modes.
- Shadows: Toggles rendering of 3D Shadows on and off. By default, this option is enabled in Final and Draft modes.
- Reflections: Toggles rendering of Reflections on and off. By default, this option is only enabled in Final mode.
- Motion Blur: Toggles rendering of Motion blur on and off. By default, this option is only enabled in Final mode.
- Depth of Field: Toggles rendering of Depth of Field on and off. By default, this option is only enabled in Final mode.
Paused Resolution
Adjusting the resolution can dramatically affect performance speed, but it also determines the accuracy of the rendering displayed on the Viewer. Paused Resolution only affects the image displayed within the program when the timeline is paused, and will not affect playback, or exported files. The setting you choose here determines the resolution at which the source media is sampled and processed, before being displayed in the Viewer. For example, selecting Half resolution reduces both the vertical and horizontal resolution by half, and effectively reduces the processing required for each frame by 75%. This can dramatically speed up performance. In most cases, Antialiased or Full will be preferred.
- Antialiased: Processes the video at full resolution and applies the antialias settings you have selected in your Project screen. This settings gives maximum quality, and the longest processing times.
- Full: Processes the image at full resolution, but does not apply antialiasing. Quality is still high, but some stair-stepping may be visible along diagonal lines.
- Half: Reduces horizontal and vertical resolution of the source media by half before it is processed, resulting in faster performance.
- Quarter: Reduces horizontal and vertical resolution of the source media to ¼ of its original value before it is processed, resulting in reduced visual quality and faster performance.