
In order to use media files in your project, you first need to import the files you want to use. Once imported, they become assets in the Media panel, where they can be accessed and re-used as many times as you want within your project.
Importing media to your project does not alter or affect the original source files on your computer, as HitFilm only references the original files. Therefore removing a clip from a timeline or from the Media panel does not remove it from your computer. Similarly, duplicating a clip in a HitFilm project does not create multiple copies of the source, as they all reference the same source. Therefore, if you wish to transfer a project to another computer you must make sure all project media is also included.
Importing Files
The Media panel is the chief location for importing files into HitFilm, and is where all imported files are stored and organized.
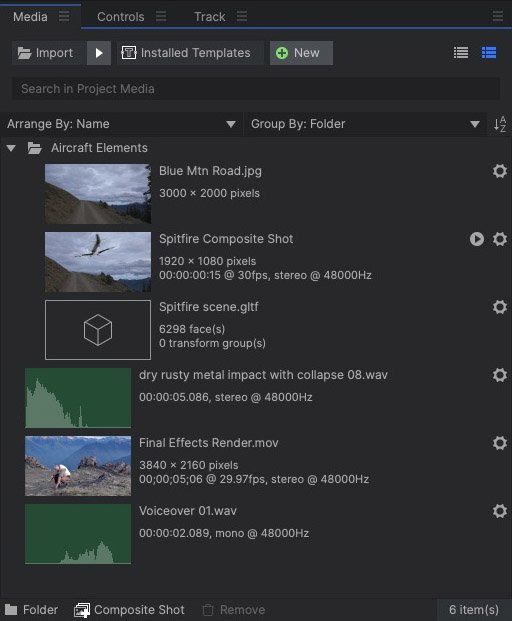
There are four methods of importing media into the Media Panel, so you can use whichever fits best into your workflow.
Importing Using the Import Menu ![]()
The Import Menu in the media panel consists of the Import Button itself, and the triangular arrow to the right of the button. Clicking the triangular arrow to the right of the Import button reveals additional import options.
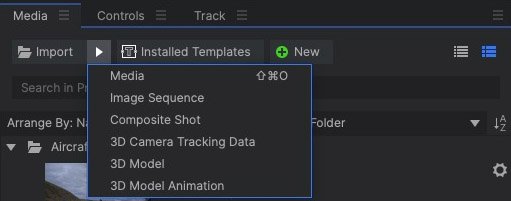
- Media: This is the option accessed by clicking the Import button. It works for importing videos, images, audio, image sequences, or composite shots.
- Image Sequence: This option is used for importing a series of sequentially numbered images. The sequence of images will be converted into a single media clip, which is listed in the media panel as a video file.
- Composite Shot: Use this option for importing HitFilm projects (.hfp) and composite shot (.hfcs) files. See Saving Composite Shots for more details.
- 3D Camera Tracking Data: Allows you to import camera tracking data in the .ma format, from software including Boujou, SynthEyes, PFtrack and more. This will create a new composite shot containing the 3D camera and point cloud.
- 3D Model: Use this option to import 3D objects, which can then be manipulated on the HitFilm timeline. See Importing 3D Models for more information.
- 3D Model Animation: Choose this option for importing animation files, in the .abc (Alembic) format. These are used in combination with an associated 3D model.
Importing Using the File Menu
All of the above commands can also be accessed through the File Menu, at File > Import…
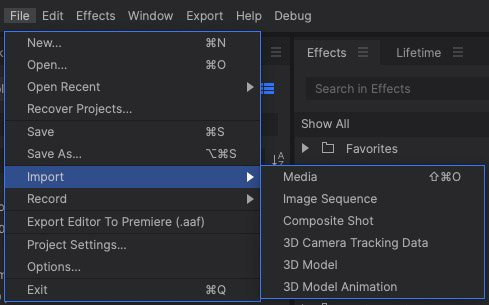
- Media: Select this option to import videos, images, audio, image sequences, or composite shots.
- Image Sequence: This option is used for importing a series of sequentially numbered images. The sequence of images will be converted into a single media clip, which is listed in the media panel as a video file.
- Composite Shot: Use this option for importing HitFilm projects (.hfp) and composite shot (.hfcs) files. See Saving Composite Shots for more details.
- 3D Camera Tracking Data: Allows you to import camera tracking data in the .ma format, from software including Boujou, SynthEyes, PFtrack and more. This will create a new composite shot containing the 3D camera and point cloud.
- 3D Model: Use this option to import 3D objects, which can then be manipulated on the HitFilm timeline. See Importing 3D Models for more information.
- 3D Model Animation: Choose this option for importing animation files, in the .abc (Alembic) format. These are used in combination with an associated 3D model.
Importing Using Drag and Drop
If you already have a file browser open to the location of the files you want, you can drag and drop the files from the Windows File Browser (or a Finder window on Mac) into the Media Panel of HitFilm.
Drag and drop import is supported for the following media types:
- Video Files
- Audio Files
- Images
- Image Sequences
- HitFilm Composite Shots
Import of 3D Models, animation, or tracking data must be performed through one of the Import menus.
Importing Using the Keyboard Shortcut
Files can also be imported using a keyboard shortcut to open a file browser and locate the files you wish to import. On Windows, the default keyboard shortcut is SHIFT+CTRL+O. On a Mac, the default shortcut is SHIFT+CMD+O. These shortcuts can be edited in the Options.
Import using the keyboard shortcut supports the following media types:
- Video Files
- Audio Files
- Images
- Image Sequences
- HitFilm Composite Shots
Import of 3D Models, animation, or tracking data must be performed through one of the Import menus.
Importing Image Sequences
There are a variety of ways to import image sequences. Use whichever option works best for your circumstances.
- Import Button: Click the Import button in the media panel to open a file browser window, where you can select the file(s) to import. You do not need to select the entire image sequence. Instead, use one of the following options:
- Select a Single Image: Select any single image which is part of the image sequence, and click Open. A prompt will appear asking if you wish to import the selected image, or the image sequence. This prompt can be enabled/disabled at File > Options > Prompts and Warnings.
- NOTE: You can also select individual images from multiple image streams, to import multiple image streams at once.
- Select an Image Range: You can import a portion of an image sequence by selecting the first and last images of the range you wish to import, then clicking Open.
- NOTE: You can import multiple ranges, by selecting the first and last images of the range you want from each image sequence.
- *Drag and Drop: If you have told HitFilm to always import image sequences, via the prompt that appears when you use the Import button, then you can drag and drop a single image from an image sequence into the Media panel, and HitFilm will automatically import the entire sequence.
- Select a Single Image: Select any single image which is part of the image sequence, and click Open. A prompt will appear asking if you wish to import the selected image, or the image sequence. This prompt can be enabled/disabled at File > Options > Prompts and Warnings.
Once an item is in the Media panel you can customize its properties by clicking the gear icon to its right, or choosing Properties from its menu.
Importing Templates ![]()
Templates are a special form of composite shot, designed to be easily re-used in different projects. They are imported using a dedicated button in the Media Panel.
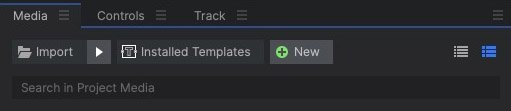
- Installed Templates: Click this button to open the list of installed templates on your system, and select the template(s) you desire to import. For additional details on creating and using templates, please see Creating templates with composite shots.
The Media Cache
Imported video will automatically generate cache files for specific situations, to improve performance in HitFilm. This process is handled in the background, and does not require any user input.
- Variable Frame Rate: When a variable frame rate video is imported, HitFilm will map the actual frames to the constant frame rate used by your project, and create a cache file to keep track of how the frames are mapped.
- Audio Mixing: When media containing audio is imported, a cache of the audio is generated for use in audio mixing.
- Audio Waveforms: When media containing audio is imported, a waveform of the audio signal is rendered and saved in the cache, so it can quickly be displayed on your timelines.
For details on configuring the Media Cache, see the Cache Options page of this manual.
Syncing Video and Audio
If your video and audio are recorded in separate files, you can sync them in the HitFilm media panel. Select the video file in the media panel, then hold CTRL (CMD on Mac) and select the associated audio file. Right-click on either of the files, and select “Merge Audio/Video.” HitFilm will compare the audio in both files, synchronize them, then replace the original audio in the video with the audio file you selected. A new synchronized file will be created, and can then be edited on the timeline. For more info see Audio and Video Sync.