
Exporting creates a new media file, created from the contents of your timeline. This can include exporting video, audio, or still image files, as well as exporting timelines for use in other HitFilm projects or other video editing applications.
- Export Menu: The Export Menu is where all available export commands are collected.
- Export Panel: The Export panel is where the export queue resides, and where you can edit the settings to be used for each export and view the progress of your exports.
- Timeline Export Menu: The timeline also contains a menu at the top left for exporting its contents.
The Export Menu
We will start with a look at the Export menu in the top menubar, where you find all of your export commands.
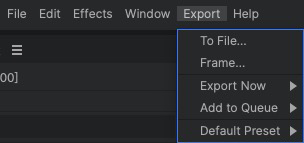
- To File…: Use this option to immediately export the entire contents of the currently open timeline. A dialog will open where you can name the file, and select where it will be saved. Once you click Save in the dialog, the export will begin as a background task in HitFilm, so you can continue working on your project while the export is processed.
- Frame…: Use this option to export the current frame as a still image. A dialog will open where you can choose the format for the image, and whether it is re-imported back into your HitFilm project. See Export Frame for complete details.
- Export Now: The options in this menu are similar to the To File… option, in that they immediately export the current timeline. The difference is that rather than opening a dialog where you choose a destination and file name, these options use the name of the timeline as the filename, and save it to the destination currently selected in the export panel.
- In-to-Out Area: Exports all frames between the In point and Out point on the current timeline, using the timeline name as the file name and saving to the default export preset.
- Contents: Exports the entire contents of the current timeline, using the timeline name as the file name and saving to the default export preset.
- Add to Queue: Use this option to add a timeline to the export queue for export later. You can add export tasks to the queue from a single project, or from multiple projects, and then export the entire queue all at once.
- In-to-Out Area: Adds the area of the current timeline between the In point and Out point to the queue, as an export task. The format and naming details can then be edited in the Export panel, before the export process is started.
- Contents: Adds the entire contents of the current timeline to the queue, as an export task. The format and naming details can then be edited in the Export panel, before the export process is started.
- Default Preset: This menu lists all available presets on your system, including any custom export presets you have created. Select any preset to set it as the default. The selected default preset will be used for all future Export Now functions, and will be assigned to all tasks added to the export queue.
The Export Panel
The Export panel contains two tabs:
- Queue: The Queue tab includes the list of tasks to be exported, and provides access to editing the settings which will be used for those export tasks.
- Presets: The Presets tab lists all of your available presets, and is where you can edit those presets or create new export presets of your own.
See Introducing the Export Panel for complete details.
Export Queue
The export queue is a list of export tasks, found in the Export panel. It allows you to add multiple export tasks to a list, and then export them all at once. Any timeline, asset, or media clip can be added to the export queue. The “Start Exporting” button, found in the Export panel, can then be used to begin exporting everything in the queue.
See the Export Panel page for full details on using the Export Queue.
The Timeline Export Menu
The Export menu at the top right of the timeline contains Add to Queue options which allow you to add the current timeline to the queue.

- To File…: Use this option to immediately export the entire contents of the currently open timeline. A dialog will open where you can name the file, and select where it will be saved. Once you click Save in the dialog, the export will begin as a background task in HitFilm, so you can continue working on your project while the export is processed.
- Frame…: Use this option to export the current frame as a still image. A dialog will open where you can choose the format for the image, and whether it is re-imported back into your HitFilm project. See Export Frame for complete details.
- Export Now: The options in this menu are similar to the To File… option, in that they immediately export the current timeline. The difference is that rather than opening a dialog where you choose a destination and file name, these options use the name of the timeline as the filename, and save it to the destination currently selected in the export panel.
- In-to-Out Area: Exports all frames between the In point and Out point on the current timeline, using the timeline name as the file name and saving to the default export preset.
- Contents: Exports the entire contents of the current timeline, using the timeline name as the file name and saving to the default export preset.
- Add to Queue: Use this option to add a timeline to the export queue for export later. You can add export tasks to the queue from a single project, or from multiple projects, and then export the entire queue all at once.
- In-to-Out Area: Adds the area of the current timeline between the In point and Out point to the queue, as an export task. The format and naming details can then be edited in the Export panel, before the export process is started.
- Contents: Adds the entire contents of the current timeline to the queue, as an export task. The format and naming details can then be edited in the Export panel, before the export process is started.
- Default Preset: This menu lists all available presets on your system, including any custom export presets you have created. Select any preset to set it as the default. The selected default preset will be used for all future Export Now functions, and will be assigned to all tasks added to the export queue.
Individual clips or layers on the timeline can also be added to the queue, to be exported independently.
- Editor clips: Click-drag any clip on the Editor timeline, from the timeline onto the Export panel, to add it to the queue.
- Selecting multiple clips on the editor and dragging them to the queue will create a separate export task for each clip.
- Composite Shot Layers: Click-drag the name of any layer from the timeline to the Export panel, to add it to the queue.
- Selecting multiple layers in a composite shot and dragging them to the queue will create a separate export task for each clip.
- Right-click: Right-click any Editor clip or Composite Shot layer and select the Add to Export option to add it to the queue.
- Selecting multiple clips on the timeline and adding them to the queue using the right-click option will create a separate export task for each clip.
Adding Export Tasks from the Media Panel
Any clip in the media panel can be queued, to add its contents to the export queue.
- Media Panel: Click-drag any clip from the media panel onto the Export panel, to add it to the queue.