
To view the journal status sheet.
- From the menu ribbon select Create Journals
![]() from the ICB and Journals group.
from the ICB and Journals group. - From the Journal Status dialog box (shown below), select the appropriate options.
- Once you have selected the entity and the version you want to view the journals for, any relevant journals will be presented in a grid on the right side of the window.
 from the
- From the Entity Sets drop-down select an Entity Set to view.
- The Input/Elimination Entities window presents a list of entities in the selected set. Click an entity to view or raise a journal for that entity
- From the Version drop-down select which version you want to view or raise a journal for.
- From the Sort by drop-down select how the Journals will be listed.
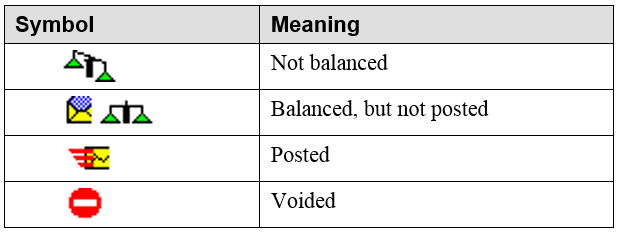
The Status of the journal is expressed graphically in the Status column of the display. The various symbols have the following meanings:
To view the full journal details, select the journal you wish to view and click Open. The full journal with all its entries will be displayed.

To raise a new journal.
- From the menu ribbon select Create Journals
![]() from the ICB and Journals group.
from the ICB and Journals group. - From the Journal Status dialog box (shown below), select the appropriate options.
- Click New to open a new empty journal details screen.
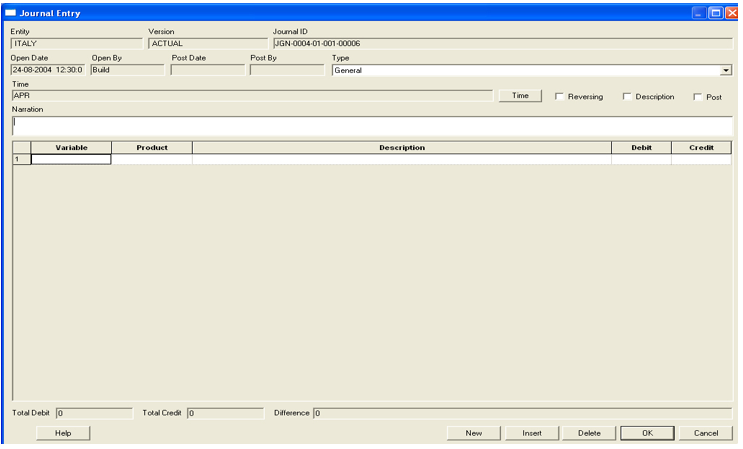
- Click Time to display a list of available time periods. Select one of these, and then click OK.
- The Reversing checkbox creates an automatic reversal of the current journal when the journal is posted. Clear the Reversing checkbox for a Normal journal.
- The Description checkbox displays member descriptions rather than the short names. For example, “JAN” would become “January”.
- The Post checkbox informs Cubix to automatically post this journal when completed.
- From the Type drop-down, select whether the journal will be General or an ICB (For inter-company balance adjustments & eliminations).
- Type a Narration to describe the purpose of the journal.
- Double-click the Variable field to display a selection of all Variables. Select one and click OK to return to the Journal Entry screen.
- Double-click the Product field to display a selection of all Products. Select one and click OK to return to the Journal Entry screen.
- The Description field is similar to Narration, but allows line level transaction description. (Narration, in contrast, covers all of the transactions involved in the journal).
- In the Debit field, enter the value that you want as the debit side of the journal.
- In the Credit field, enter the value that you want as the credit side of the journal.
- For ICB type journals only, double-click the Balance To field (not shown in screen shot above) to display a selection of all ICB entities. Double-click one of these to balance the ICB journal to this entity.
When you have finished entering the first line of the journal, press the TAB key on the keyboard or click New to add the next line of the journal.
Repeat this process until you have all the required lines for your journal. The “Total Debit” and “Total Credit” values at the bottom of the input screen should balance and the “Difference” should be zero.
When you have completed your journal, click OK to return to the journal status screen box. You will now see your new journal on the list and its status will reflect the way it was completed.
Post your comment on this topic.