
For each field in the input file, every different item should be mapped to an item for the output file. For example you may need to map account codes from the source system to the variable names used in your Cubix model. Such as:
| Input Name | Output Name |
|---|---|
| ABC12 | Profit00100 |
| ABC12 | Profit00100 |
| ABC13 | Profit00200 |
| ABC14 | Profit00300 |
The mappings can be defined manually one by one, or by using the Acquire option to populate with all the source file members, leaving just the output names to be specified.
Defining Mapping Manually
Manual definition of mapping is not the most efficient method, particularly when there are lots of different possible input names in a field. However, where only a few items exist, it can be as quick, if not quicker to add them manually rather than using the full acquire process (described below)
From the Mapping window, click New to add a new field. The Mapping Field window is used as follows:
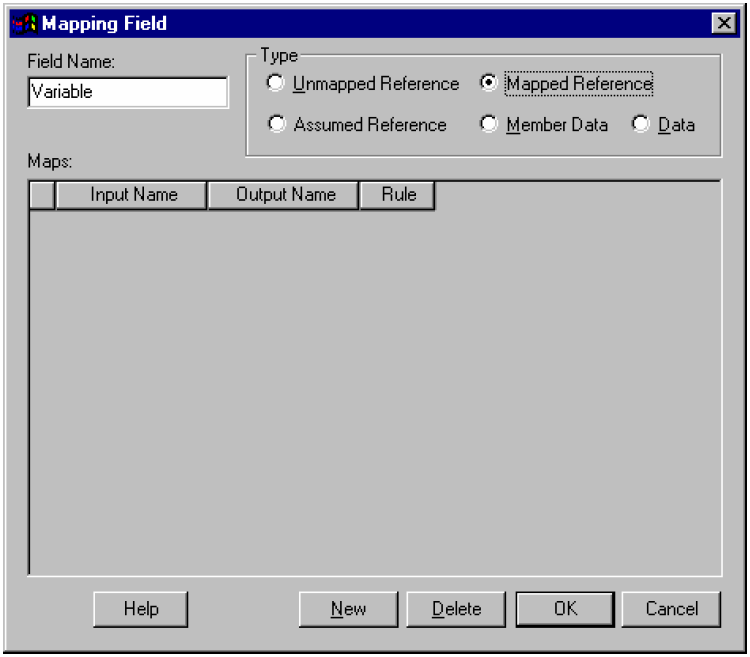
| Name | Enter a name for this mapping field |
| Type | There are five options available for the type of mapping that will be applied to this field. They are: Unmapped Reference – this field contains reference data (i.e. specifies what the data fields on this line refer to) and the names are not changed by the mapping. That is the names that come in are the same as the names that go out. Mapped Reference – this field contains reference data but the names are mapped so the output names can be different to the input names. Assumed Reference – this field contains reference data but the output is fixed to one particular name. Member Data – this field contains data (as opposed to the reference information in other fields). Data fields are not used to define mapping, but rather are the result of the process which will be loaded into Cubix. Data – this field contains the actual data values to be processed. You MUST include a mapping for data fields when the mapping is a “Many to One” type mapping. This tells Channel what fields to process the summarisation on. For a “One to One” type mapping, identifying the data fields is not normally necessary. |
| New | Adds a new field – this is where you specify input names of members and map them to corresponding output names |
| Delete | Deletes the selected member. You can select more than one member to delete. |
| Copy | Creates a copy of the selected mapping field and opens it for editing – by default, its name will be Copy of mapping. |
| OK | Accepts the member names for the current mapping field you are working on and closes the dialog box |
| Cancel | Closes the dialog box without saving changes (for instance, if you had changed the member names for the current mapping field, then clicked Close this change would not be saved) |
| Input Name | Type the name of the input member name or names – for instance, if you want to map variables called “Sales” and “Costs” you would need to name these on individual lines |
| Output Name | Type the name that you want each input name to correspond to in the matching Output Name field – for instance, if you want input name “Sales” to become output name “Total Sales” you would make a new entry, type “Sales” as the input name, and then type “Total Sales” as the output name |
| Rule | Specify an optional rule for each entry – this allows you to convert specified members during the mapping process. The rule works by multiplying the data specified by the line’s input name by the value specified in Rule. |
Once you have manually specified every expected member for the first mapping field, click OK and return to the Mapping dialog, and create a mapping field for every field in the input file, then repeat for each one the process of matching input names to output names.
Defining Mapping using Acquire
From the Mapping dialog box, click the Acquire button. This will display the Acquire Mapping dialog box.
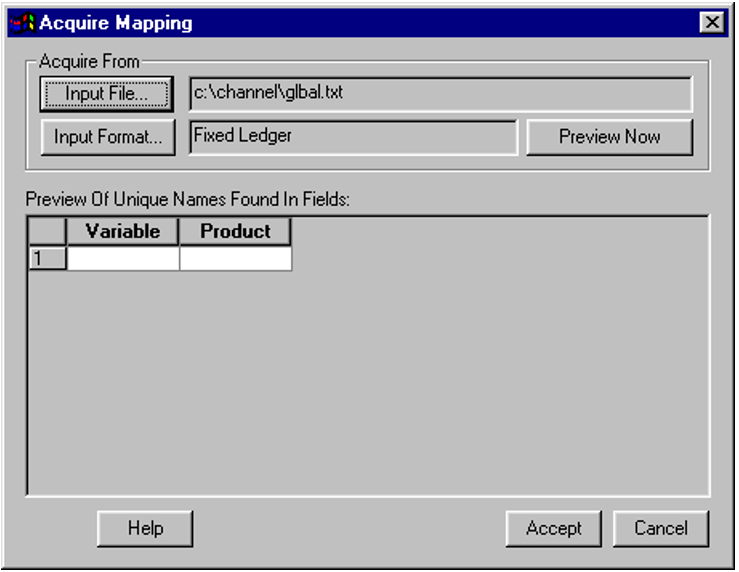
The Input File is selected. This is the source file you are wanting to map.
The Input Format is selected. This is the format you defined to go with the input file.
Because the Acquire function has already analysed the input format, it has recognised which fields are text type (in this instance Variable & Product) and determined that these are the reference fields to be mapped.
Click the Preview Now button to start the process of acquiring the unique names found in the fields.
Click OK and the names found will be displayed in the grid on the Acquire Mapping dialog, similar to below.
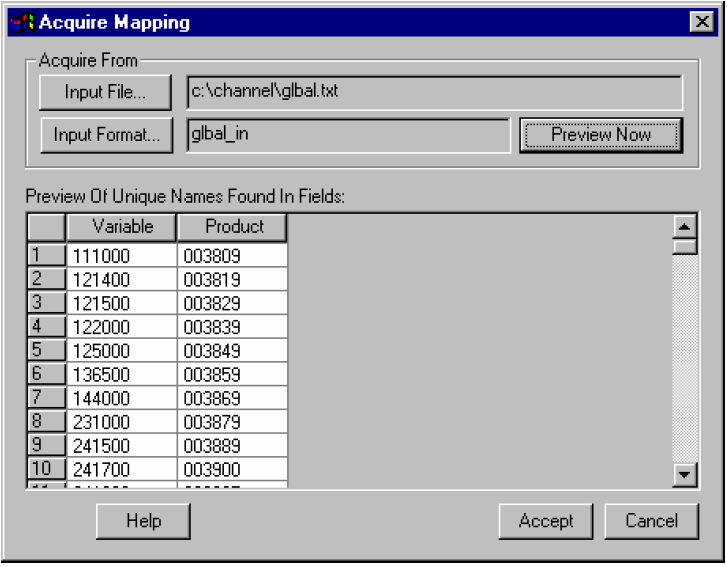
If the names found are correct, click Accept to return to the Mapping dialog box.
Your input file will include at least one field marked as Data type. Channel recognises that it is not necessary to acquire the names in these fields (as they are data, not reference), but as they are included in your format they need to be included in the mapping process. You will be prompted to confirm that you wish to include these in your mapping.
Click Yes to include these data fields as part of the mapping. When you return to the Mapping dialog you will see the new fields included in this mapping.

Post your comment on this topic.