
Any model that is created in Cubix can be shared to a network or cloud based location and accessed by anybody with the Cubix software installed on their machine, providing they have been added as a valid user in the model. See Adding Users. They can have access to the model designer, data in the model and will be able to analyse and report on it as a full Cubix user. This is referred to as sharing a model.
There are two ways a model can be shared:
- Share Model Design and Database (Joint Ownership)
- Share Database
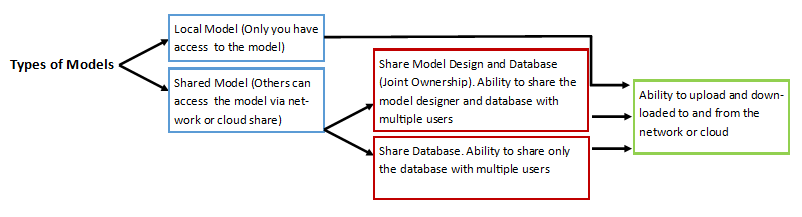
Share Model Design and Database (Joint Ownership)
In this type of share users have access to both the designer and the runtime.
The design and maintenance of a model can be made the responsibility of more than one user by assigning Share Model Design and Database (Joint Ownership). With Joint Ownership a model will appear in the model list for designated users, who will be able to edit it in the model designer once they have been advised of the Designer Username for that model.
Users will also be able to access the database in excel and use Cubix to create and analyse reports etc.
Share Database
In this type of share users have access to the runtime.
Assign Share Database so that the designer is only able to be edited by one user, all other users will only be able to view the database in excel. The model may well have been designed and created by one person and the design definitions will reside with that one user on their machine, accessed with a specific designer username that they designated when first creating the model. This means no other user can access the model’s designs.
Setting a model up for sharing
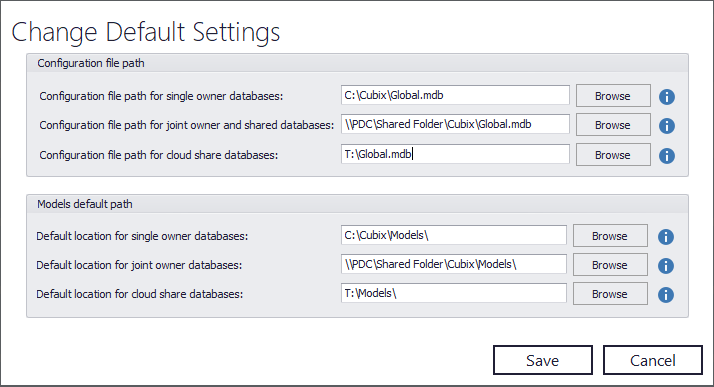
Change Default Settings
Before changing an individual model’s settings you must change the application settings to specify a configuration and default location for network and/or cloud shared models. This should be done for all users who have access to Cubix and need access to the model. These settings should be the same for all users.
From the Cubix Model Designer main screen, select the Settings option found at the top.
In the settings window, set a path for either the Configuration file path for joint owner and shared databases (Network Shared) and/or Configuration file path for cloud share databases (Cloud Shared) and for either the Default location for joint owner models (Network Shared) and/or Default location for cloud databases (Cloud Shared).
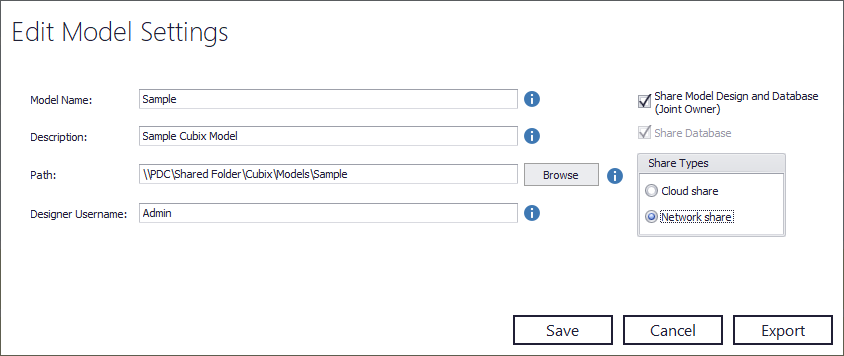
Change Individual Model Settings
For the model(s) you wish to share the designer and database, you need to edit the individual model settings by hovering over the model’s tile and select ‘Settings’. In here tick either the Share Model Design and Database (Joint Owner) or Share Database box depending on your preferred sharing option.
Next select whether the model will be Cloud or Network shared. Depending on which option you choose, the new shared model that will be created will use the paths defined in the default settings.
Check the path is now correct, Save, confirm the process.
This will move the model’s path from your local path to your shared path defined in the default settings. Once the model has been changed to a shared model there will no longer be a local copy. You can then use the Download button on the shared model to create a local copy again. From this point you can either use the shared model in Cubix and use the download feature to keep the models the same or use the local model in Cubix and use the upload feature to keep the two models the same, these features are explained below.
Upload and Download
You can upload and download any model to either a shared network or cloud. This is done using the Upload or Download button found within a model’s tile in the model designer.
When uploading a local private model this will still remain a private model in the shared area. This is mainly used for backup purposes.
If you have local and shared versions of the same model you can use both upload and download.If you have made changes to the local model and want to see the changes in the shared model use upload. If you have made changes to the shared model and want to see the changes in the shared model use download.
When selecting Upload there will be an option to select Cloud Share or Network Share, select the correct option for your model and continue. After retrieving the directory you will be given the option to choose which files are to be uploaded, select the files you want to copy across ensuring you don’t take any files you don’t want to overwrite in the shared model. Upload and wait for the process to finish.
Selecting Download from a shared model will start retrieving the directory, like Upload select the files that are to be downloaded ensuring you don’t tick any files you don’t want to overwrite in the local model. Click Download and wait for the process to finish.
Post your comment on this topic.