
Configure Pureservice authentication with OAuth 2
Configuring ADFS
- Add OAuth 2 client
- Open Powershell on the ADFS server
- Run the following command: Add-AdfsClient -RedirectUri “https://YOUR-PURESERVICE-URL/login/oauth” -ClientId “A-KEY-OF-YOUR-CHOICE” -Name “Pureservice OAuth2”
(You can easily generate a random key here: https://www.guidgenerator.com/online-guid-generator.aspx
Configuring Azure
- Log in to Azure, navigate to “Azure Active Directory” and “App Registrations”.
- To create a new Application, select “New registration”.
- Give it a relevant name
- Enter the reply URL for your Pureservice as the Redirect URI, this can be found in Pureservice Administrator settings -> Security -> Authentication -> Either Agent or End user authentication -> Set type to OAuth 2 and copy the URL after Use the following reply URL:.
- Click “Register”
- Go to “Certificates & secrets” and create a new “Client secret”. The key will be shown only once after saving, so make sure you copy it to the clipboard and save it for later in the setup!
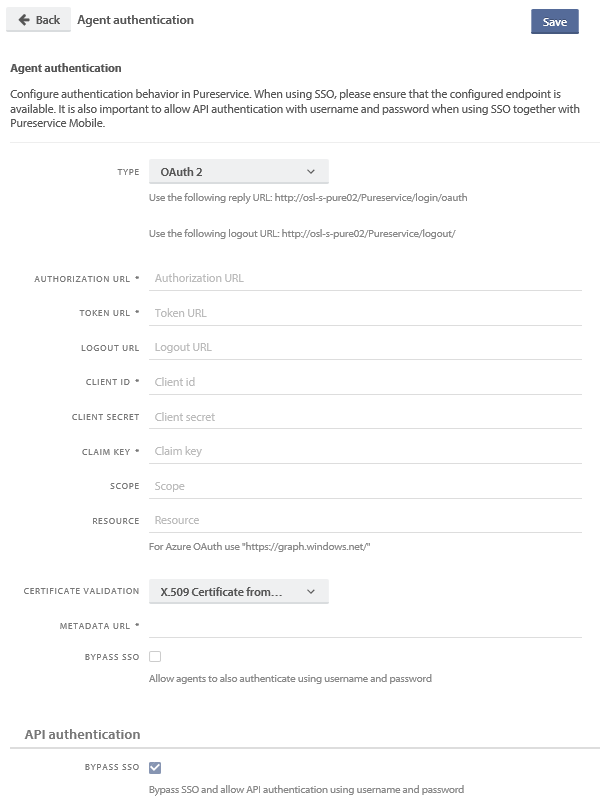
Configuring Pureservice
- Go to the Pureservice Agent Console and open the Administrator, go to Security -> Authentication and select the relevant site (Agent authentication for the Agent Console and Enduser authentication for Selfservice)
- Set the Type to “OAuth 2”
- Set the Authorization URL. This can be found in Azure under “Endpoints” as the “OAuth 2.0 authorization endpoint (v1)”-value.
- Set the Token URL. This can be found in Azure under “Endpoints” as the “Oauth 2.0 token endpoint (v1)”-value.
- Optional: Set the Logout URL. Use the same value as in the previous step, but replace “token” at the end with “logout”.
- Set the Client ID to the same as “Application (client) ID” this can be found in the Application’s settings/properties (Overview) site in Azure below the Display name.
- Set the Client secret to the same key that was generated earlier (Step 3 of “Configuring Azure” or step 1b of “Configuring ADFS”).
- Set the Claim key to the URI corresponding to the AD attribute you use as usernames in Pureservice
- Copy XML link for “Federation metadata document” and open this in a browser. This can be found in Azure under “Endpoints”.
- Find the XML node “ClaimTypesOffered” and copy the URI value of the relevant attribute.
- If the users’ usernames in Pureservice is their userPrincipalName attribute in AD, then the following “ClaimType” can be used: http://schemas.xmlsoap.org/ws/2005/05/identity/claims/upn
- Leave the Scope and Resource fields in Pureservice blank for Azure.
- Leave the Certificate validation as “X.509 Certificate from metadata URL” and enter the Metadata URL that is mentioned in step 8a.
- Optional: Enable Bypass SSO. This will allow users to log in “manually” with their Pureservice usernames and passwords while also having the option of using the OAuth 2 Single SignOn.
Need more help with this?
Ta kontakt med oss for videre spørsmål her!