
There are 3 ways to add employees to Telephone Timesheets:
1. Allow your employees or subcontractors to self-enroll when they first call in.
2. Import employees from another system like When To Work, QuickBooks Online, QuickBooks Desktop, ADP, WinTeam, or any other system that supports file exports or API-based exports.
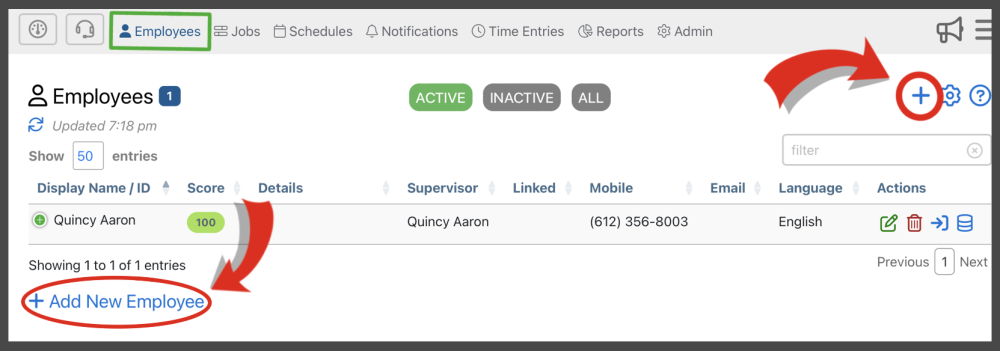
3. Manually add each employee either using the ![]() icon in the upper right corner or use the
icon in the upper right corner or use the  in the lower left corner of the Employee section of the portal.
This will bring you to the Add Employee form where you can enter the Name, Mobile Number, Language, and other details for the new employee.
Highlights of This Form:
First Name
First name of the employee. It is OK to have more than one employee with the same first name.
Last Name
Last name of the employee. It is OK to have more than one employee with the same last name.
Display Name
When entering your employee’s first and last name, their display name will auto-fill. However, you can enter a custom display name in this field. This is especially useful if you have 2 employees with the same first and last name. For example, if you have two employees named James Smith, but one of them goes by Jim and the other goes by Jimmy, you could customize their display names to be Jim Smith and Jimmy Smith.
Employee Supervisor
This field will not be visible unless more than one Supervisor exists. If more than one supervisor exists, then you will be required to assign a supervisor to each employee. By assigning a supervisor to each employee, you enable the following capabilities:
1. Reports can be filtered based on the employee supervisor. For example, you could filter a report to only show employees that belong to a particular supervisor.
2. Admin Portal permissions can be enforced based on the employee supervisor. For example, you could restrict a supervisor to only be allowed to view time entries that contain employees they are assigned to.
Phone Number
Each employee must have their own unique 10-digit mobile number. The mobile number is required as it is used by the system as the employees unique identifier, or “Employee ID”. This approach generally works well because all mobile numbers are globally unique and they are easy for employees to remember. For the rare case where an employee does not have a mobile number, you can assign a unique 10-digit “phantom” mobile number. For example, 612-555-1234. This is not a real number, but it follows the North American Dial Plan format, and can be used by employees who do not have a mobile phone. Alternatively, you can enable the use of an employee ID for clocking in and out.
Email Address
This is where you can add your employees email. This is optional.
Language
English, Spanish, French, Chinese, and Russian are supported. Additional languages added on request.
Tags
Tags can be used to add searchable labels to an employee, such as CPR trained, Armed, etc. Tags can be especially useful when searching employees for jobs that have prerequisites. The tag function has freeform text, meaning you create any tag that is applicable to your employees. Once you have created a tag it will be saved, that way you can reuse it for other employees.
Add Address
This is where you are able to add an employees address. In order to do so you will need to click add address + to add a field for an employee address. This is optional if you’d like to store this information in Telephone Timesheets. This will eventually be useful for jobs where employees that live within a certain area could accept the job.
Supervisor Group (advanced options)
This field will not be visible unless Supervisor Groups are in use. Supervisor Groups can be created under the Admin —> Supervisors menu. By assigning a Supervisor Group to each employee, you enable the following capabilities:
1. Reports can be filtered based on the employee supervisor. For example, you could filter a report to only show employees that belong to a particular supervisor.
2. Admin Portal permissions can be enforced based on the employee supervisor. For example, you could restrict a supervisor to only be allowed to view time entries that contain employees they are assigned to.
External ID (advanced options)
The External ID is used for 2 reasons.
- To assign an ID that is already in use in an external system, such as a payroll system. The External ID can be entered here manually or in some cases the External ID can be synced automatically with a third party system (e.g. ADP).
- To assign an ID that can be used as en “Employee ID” for clocking-in and out over the phone. This can be useful in cases where your employees are already accustomed to using their employee ID number for clocking-in and out.
Station Pin (advanced options)
A Station PIN is the number used for employees to clock in at a fixed station such as a tablet mounted to a wall, a lobby PC used as a clock in “kiosk”, or even the employee’s personal desktop computer. If a station is set up, it can be configured to require the employee to enter their unique Station PIN number for clocking in and clocking out. Note: a Station PIN is not the same as an External ID. A Station PIN cannot be used while clocking in over the phone.
Employee Details (advanced options)
In this field you can add any additional information you deem important for a particular employee. It’s important to note that Employee Details will be displayed in Time Entries.
Department (advanced options)
This field allows you to assign an employee to a department. The department field has freeform text, meaning you create a department that is applicable to your employees. Once you have created a department it will be saved, that way you can reuse it for other employees
Start Date (advanced options)
This field allows you to select your employees Start Date. This can be useful for reports and knowledge on how long that employee has been employed.
Birthday (advanced options)
This field allows you to select your employees Birthday. This is optional for you to store this information in Telephone Timesheets.
Anniversary (advanced options)
This field allows you to select your employees Anniversary. This can be useful if employees get a yearly raise, have annual training, etc.
Base Pay Rate (advanced options)
An employee’s Base Pay Rate will be attached to any time entries for that employee unless there is a more specific pay rate assigned. More specific pay rates can be defined at the Job level. Job-specific pay rates can be defined in the Job Edit form, or in the Pay / Bill Rates table.
Mark Employee Active (advanced options)
When an employee is marked as Active they will be visible wherever employees are displayed. If this field is not selected they will be marked as Inactive. Inactive employees will be hidden. This field is preselected, but you can toggle this on an off as you please.
Use GPS (advanced options)
When Use GPS is selected, that employee will receive a request while clocking in to share their location. If this is not selected they will not be asked to share their location. This is nice for employees who may use a device to check in such as a flip phone that doesn’t allow GPS sharing. This field is preselected, but you can toggle this on an off as you please.
Enable Voice Fingerprints (advanced options)
A Voice Fingerprint is an audio recording created by the employee during clock-in. If you have Voice Fingerprints enabled, your employee will be asked to record their name over the phone when they call to clock in. Voice Fingerprints helps to discourage buddy-punching when multiple employees are calling in from the same landline phone. Recorded Voice Fingerprints are visible in each Time Entry.
Auto Check In / Out (advanced options)
This feature allows an employee to be automatically clocked in and out for their shift. This could be useful for employees who are paid fixed number of hours. Their number paid hours would be determined by the employees schedule. This feature is hidden. If you would like access to this feature contact support@telephonetimesheets.com
![]()
Need more help with this?
Telephone Timesheets Support