
The Family Link
The Student-> Family Link section is where the system will connect all of the members of a family.
The Family Link page is also where the information is used for Family Billing Statements. The Email address the statement is sent to and the first name and last name of the person it is addressed to with the address. To edit any of this information click the Pencil icon
You can look at All Active Families or All Inactive Families by selecting/deselecting the check boxes. If you would like to look at ALL leave box boxes checked. Uncheck both boxes to see Families who are not Linked.
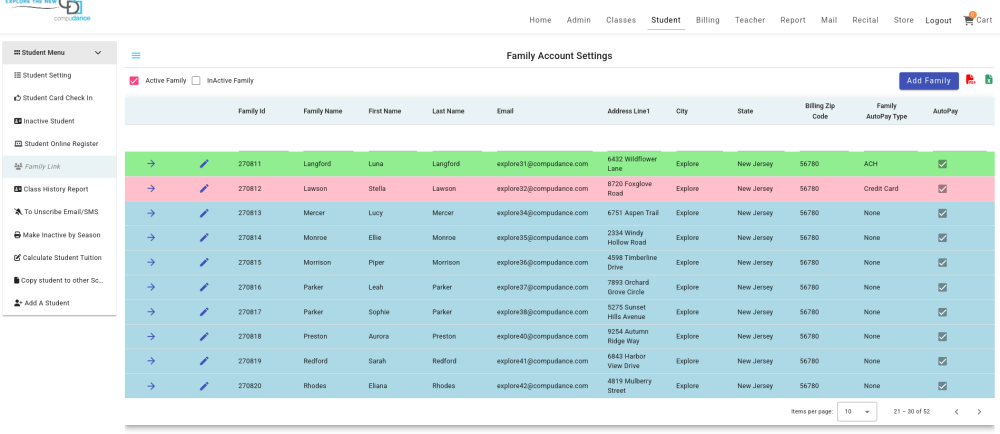
The Autopay Type flag – This flag will be triggered when an account is on file just to control the payment tabs in View/Pay Invoices and Family Invoices by the studio and the parent. It will not control the Autopay feature for the family or remove a previously saved account. See below.
The Colors represent the Autopay Type – ACH account Credit Card None No Type selected
Most of the time, the studio will not have to link students to a family themselves.
- If you enter the students together in Add New Student form and answer yes to “Do you want to add a sibling?”
The Students will all be made into a family under the_ Billing Parent’s Last Name_ . (You can always edit this after it is created.)
- If you are adding a sibling to the system of a student who was previously entered, you should use the same email address for the new student.
The system will then copy the address and guardian tabs. It will also add the new student to the same family of the existing student and add the new sibling student to be accessed by the same parent logins as the previously entered student with that email address.
If a Student is not appearing in it’s family or in the wrong one
- Go to the Family Link and find the family the student should be associated with
- Click the plus for the detail tabs
- Go to the Add Sibling Student tab (2nd tab)
- Find the student to be moved to this family. Check the box on the right.
- Click Link.
If the student was in a different family, it will automatically be moved to the new one.
You can view the family in the Student Sibling tab
It will show the student guardians, then click the plus to see the Students.
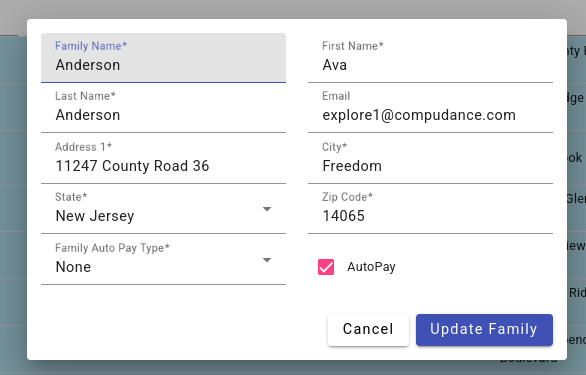
To Add or Edit and existing Payment Account on file
The Studio may need to edit this information. ( It is actually saved in the Payment XP system, not CompuDance.)
If you are Adding or changing the type of account (Credit Card or ACH) for the same type of account, you may go to that payment tab.
Click Edit and correct or enter the information. Then click Update.
If PaySafe approved of the information entered, you will see the *** information updated.
The studio may turn on/off a family’s Saved accout from Autopay.
If the school has the autopay feature turned on for the school, you may now individually control which families have the autopay function run when one of their invoices are scheduled. Therefore, you may let a family save a payment account and not include them in autopay. (You can also give this on/off ability for the parent to control.)
To edit the autopay option, Go to the Student- Family Link page.
Find the family. Click Edit to open the form.
Check the Autopay checkbox to include this families invoices in autopay.
Uncheck the box to remove from Autopay. The payment account on file will still be saved.
Click Update to save.
If you need to Remove or change to the other payment type
You will need to remove the information first from the PaymentXP system .
Follow these directions, also found in the Left side menu of Family Link.
Need more help with this?
Please complete our support form if you need assistance.
Powered by