
Relays allow video from one layer, viewport or mix to be sent to other layers as a source on the same machine.
 To access relays, select the relay icon in the Source of the desired layer.
Relay Select is two integer pins.
| Note: The relay select pin has changed from Hippotizer Version 4.4 from one pin to two. |
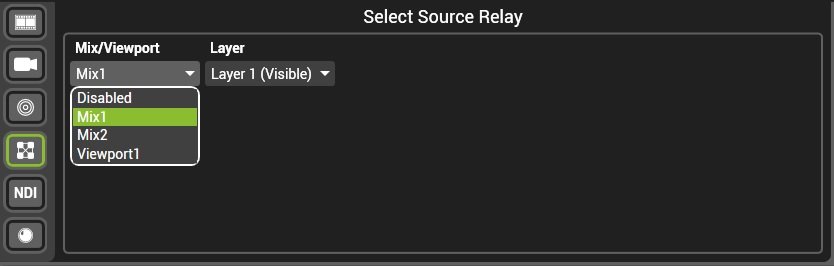
Mix / Viewport
A layer can use any local layer, mix or viewport as a video source.
0: Disabled Not relay source used
1: Mix 1 If master is set on the Layer Relay pin, Mix 1 will be used.
2: Mix 2 If master is set on the Layer Relay pin, Mix 2 will be used.
…
127: Mix 127 If master is set on the Layer Relay pin, Mix 127 will be used.
128: Viewport 1 If master is set on the Layer Relay pin, Viewport 1 will be used.
129: Viewport 2 If master is set on the Layer Relay pin, Viewport 2 will be used.
255: Viewport 128 If master is set on the Layer Relay pin, Viewport 128 will be used.
Layer
0: Master Use the Mix or Viewport selected on the Mix/Viewport pin
1: Layer 1 (Visible) Use Layer 1’s visible layer
2: Layer 1 (Hidden) Use Layer 1’s hidden layer
3: Layer 2 (Visible) Use Layer 2’s visible layer
4: Layer 2 (Hidden) Use Layer 2’s hidden layer
…
32: Layer 16 (Visible) Use Layer 16’s visible layer
33: Layer 16 (Hidden) Use Layer 16’s hidden layer
Relay Rendering
Relays do not carry geometry
Relays are located after the media player and effects, but before colour, geometry and the layer level in the render sequence. Meaning a relay will convey clip information and effects but ignore colour, geometry and layer level.
Relays are before X-Fade
Relays use layers as a source before the X-Fade engine. As a result, if the visible layer is used as a relay source the content will not fade — it will snap at the midway point of the X-Fade.
Common uses for Relays:
- Adding Effects to a Layer
- On Layer 1, leave the level down and play a clip
- On Layer 2, set the Layer source to relay from Layer 1 and put the level up.
- Use Layer 1’s media select and effects
- Use Layer 2’s Geometry, colour, level and effects.
- Sending a whole mix to a Pixelmapping mix
- Start 2 Mixes, using one to output to the Pixelmapper only and the other outputting video to screen
- Set Layer 1 on the Pixelmapper mixes to relay from Mix the Mix Master of the output mix.
- Pixelmapper will now exactly follow the output and corrections can be applied to pixel mapper (Geometry, Colour, Level etc.)
- Multiple Inputs into SHAPE
- Patch SHAPE
- Navigate to the Viewports page of Zookeeper and click the SHAPE viewport
- Inputs 2-8 of SHAPE are relays and can be changed in real time.
For more information about SHAPE in Hippotizer please see here.
Post your comment on this topic.