
Requests for the R & R Leave can be submitted up to 6 weeks post facto and 6 weeks in advance.

The Rest & Recuperation option will be displayed only if the staff member is eligible for R&R.

- Start the transaction using the menu path: Employee Self-Service SM>Time Management>Create Leave Request
- Click on the Employee Self-Service SM tab.

- Click on the Time Management link.

- Click on the Create Leave Request link.

- Click on the dropdown arrow icon to close the Absence Balance section.

- Select Rest & Recuperation (R&R) from the list of leave types.

- Select the date the leave is to start. Dates can be selected from the calendar by clicking on the Calendar icon or entered directly into the field using the DD.MM.YYYY format.
- Select or enter the date the leave is to end. Dates can be selected from the calendar by clicking on the Calendar icon or entered directly into the field using the DD.MM.YYYY format.

- Add remarks or comments in the New Note box explaining why the request is being submitted on behalf of the staff member.

![]()
Next, we will select the time manager(s) who should receive your request.
- Click on the drop-down arrow to view a list of the staff member’s primary and secondary time managers. The list may be blank if the primary manager has not delegated this responsibility.
The primary time manager will automatically receive notification of the leave request even if they have delegated the time approval function to a secondary manager.
If they have delegated the time responsibility to a secondary time manager, the staff member’s secondary manager will not be notified of the request unless they are selected from the list of time managers.

- Select the secondary time manager from the list of managers who should receive notification of the request or select ALL and all the secondary time managers will receive a notification.
![]()
Next, we are going to have the system check the request against the staff member’s leave balances.
- Click on the Check button. This will check your request against any other submitted requests for those days to ensure there are no conflicts.

- Click on the Send button. You will be asked to verify the information you entered for the request.

- Verify the information (dates, note, calculation of used dates and managers who will be notified) and click on the OK button.

![]()
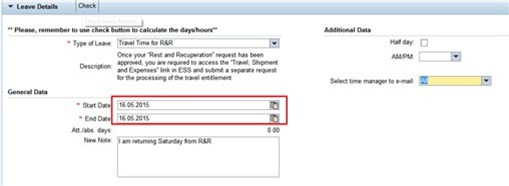
Next, you will need to enter the days the staff member will be traveling for R&R. You will have to enter the time when the staff member will leave and return as two separate requests. First, we will enter the date the staff member will be leaving for R&R.
- Your request will be sent to the staff member’s primary time manager and any secondary time manager you selected earlier.

- Select Travel Time for R&R from the list of leave types.

- Select or enter the start date the staff member will be leaving the duty station for R&R, this is the day before the first day of R&R.
- Select or enter the end date of travel from the duty station for R&R, this is the same as the start date.

- You may add remarks or comments in the New Note box.
- Select the staff member’s secondary time manager from the list of managers who should receive notification of the request or select ALL and all the secondary time managers will receive a notification.

- Click on the Check button. This will check your request against any other submitted requests to ensure there are no conflicts.

- Click Send button Send.

- Verify the information (dates, note, calculation of used dated and managers who will be notified) and click on the OK button. Your request will be sent to the primary time manager and any secondary time manager you selected earlier.

![]()
Next, we will enter the Travel time for R&R for the return trip.
- Next, record return to the duty station as R&R travel time. This will be the day after the last day of R&R and the steps are the same as the above steps you just performed for the travel time from the duty station.
![]()
- Once you have entered and sent the R&R request and From/To R&R Travel requests to the time manager, click on the Leave Request tab.

- Your requests have been sent to the time manager and are shown as sent in the Leave Requests list. The status will change when approved. The primary time manager will appear in the table, but the request will also be sent to any secondary manager you selected in the steps above.

![]()
Next, a request for travel must be submitted so the R&R request can be approved by the HR Partner, refer to the documentation on Travel for more information.
Time Administrators will not have the access to submit travel requests on behalf of staff members. In the event staff members request submission of a travel requests for R&R on their behalf, they must be directed to the Travel Administrators.


)footnote1
Post your comment on this topic.