- Start the transaction using the menu path or transaction code.
- Click
or hit enter after typing ZTM_TIMESTMNT in the command text box.
- Click
to open the Variant directory.
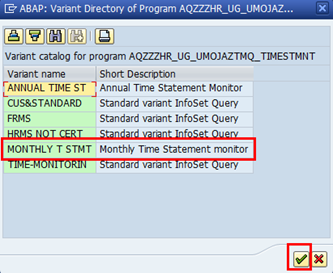
- From the Variant Directory, select the variant for this report.
Variant options are:
- ANNUAL TIME ST – used to check the certification status of Annual Time Statement
- MONTHLY T STMT – used to check the certification status of monthly time statements - Click
to select the variant.
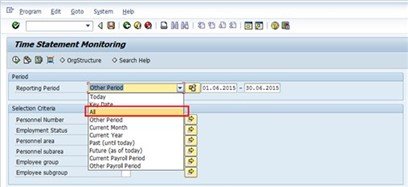
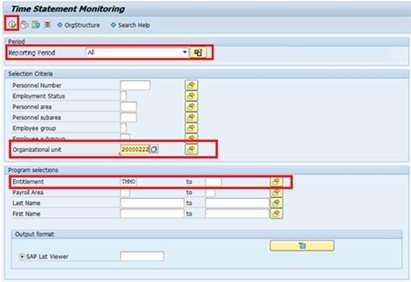
- The Reporting Period in the Period section defaults to Other Period, which enables you to search for the monthly statements issued during a definitive time frame.
Select All to capture all the monthly time statements, whether certified or not, for an individual staff member.
Reporting Period options are:
- Today – used to filter the records by today’s date. The system will display staff members monthly time statements generated as of today.
- Key Date – used to filter the records by the date you entered. For example, if you enter 30.04.2022 as the key date the system will display staff members monthly time statements on 30.04.2022.
- All – used to display a list of all staff who submitted a monthly time statement from 01.01.1800 through 31.12.9999. Also, if you enter a specific Personnel Number(s) with selecting option “all”, the report will populate all the monthly time statements of this/these staff member(s).
- Other Period – used to filter the records by the date range you entered. For example, if you enter 01.04.2022 – 31.05.2022 the system will display the staff member’s monthly time statements for the month of April and May.
- Current Month – used to filter the records by the current month. The system will display the staff member’s monthly time statement for the current month.
- Current Year – used to filter the records by the current year. The system will display the staff member’s monthly time statement for the current year.
- Past (until today) – used to filter the records by the past year to the current date. The system will display the staff member’s monthly time statements from 01.01.1800 up to today’s date.
- Future (as of today) – used to filter the records by the current date and future dates. The system will display the staff member’s monthly time statement as of the current date and beyond.
- Current Payroll Period – used to filter the records by the current payroll period. The system will display the staff member’s monthly time statement for the current payroll period.
- Other Payroll Period – used to filter the records by the current payroll period. The system will display the staff member’s monthly time statement for other payroll periods.
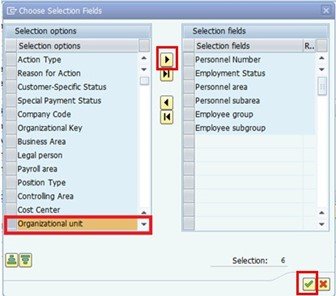
- Click
to open the selection Fields to add Organizational unit to the selection options.
- Select Organizational unit, then click
to add to the Selection fields list.
- Click
to confirm selection.
- Enter the Organizational Unit code for Advisory Committee on Administrative and Budgetary Questions (ACABQ).
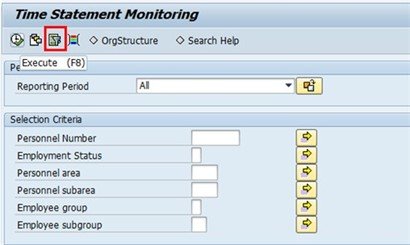
Notice that the Entitlement field under Program Selections has been pre-populated after selecting the Variant MONTHLY T STMT. No action is required in this portion. - Click
to run the report.
- Based on the period and variant that was chosen (i.e., All, Monthly Time Statements), the system will generate a list of all available monthly time statements for the selected Organizational unit.
The generated report has the following information:
- Index No.- displays the staff member’s Personnel No.
- Name – two columns displaying the staff member’s first and last name.
- Employee Group – displays the staff member’s group, e.g. International Staff.
- ESgrp – displays the staff member’s subgroup type, e.g., PR (Professional).
- Personnel Area and Personnel Subarea – two columns that display the staff member’s duty station information, e.g. United States of America and New York, respectively.
- Org Unit – two columns displaying the staff member’s organizational unit information (number and name).
- IT Start Date and IT End Date – two columns displaying the dates of the monthly time statements.
- Click
to scroll to the right and see the remaining columns.
In this example, you will see that the staff member certified the time statements for the months November 2015 and December 2015. The staff member has not certified the time statements for the months January, February, and March 2016.
The remaining columns are:
- Entitlement – The type of report selected, in this case TMMO, the Monthly Time Statement.
- Monitoring Initiated – when the monthly time statement was issued.
- Document submitted – when the staff member certified the monthly time statement.
- Monitoring Complete – when the staff member submitted the monthly time statement.
- Monitoring Follow-up – which statements are pending certification. - Click
to print preview.
- You can save this report as an Excel file by clicking List-> Export-> Spreadsheet and follow the on-screen instructions to save the spreadsheet.
- Click
multiple times until you exit the report screen and the Time Statement Monitoring filter screen appears.
- Click
to return to the SAP Easy Access screen.
)footnote1
Last modified:
17 January 2023


 to open the Variant directory.
 to open the selection Fields to add Organizational unit to the selection options.
 to add to the Selection fields list.


 to print preview.
 multiple times until you exit the report screen and the Time Statement Monitoring filter screen appears.
 to return to the
Post your comment on this topic.