
The Setting tab displays options that change the way RazorPlan looks and functions. This area should be reviewed when first setting up the program and typically will not need to change it after the initial setup. Changes to these system settings are not client file specific and do not change client data. However, some settings change the way RazorPlan performs calculations which can result in the analysis looking different especially if the file was build under different conditions. Please review client files carefully after changing some of these system settings.
Language
To switch RazorPlan between English and French, select the desired language from the drop-down and click  . Once a language has been selected, all content and Client Reports will also be updated. Text data entered by you (i.e. Goals, Recommendations, and Planning Notes) does not get translated and should be reviewed whenever the language option is switched.
System Switches
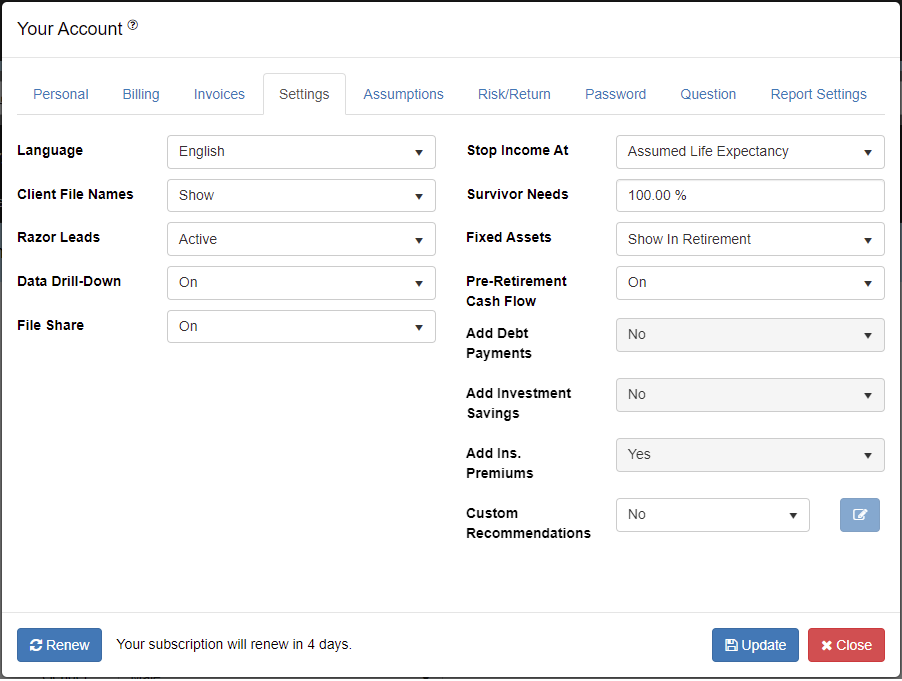
In this window there are 4 system switches that modify access to certain areas within the software.
- Client File Names – This controls the display of client file names in the Open Client window. Setting to “Show” will also enable the Recent Activities list on the RazorPlan Home Page.
- Razor Leads – This is the master control for your Razor Leads account. Set to “Inactive” to disable all areas of Razor Leads in your account and Custom Link.
- Data Drill-Down – This allows you to disable the Drill-Down controls within data entry. If this level of data entry is not required by you, you can set to “Off” and all drill-downs will be removed.
- File Share – This will enable or disable the option to Share files to and from your RazorPlan account. If set to “Off” you will not have the option to share files or receive shared files.
Planning Switches

There are 7 planning switches that change data entry screens, adjust how the program calculates in certain situations and change how the charts are displayed.
- Stop Income At: Control when income will stop for client(s) in a plan. Select ‘Assumed Life Expectancy’ to have income stop at the entered client and spouse’s assumed life expectancy, independent of each other. Survivor percentages will control how income from pensions and other areas will carrying forward after the assumed life expectancy. When this option is used, survivor needs can also be controlled using the Survivor Needs % area in Retirement Income Needs. Select ‘End of Analysis’ to have income continue to the end of the analysis, which is determined by the later of client or spouse assumed life expectancy.
- Survivor Needs: Enter the default percentage that will be set for new client files in the Survivor Needs field of the Retirement Needs tab in Step 2. (Note: this field is disabled when Stop Income At is set to ‘End of Analysis’ .
- Fixed Assets: Set the default for displaying the fixed assets on the Financial Assets Chart. Select ‘Hide In Retirement’ option to hide the fixed assets bars on the financial assets chart. Select ‘Show In Retirement’ to have the bars for fixed assets displayed for all years on the financial assets chart.
- Pre-Retirement Cash Flow: Indicate if the program is tracking pre-retirement cash flow. Selecting On makes the program track pre-retirement cash flow and allows for the entry of Pre-Retirement Lifestyle Needs which are used to determine allocated and unallocated income. Selecting Off results in the program not tracking pre-retirement cash flow. (Note: RazorPlan Advanced subscribers need to turn Pre-Retirement Cash Flow on to enable the Cash Flow Excess Management Tool.)
- Add Debt Payments: When Pre-Retirement Cash Flow (switch #4) is turned Off the program needs to be told if debt payments are going to be added to lifestyle needs or not. Select Yes to default the program to add debt payments to the lifestyle needs amounts entered, including in retirement years. Select No to set the default for the Add Debt Payment field to No, indicating that debt payments are not added to the lifestyle needs. This field sets the default for new plans but can be changed on a client by client basis.
- Add Investment Savings: When Pre-Retirement Cash Flow (switch #4) is turned Off, the program needs to know if investment savings should be added to lifestyle needs. This field allows for setting a default value on new plans, Yes indicates that when cash flow planning is turned off the investment savings should still be added to lifestyle amounts. Select No to set the default on new plans to not include investment savings in Lifestyle Needs when pre-retirement cash flow is turned Off.
- Add Ins. Premiums: If Pre-Retirement Cash Flow (switch #4) is turned Off, RazorPlan needs to understand how the program should handle any insurance premiums entered. This field allows for setting a default on how to handle insurance premiums. Select Yes to set the default to add insurance premiums to the Lifestyle Needs amounts entered. Select No to set the default to not include insurance premium amounts with the lifestyle needs.
Custom Recommendations

RazorPlan allows custom recommendations to be used in place of the standard text recommendations that are provided with the program. When Yes is selected, the Recommendations area of the program displays only the custom recommendations that are entered using the edit feature provided here in Your Account.
To edit/add custom recommendations, click the  button to open the custom recommendations window.
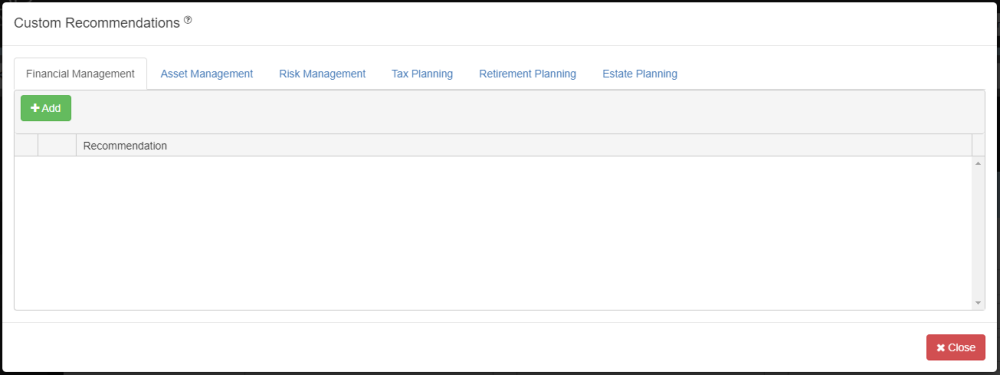
Recommendations can be added for all of the recommendation categories. To add a new custom recommendation to a category first select the category tab and then click the  button. A blank line will appear where the custom recommendation text is entered. Custom recommendations are designed to be used in all client files so the text entered should be generic and not specific to any one client. These custom recommendations can be added and tailored to specific client files by using the Recommendations area of the program.
Custom recommendations can be removed by clicking the  button on the line of the recommendation that you want to remove. The deleted recommendation is removed from the program defaults however it is not removed from any client files the recommendation was added to.
When all of the custom recommendations are entered click the  button to store the recommendations to the program defaults. The standard RazorPlan recommendations can be restored at any time by changing the Custom Recommendations drop down to No.
Need more help with this?
Contact Razor Support