
When platting new Subdivisions, Landmark Subdivide Tool interacts with MapAnalyzer to create parcels from a Subdivision and Lot layer.
Steps in Subdivision Creation
- SPLIT parcel into the correct size for the Subdivision (if needed).
- BUILD Subdivision, Lot and Block Layers in MapAnalyzer
- USE Subdivide Utility in LandMark to enter Appraisal data
- CONNECT the LandMark data to MapAzalyzer layers to make new accounts
Parent/Child accounts will show the same message in the Value Change Log.
Subdividing Parcels Across Multiple Sections
If subdividing across multiple sections, there are extra steps to do…
A. BUILD Subdivision, by drawing Lot, Block(s), Subdivision layers in the map (Step 2)
B. CHANGE the first four digits of the parcel number to the subdivision code on the parent parcel
C. COMBINE multiple parcels into the parent parcel
D. SUBDIVIDE from the parent (Step 3 and 4)
1. SPLIT parcel into the correct size for the Subdivision (if needed).
Go to Splits: for how to video and step by step instruction.
2. BUILD Subdivision, Lot and Block Layers in MapAnalyzer
To Add Subdivision Layer by COGO
OPEN Subdivision Layer in Edit Mode
GO to Add — Add by COGO
SET waypoint
SET POB
ENTER metes and bounds for Subdivision
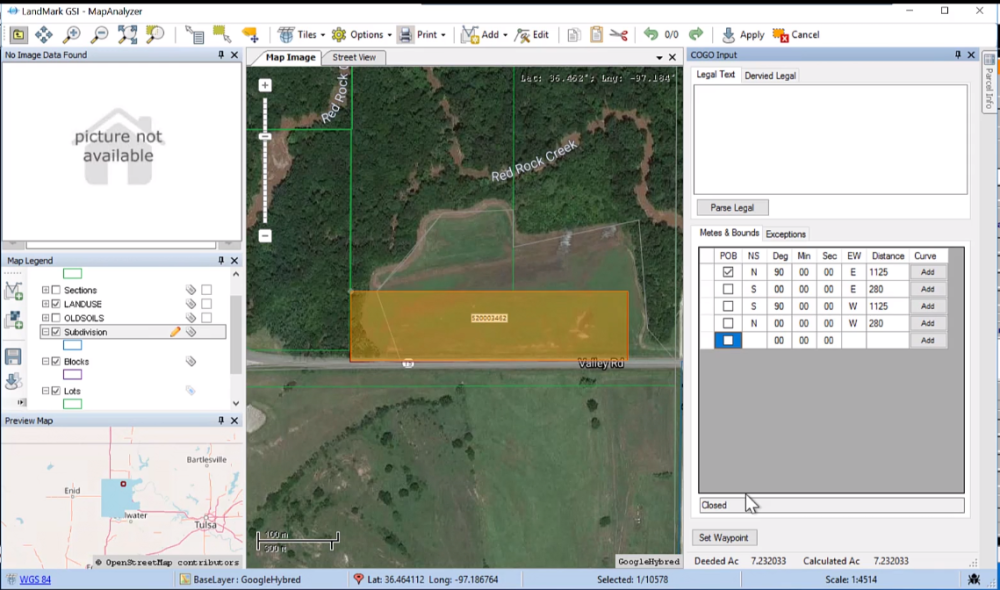
CLICK Apply
YES Continue Editing
WRITE Subdivision name under value
SAVE
RIGHT-CLICK to realign vertexes
CLICK Apply
NO
Your subdivision layer is complete. Now user must add lot layer.
Add Lot Layer by COGO
OPEN Lot Layer in Edit Mode
GO to Add — Add by COGO
SET waypoint
SET POB
ENTER metes and bounds for first lot
CLICK Apply
YES Continue Editing
TYPE lot number under value
SAVE
RIGHT-CLICK to realign vertexes
CLICK Apply
REPEAT until all lots have been added.
IF multiple lots are the same size and shape, user may copy and paste lots, updating the lot number each time.
Aline vertexes and apply to each new lot.

Add Block Layer by COGO or copy and merge
(Adding block by COGO works the same as above.)
To add Block layer by copy, paste and merge:
OPEN Block Layer in Edit Mode
CLICK on Lot Layer to highlight gray
SELECT by polygon all lots in block
RIGHT-CLICK and SELECT copy
CLICK on Block Layer
SELECT by polygon on area to paste
RIGHT-CLICK
PASTE
SELECT by polygon area AGAIN
RIGHT-CLICK
CLICK merge
CLICK Apply
YES Continue Editing
TYPE block number under value
SAVE
RIGHT-CLICK to realign vertexes
CLICK Apply
NO
The Block Layer is complete.
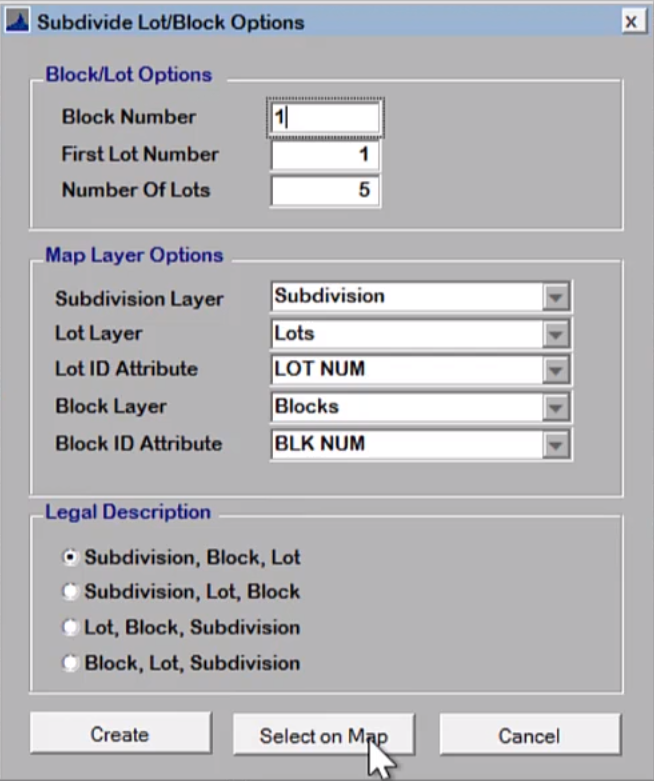
3. Use Subdivide Utility in LandMark to enter Appraisal data
From LandMark go to Tools — Subdivide, the Subdivide Utility will open.

Parent Parcel Data: This will be the parcel in which the subdivision was/ will split from.
New Parcel defaults: here users can enter the street name, subdivision code.
Create a new subdivision by checking the “Create New Subdivision” box, check process as pending box (if needed) and make any changes to the Default note.
Appraisal Data: Enter appraisal data information. If needed users can edit the Parcel ID and Cadastral numbers. If platting a new subdivision across section lines, LandMark recommends changing the parcel ID at this time. Example: If the subdivision code is 46, user may create a new Parcel ID like this: 0046-00-001-001-0-000-00
- Block Count: this will be the total number of blocks that have linked accounts to create. Example: If the Block numbers to be added are 5-7, user must enter & as the highest block number (even if there are three blocks).
- Lot Count: total number of lots.
- Land Value: here users can enter a set land value for the parcels.
After entering the required data in the form, select the Create List button.
If the plat has multiple blocks the user will be prompted to select the lots in each block.
If there are no defined blocks the user simply selects the lots
The plat tool for a subdivision with multiple blocks.
The Subdivide tool with automatically clip the subdivision from the parent parcel and create new parcels for each lot in the subdivision.
Under legal description, the user can select how the legal description will read from the provided data.
4. CONNECT the LandMark data to MapAzalyzer layers to make new accounts.
When the Select on Map button is pressed, MapAnalyzer will open. If blocks are defined, all lots contained in each block will be selected. If blocks are not defined, all lots in the subdivision will be selected.
When the lots are selected CLICK the  button at the top of the form. This button will populate the New Accounts tab of the Subdivide tool.
When all the lots or blocks have been defined select the Process Sub button.
The tool will then create new parcels in Landmark and a new polygon in the parcel layer for each lot.

Post your comment on this topic.