
Setup Process followed in Quick Start Guide for KC-BRAINware Server Units
The below steps will be shown in the Quick Start guide that is shipped inside the KC-BRAINware5/25/50 units. This explanation skips some steps and begins with step 4 from the document.
Step 4: Connect the Inputs and Outputs
- Connecting Keyboard, Mouse, and Display are optional. SSH has been enabled by default and is the recommended process for configuring your KC-BRAINware unit
Step 5: Connect the power & Network cables
- Connect Power and Ethernet cables
Step 6: Set up KC-BRAINware
Knowledge of IP networking is required to perform the following procedure. Inaccurate IP calculation could damage your IP network when you start KC-BRAINware
- You may need to contact your IT manager to obtain the below information
Connect to the KC-BRAINware using one of the two options below
- Ssh kramer@IPofHardware
- Password = KC_Brainware
- You can also connect a mouse, keyboard and monitor to KC hardware
- Password = KC_Brainware
Check for running containers
These units are shipped with licenses installed and the Docker image is configured to ensure that powering on a new KC BRAINware unit will start all your Brains. To make sure you do not create conflicts within the Docker software check to see if you have running containers when setting up your new unit
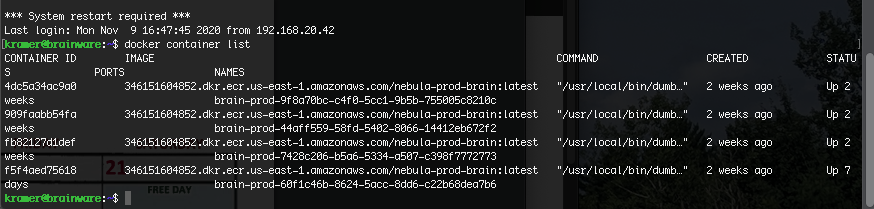
- docker container list
- If containers are running you will see a list of containers like the image shown below
![]()
- If containers are running you will see a list of containers like the image shown below
- If you see running containers and you have not configured the Network settings below, you will need to stop the running containers and prune the docker system
- docker kill $(docker ps -q)
The last step is to perform a docker system prune and yes to confirm which will wipe any existing data. You can then return to the steps below to finish the setup process.
Set the configuration of the KC-BRAINware
There are two network setup options, macvlan or bridge. Both options are explained below, and out the box these units are defaulted to create a macvlan network. The recommended setup option would be to use Bridge networking
macvlan setup (default option)
- Gateway Setup
- Example Command to set Gateway of Kramer Control Brains:
- Kramer config set docker.brain.network.gateway=192.168.1.1
- Example Command to set Gateway of Kramer Control Brains:
- Subnet Setup
- Example Command to set Subnet of Kramer Control Brains:
- Example: kramer config set docker.brain.network.subnet=192.168.1.1/16
- Example Command to set Subnet of Kramer Control Brains:
- IP Range Configuration
- Example Command to set IP Range of Kramer Control Brains:
- Example: Kramer config set docker.brain.network.ip_range=192.168.1.1/29 (KC5)
- Example: Kramer config set docker.brain.network.ip_range=192.168.1.1/27 (KC25)
- Example: Kramer config set docker.brain.network.ip_range=192.168.1.1/26 (KC50)
- Example Command to set IP Range of Kramer Control Brains:
- IP calculations are done using CIDR notations. The above /29, /27, and /26 identify the number of hosts available in the identified range. The range of IP addresses needs to be available within the Customer Network in order to complete the setup of KC-BRAINware
Bridge network (Preferred Method)
p(banner important).The Bridge network uses a single IP address. The IP address of the host machine will be used for all running brains on the KC Brainware. Each Brain will use a unique port tied to the host IP address.
One example of a bridge setup for a KC-5 would be:
- 192.168.1.10:8000 for Brain 1
- 192.168.1.10:8001 for Brain 2
- 192.168.1.10:8002 for Brain 3
- 192.168.1.10:8003 for Brain 4
- 192.168.1.10:8004 for Brain 5
When using Express mode on the client applications, the IP address format above will be used.
- Change network setup to bridge
- kramer config set docker.brain.network.type=bridge
Updating Brains on Server
- Run the following commands back to back to update all Brains
- kramer docker pull brain
- kramer docker update_all brains
After completion of the update all Brains will start and be available on the customer network
Post your comment on this topic.