
Employee/User Registration
Introduction:
Here we will address how to register employees who are part of the company. Employees are involved in various processes, assuming roles such as responsible parties, data entry roles, approvers, meeting participants, etc.
The employee registration is divided into three parts:
- Personal information;
- User data;
- Configuration of permissions in areas;
Procedures:
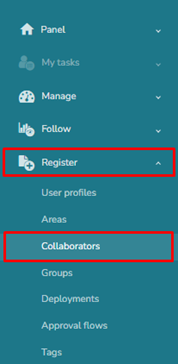
1.To register an employee, access the menu Register > Employees:
2.On the Summary tab, you should fill out the employee’s personal information such as name, department, ID number, etc. Additionally, you can upload a photo of the employee. To do this, click on  .
.
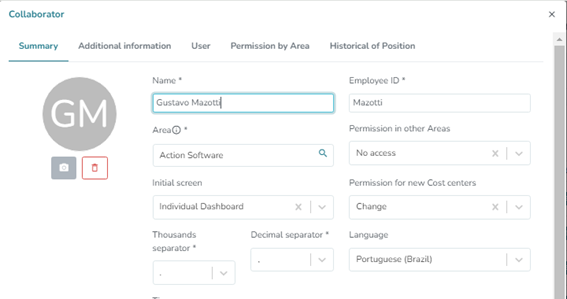
Employee ID: The registration number is the code that identifies the employee, similar to a person’s CPF (Brazilian Individual Taxpayer Registry). Typically, this information is provided by the company’s HR department. The registration number will be used in the importation of indicators, for example, to designate the employee as responsible for the indicator, thus its completion is mandatory.
Permissions in other areas: When an employee is assigned to a specific area, they automatically gain permission to make changes within that area. The “Permissions in other areas” field allows you to define what type of permission this employee will have in other areas—whether it will be for making changes, read-only access, or no permission at all.
Home screen: Here you can define which screen will be the initial view when the user accesses the system. By default, the initial screen for users is set in Settings > General Settings > System tab > Appearance > Home Screen. However, you can specify that a particular user sees a different screen from others.
3. On the User tab, enter the employee’s email address so they can receive system-generated notifications; associate a user profile with them to grant access to system functionalities; and fill in the username and password for them to log into the system.
Note: It is also possible to access the system using the email address.
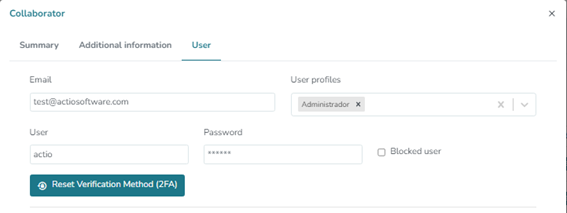
Block user: When a user is blocked, they can no longer access the system, even if they have a username and password.

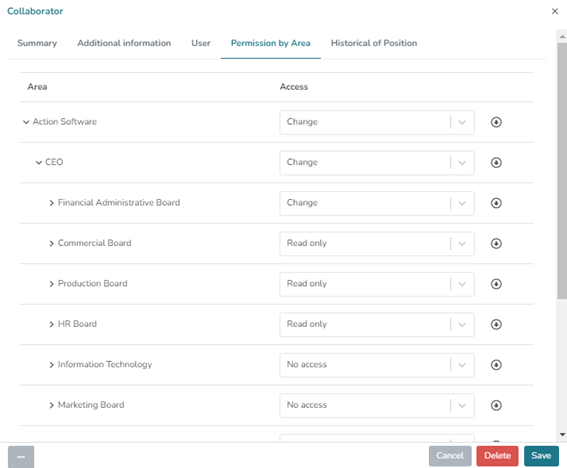
4. On the Permissions by Area tab, we will define the types of permissions the user will have in each area. The available options are: Edit, Read Only, and No Permission. By clicking on the arrow, you can replicate the same permission from the parent area to the subordinate areas.
These permissions apply to all records in the system that are related to the area. For example, the user’s profile may allow them to edit indicators, but they will only be able to edit indicators in areas where they have edit permissions.
Additional Information:
If the language is not specified, the system will default to English.
Conclusion:
This topic has demonstrated how to register an employee/user.